Monthly Archives: June 2014

The One Dish Oven Roasted Salmon with Asparagus, Fingerling Potatoes and Sliced Lemons

Standard

salmon dish ready to eat  salmon roasted,plated

The One Dish Oven Roasted Salmon with Asparagus, Fingerling Potatoes and Sliced Lemons

Serves 4

Oh my—so easy and so delicious. It’s a country style dish— not quite the elegant dish that my previous oven poached salmon presents however in a different way, every bit as excellent and certainly a bit more economical. This time I bought a nice fresh flown-in salmon fillet for $6.99/lb. It weighed a little more than 1 lb.; it was not super thick but just perfect for the making of this one dish meal.


Spring time does bring some of the best foods around such as the fresh salmon from WA and Alaska; and then there is the fabulous fresh asparagus that appears. Lucky are we that there is a continual wonderful array of lemons, dill and fingerling potatoes that arrive in our markets for us to purchase. We are so spoiled; sometimes I really feel guilty being able to enjoy these feasts on a daily basis. I truly think about those in other parts of this world who are going hungry—no food for them—no glorious markets and displays for them. I think about that a lot however, that doesn’t stop me from writing these recipes for all of us to enjoy. So, here I am with another yummy recipe for you to cook for your family and friends—and maybe when enjoying your repast, you could send out a little prayer for those who aren’t fortunate enough to be able to enjoy a repast such as this. Sorry to have become maudlin but I do think that prayers are important. Enough Margot—-and on to the good stuff!!!!
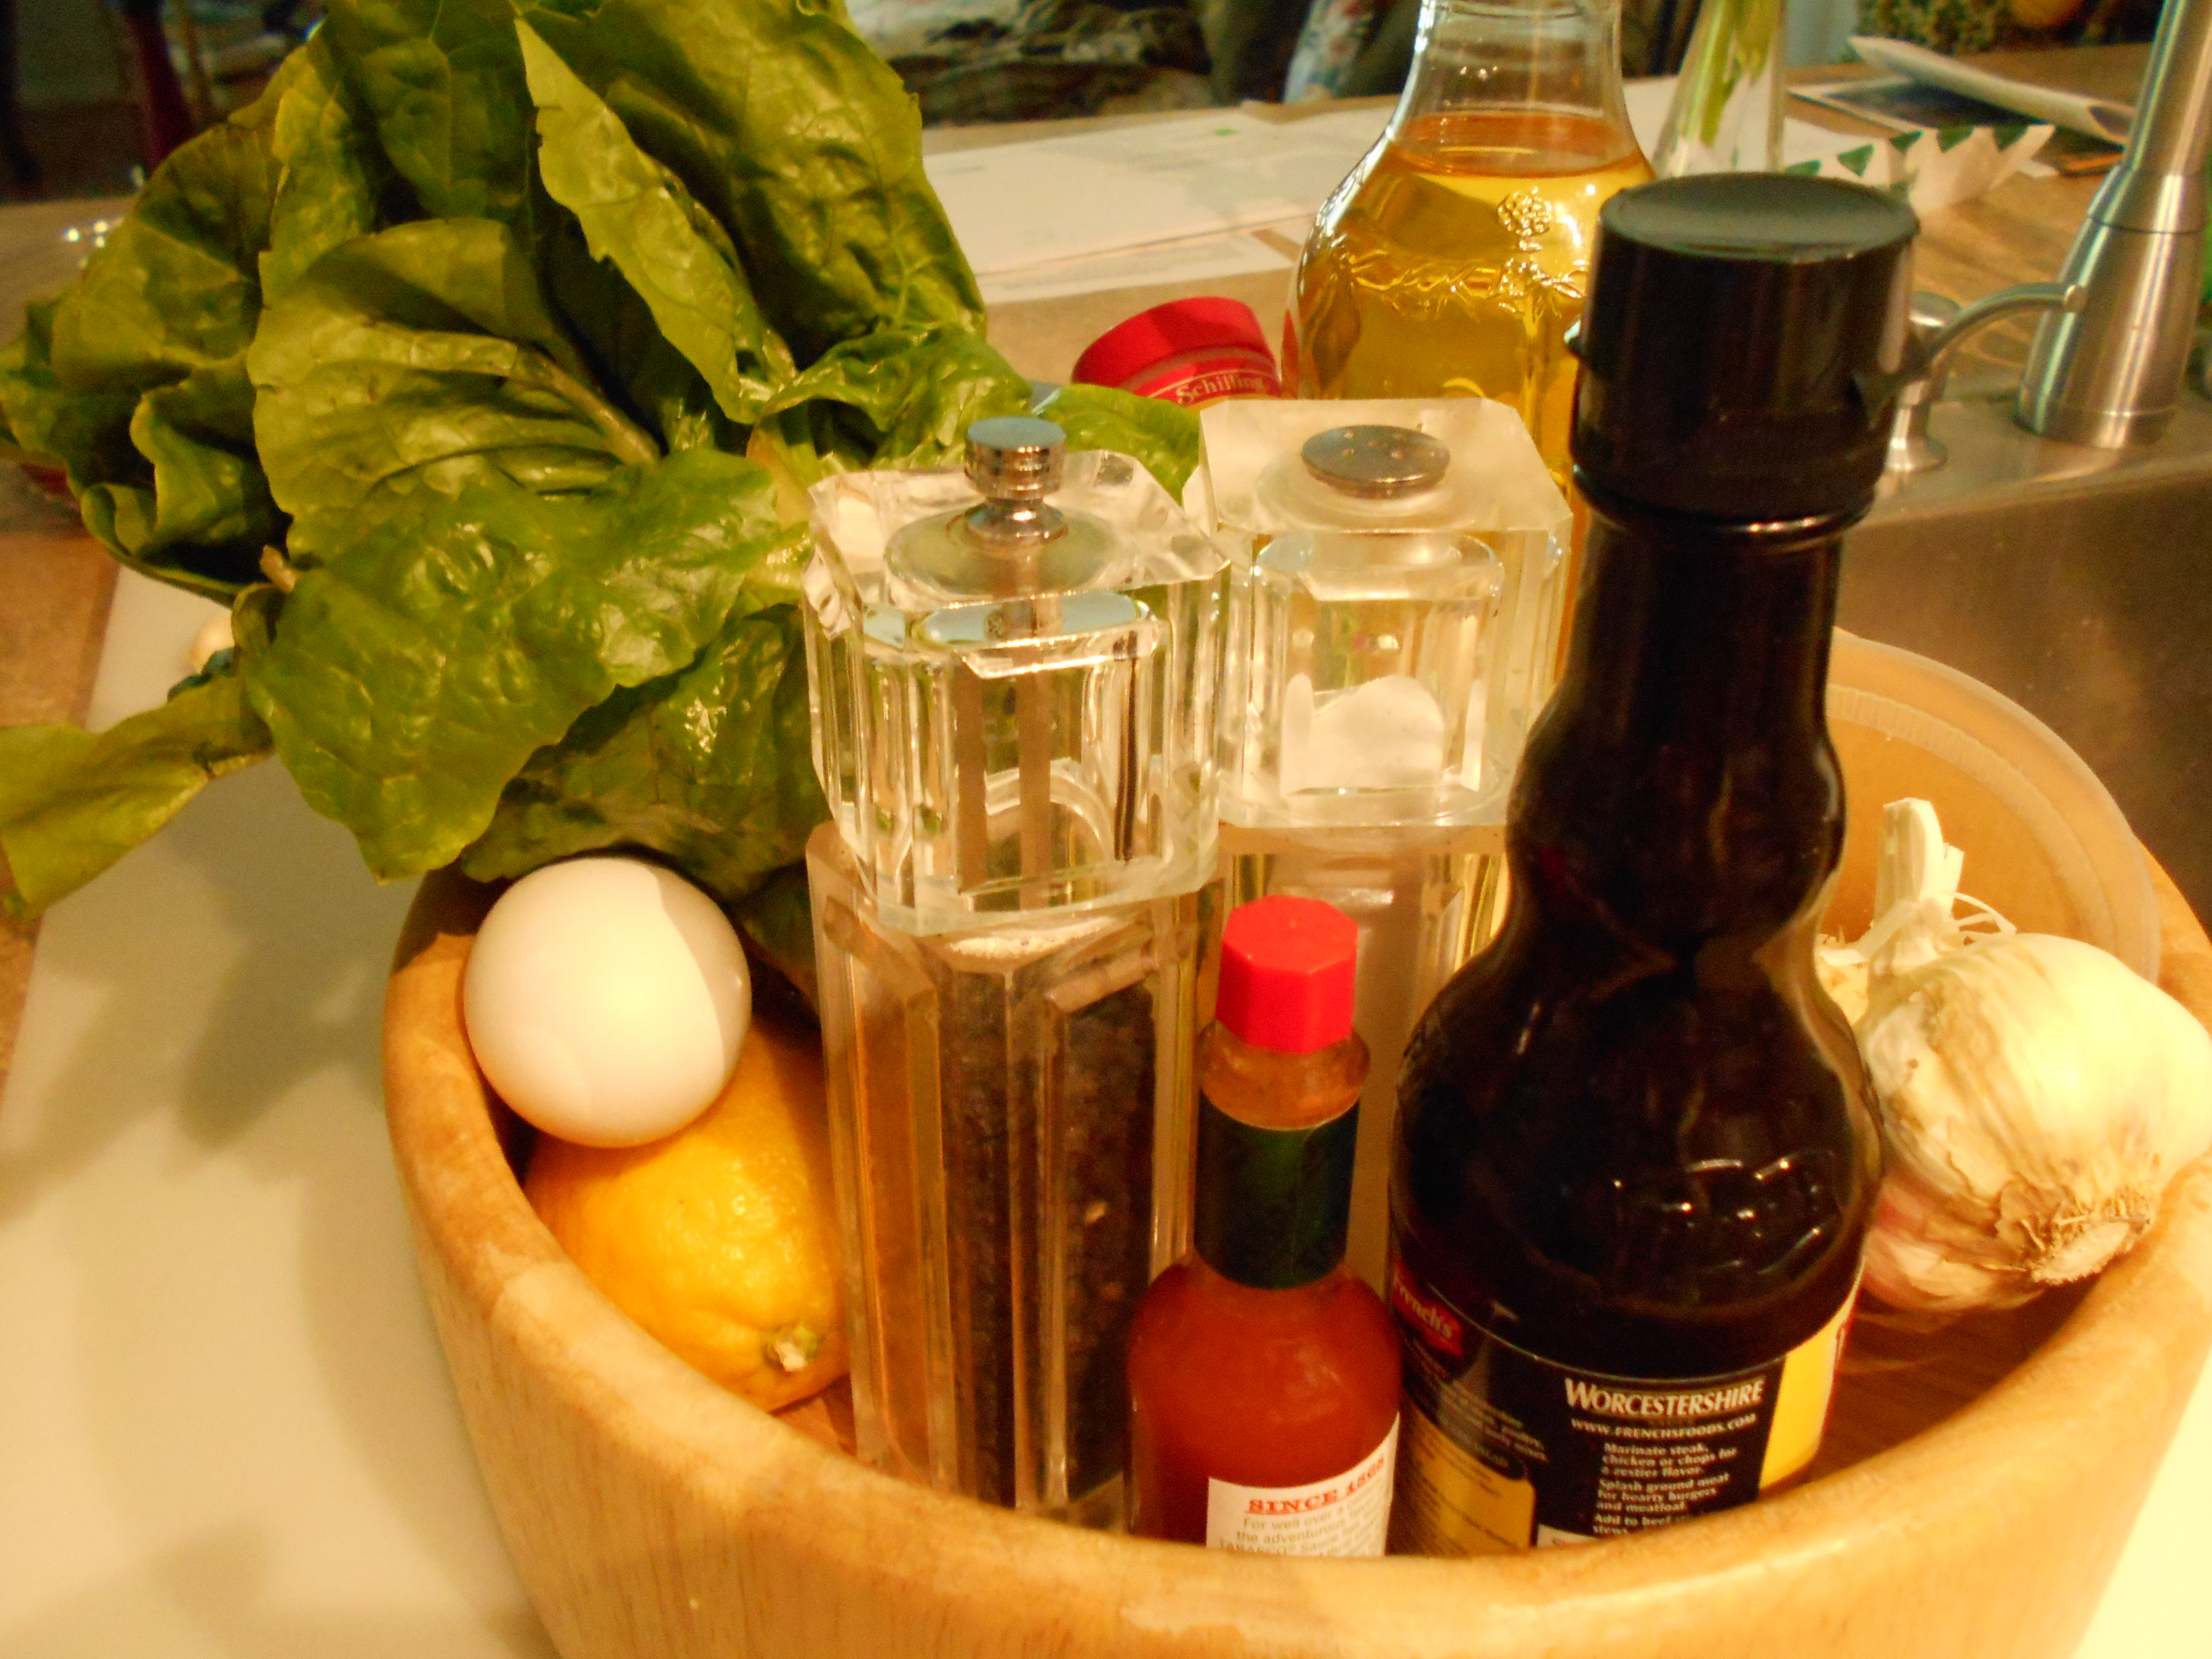
 

Ingredients:

  1. 1 lb. plus a bit more if you wish of a nice fresh salmon fillet—skin on
  2. 1 lb. fingerling potatoes, washed and cut in half
  3. 4 Tbsp. olive oil divided in two parts plus some more
  4. 1/2 lb. asparagus—medium sized- washed, ends trimmed (if you wish you can cut the asparagus in 1-inch pieces but I like to leave them whole. If your asparagus are pencil thin and in particular if you have cut them they may only need 12-15 minutes of baking so you might have to add them a bit after you’ve added your salmon and then continue cooking the dish.)
  5. 1 Tbsp. chopped fresh dill
  6. 1 strip of lemon zest and 1 tsp. grated lemon zest
  7. 1 garlic clove, coarsely chopped
  8. S&P to taste
  9. 1 lemon sliced thin
  10. 1 other lemon for garnish—cut into wedges
  11. Dill sour cream sauce if desired (combine 1/4 C. sour cream with 1/2 tsp. dill and 1 Tsp. lemon juice; I like it plain like this but if you insist, you could add a bit of Dijon)


Directions:

Place the asparagus, lemon slices, 2 Tbsp. olive oil, 1 Tbsp. chopped dill, 1 Tsp. grated lemon zest, garlic and a bit of salt in a plastic bag, close, shake and let marinade for at least 20 minutes up to 30 minutes. I also add a bit of my Gomasio (a sesame seed splash) to this mixture. For the Gomasio recipe please refer to my roasted vegetables on my blog: http://blog.tempinnkeeper.com

asparagus marinating

Preheat oven to 400F.

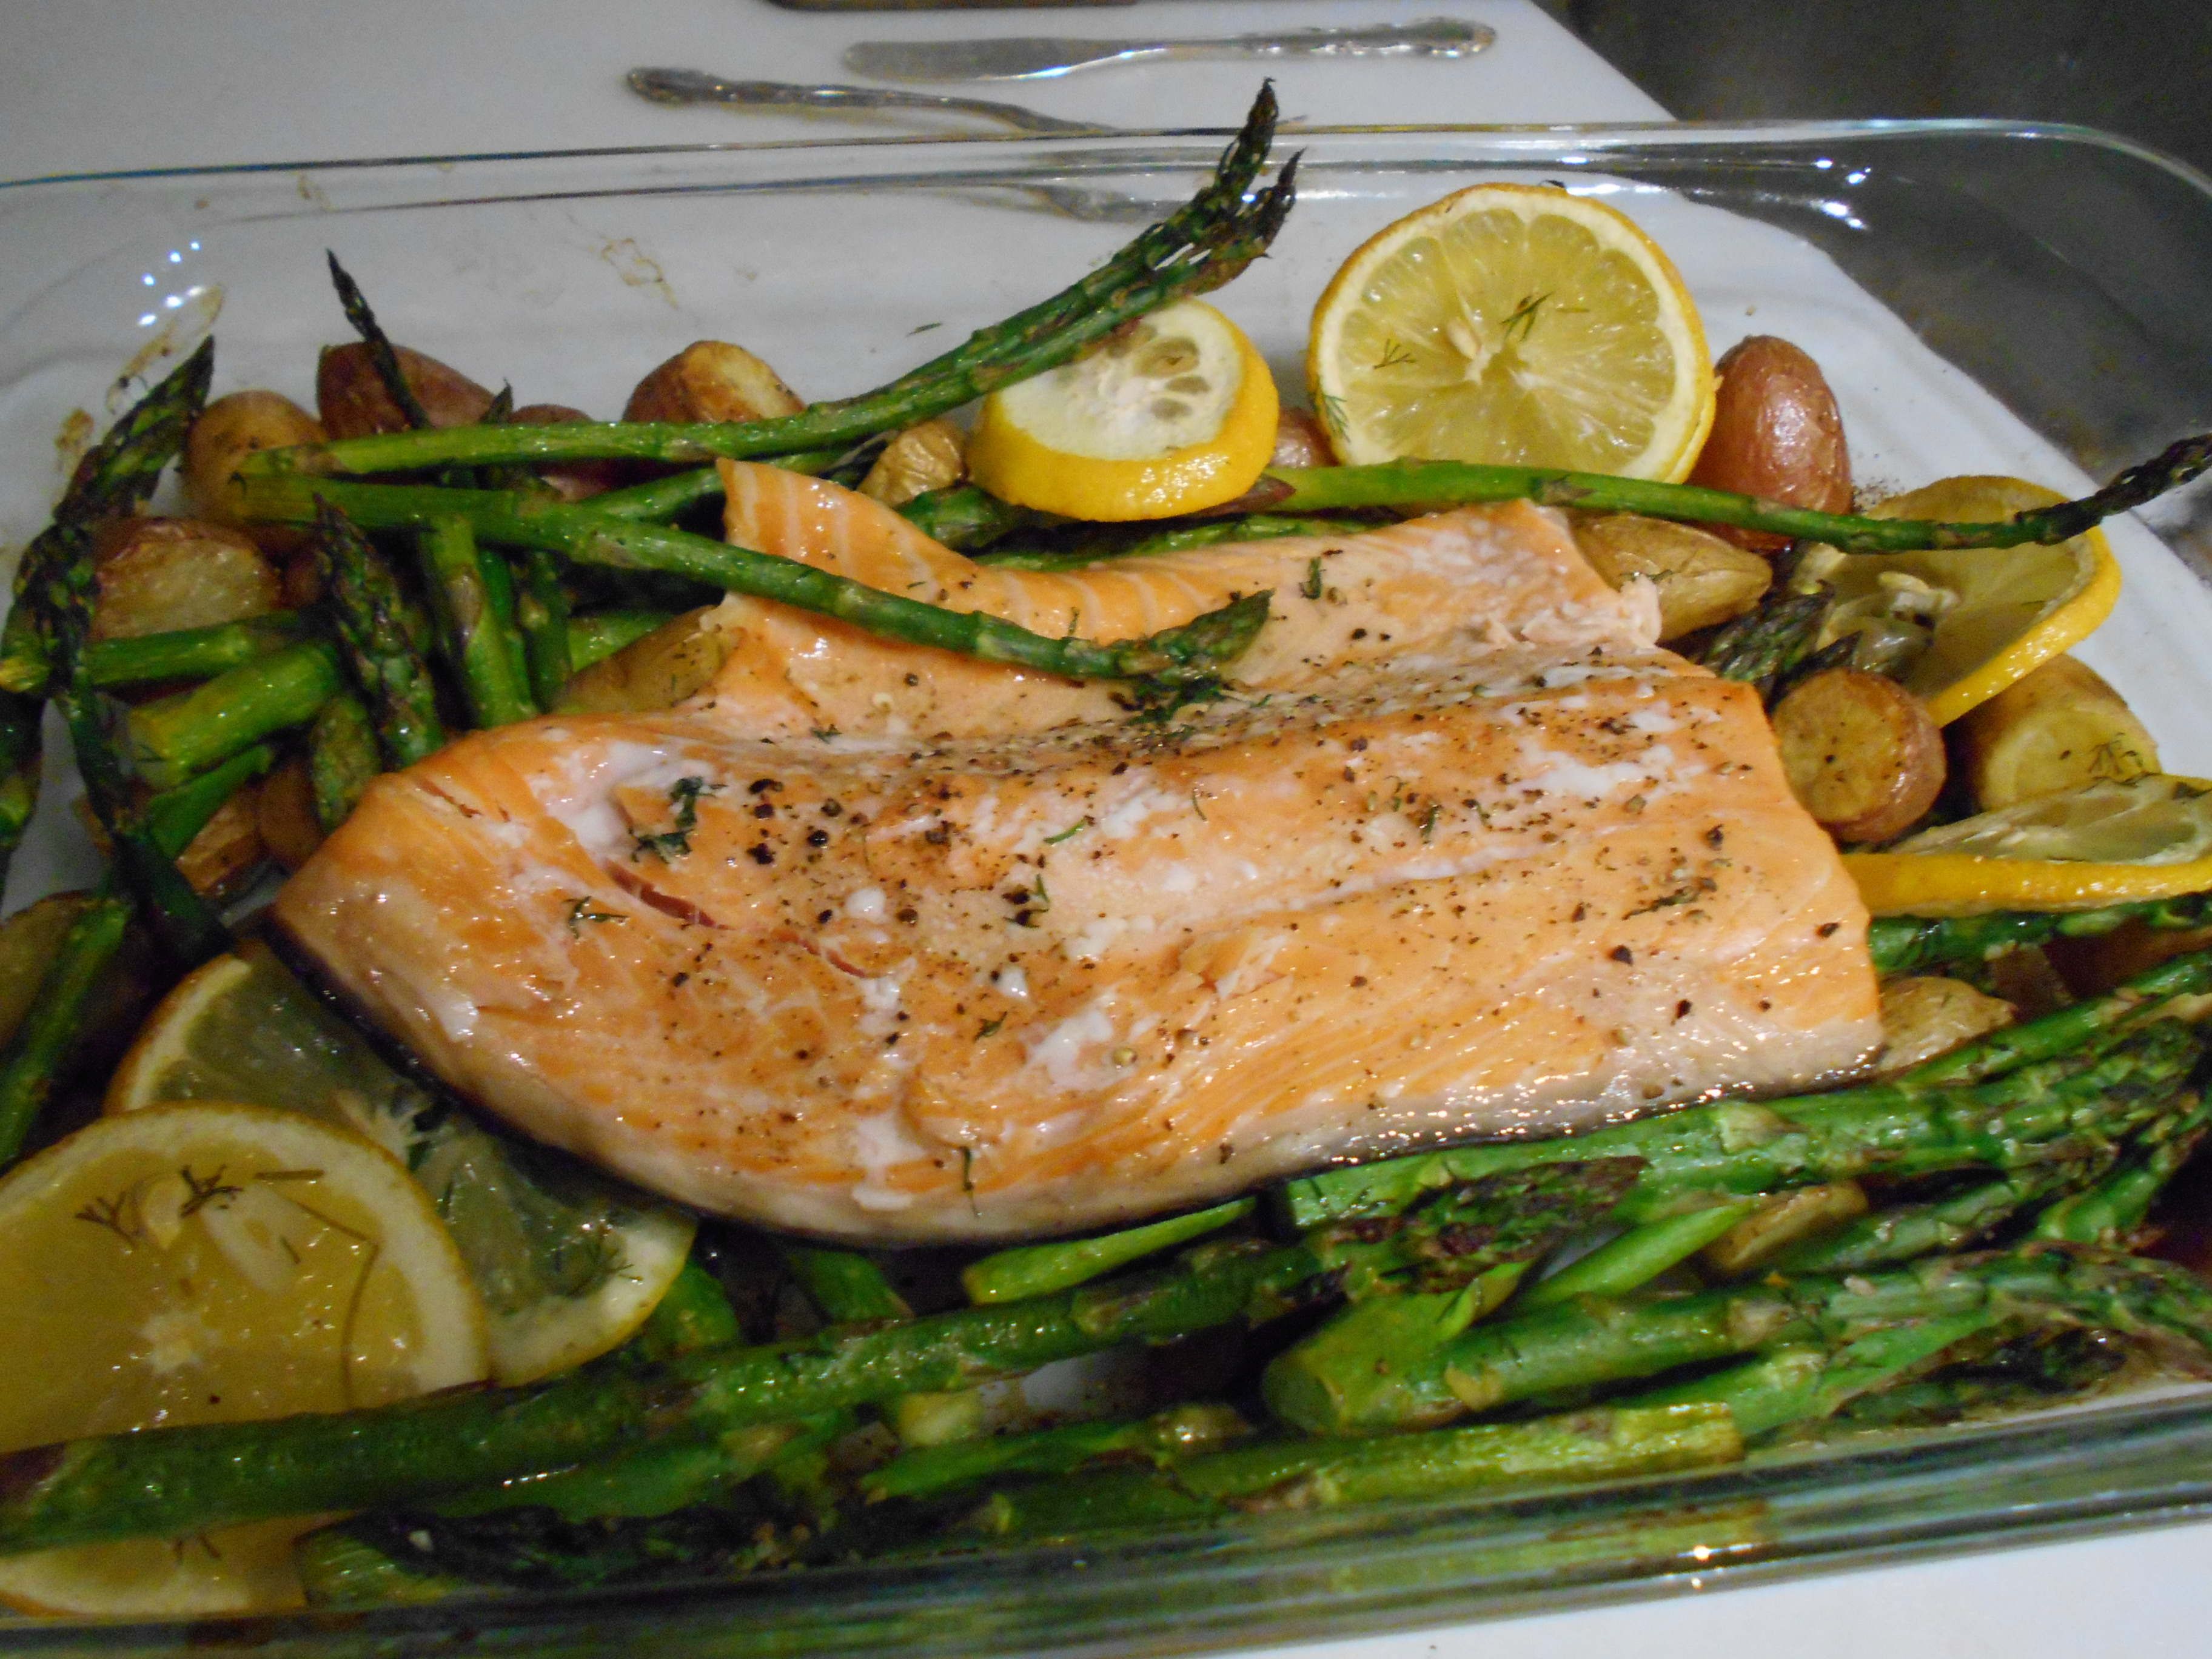
In a large Pyrex baking dish, place the cut potatoes with 2 Tbsp. olive oil and a bit of salt. Stir well and place in oven for about 10 minutes fingerlings in dish to roastor until the potatoes begin to brown a bit. At this point, shake the dish and roast the potatoes for another 10 minutes.Take the dish out of the oven, push aside the potatoes to the side and place the asparagus mixture in the dish and mix it all; then place the salmon, skin side down, on top of all and brush some olive oil on top of the salmon.Isalmon,etc. in dish ready to go in ovenI roasted my 1 lb. plus a bit salmon for about 20 minutes. (See below for further baking instructions for salmon.) The salmon was divine, the asparagus not too done and the potatoes were perfect. I did serve the sour cream sauce (minus the mustard addition) with the dish. Also, before serving the salmon, if you wish, lift it off the skin with a metal spatula.

All in all, it was a delicious and easy dish to serve.

And best of all, the next day I had the Real Deal Caesar with the left over salmon, etc.


caesar,salmon,asparagus,potatoescaesar salmon lemmon


Please see below for “good rule of thumb’s “rules for baking salmon:

  • A good rule of thumb is that the salmon will bake about ten minutes per one inch thickness of your fillet. A two-inch thick fillet will bake for 20 minutes. A 1-1/2 filet will take 15 minutes and so on.
  • Check the salmon frequently. Start checking at about 10 minutes, and keep checking until the flesh of the fish is just barely an opaque pink.
  • As previously mentioned, salmon baked in a closed packet – whether parchment, foil or a covered dish – is likely too cook a bit more quickly. Check it starting at about ten minutes and re-cover the fish before continuing.
  • Remove the salmon from the oven as soon as the flesh becomes opaque. Serve immediately.

Bruschetta with Strawberries, Balsamic and ONE Mint Leaf

Standard

Bruschetta with Strawberries, Balsamic and One Mint Leaf


strawberries only

Strawberries for an appetizer? Yes indeed and I tell you, this is a really delightfully light and delicious treat to offer your guests for a hot summer day. Best of all, it’s a breeze to make. The only thing I have found that it’s best served when the strawberries are heated so that’s a last minute thing but not necessarily so because you can make the sauce ahead of time, refrigerate it for a day or 2 or even freeze it and then reheat it briefly in the micro (about 1 minute and I put the micro at 1/2 temp just to check that it’s not getting too hot and syrupy).


Ingredients

  1. One box of Melba Snacks Whole Grain Crackers or something similar
  2. 6 Tbsp. brown sugar (I use the light brown variety)
  3. 1 Tsp. grated lemon zest
  4. 2 Tsp. lemon juice
  5. One quick tiny squirt of Balsamic (CAREFUL—not too much)
  6. 3 C. cleaned, hulled sliced strawberries (you can also dice them if you prefer)
  7. 4-6 Tbsp. mascarpone
  8. A bunch of washed whole mint leaves


Directions:

  1. In a small bowl, combine and whisk well the sugar, zest, juice and balsamic together.
  2. Heat a large Teflon skillet over medium-high heat and add the above mixture. When it begins to bubble (30 seconds to 1 minute) add the strawberries and stir until the juices begin to release their flavor and the berries are heated through (30 seconds to 1 minute more)

stawberries in pan

3.  If you are serving this immediately, I would recommend spreading the mascarpone on the crackers before you have made the sauce and have the crackers all ready on a pretty platter to finish off and serve.

4. After you have placed the sauce on top of the mascarpone, top each with a mint leaf. That will make the whole deal!!!


Bon Appétit strawberries on crackers

Caesar Salad The Tijuana Way–The Real Deal

Standard


The “Caesar” originated in Tijuana at Caesar Cardini’s restaurant. According to Rosa (Caesar’s daughter), her dad invented the dish on a 4th of July in 1924 when he had a rush of hungry customers who depleted his restaurant’s culinary food supplies. So, still having more customers, he was forced to use just what little he had remaining and that’s when he came up with the Caesar Salad. And because he was such an interesting and theatrical kind of guy, he made a big show of serving it. Voila, the very first Caesar with a proper flair.

According to Julia Child (9 years old), she and her parents in the 1920’s actually had the privilege of witnessing his making the salad at their table. She and his daughter reported that originally he did not use the outer leaves of the romaine; he just used the inner heart leaves, washed but NOT torn. He then arranged them on a plate to be picked by hand to eat. However, supposedly customers complained about oily dressing inundating their hands so Caesar changed the recipe to the torn leaf of the whole romaine head version. However, sometimes I think that it is fun to do it Caesar’s very first way and serve it to guests with lots of napkins. I wonder what Caesar would have thought of our now very often served Caesar salad spears for appetizers.

Since when Caesar first invented his salad it has become, as we all know, a favorite of many not only in the USA but world wide and has evolved into all types of variations. However, this original way of making I think is the best. It is far better than just throwing the romaine with a homemade or store made Caesar salad dressing. So give it a try, which is if you are not scared of using pasteurized or even non-pasteurized raw or coddled eggs. I am not. By the way, as I remember, in all of the finer restaurants in San Francisco, the waiters made this right in front of your eyes at your table and it was a sight to behold. You too can do this and have a little culinary fun and flair in your life right in front of your family or guests. In fact, maybe even the kids might want to give it a try.

Instructions for the preparation and serving of the Caesar per Caesar and recounted by Julia and Caesar’s daughter

In tossing his salad, Caesar put the dressed romaine leaves in the bowl and drizzled the 2 Tblsp. of olive oil over them—lifting the leaves from the bottom and turning them towards you so they tumble over like a wave. Then he sprinkled them with some salt and pepper ground before your eyes, tossed once or twice more; then he added the lemon juice and several drops of the Worcestershire; then he tossed again and tasted. If it tasted OK, he cracked the egg and dropped it right on the romaine leaves, then tossed to break it up and coat the leaves. Then he sprinkled on the cheese and tossed once more briefly before finally adding the croutons to toss for the last time. He then arranged 6 or more leaves in a single layer on individual plates, scattered the croutons all around and voila—sticky fingers but delicious eating.


DSCN0760

Ingredients:

  1. 1 large peeled garlic clove well rubbed on the bottom of your wood salad bowl. You can split the garlic if you wish (sometimes I use 2 because I LOVE garlic) and I also sometimes sprinkle some salt on the bottom so that the garlic grates better. I don’t believe that Caesar originally did this however he made his own garlic croutons and supposedly sometimes after having sautéed his croutons he used the butter/garlic pan remains to add to the salad. However, I feel that the garlic rub is an important element of the Caesar and I do recommend doing it unless you really hate garlic.
  2. 2 Heads of fresh and chilled Romaine leaves gently torn with your hands in bite size pieces placed in your salad spinner—spray washed and spun dry (make sure the leaves are DRY) or do the original and just use the heart leaves UNTORN, washed and spun very dry. You should have 18-24 heart leaves.
  3. 2 Tblsp. Olive Oil
  4. 1/2 Tsp. salt and 1/4 Tsp. freshly ground pepper (amounts are approximate and should be “to taste”)
  5. 1/4 Tsp. ground mustard (not original but once again I like it)
  6. 1 whole lemon seeded and squeezed before your eyes or pre-juiced if you must
  7. A dash of Worcestershire sauce (and sometimes I add a dash or more of Tabasco)
  8. 2 Tblsp. shredded fresh Parmegianno/Reggianno
  9. 1 large raw pasteurized egg or 1 Tsp. mayonnaise (the latter not original) or do it as Caesar did which was to coddle the egg for 1 minute. See note below.*
  10. 2 C. croutons (either home made or good store bought ones—I use or make garlic ones)
  11. 4-5 anchovy fillets (cut in small pieces or mashed with a bit of olive oil and tossed in before the cheese however, according sources they were not used by Caesar but once again, I love anchovies so I do use them. However, if you are serving your salad to guests, make sure they like anchovies because lots of people don’t. To be on the very safe side, you can have some bits of anchovies on a pass around plate or even a little pitcher with smashed anchovies in some olive oil to pour on individual salads)

This would be Margot’s version to making your Caesar (have all of your ingredients, wood salad bowl and implements at hand before making your Caesar) The ingredients needed are listed above:

caesar solo plated

  1. In a wood salad bowl, rub the bottom well with the 1 peeled and cut garlic clove and some salt.
  2. Add the 2 heads of well rinsed and dried torn leaves or 18-24 heart leaves of romaine to the bowl. (I say dried because you don’t want water diluting this wonderful salad.)
  3. Drizzle the 2 Tblsp. olive oil over the leaves and toss.
  4. Sprinkle the salt, the ground fresh pepper and the 1/4 tsp. ground mustard on the leaves and toss
  5. Squeeze the one lemon(or pour the juice),a dash of Worcestershire and the optional Tabasco dash on the leaves and toss
  6. Break the one egg (raw or coddled) over the leaves and toss (or add the 1 tsp. mayo instead of the egg)
  7. Add the optional 4-5 anchovies and toss (up to you how you want to serve the anchovies in this salad. They could be minced and tossed, or minced with oil and tossed or laid carefully as a finishing touch and on the top of each plated serving.)
  8. Sprinkle the 2 Tblsp. cheese over all and toss
  9. Add the croutons and toss
  10. Remember not to toss too much because you don’t want to bruise the leaves. However, you do want your leaves to have a glistening look. Also, remember to think when tossing: waves of the ocean coming towards you and toss high and towards you. Concentrate, be dramatic and smile while you are doing this.
  11. Also remember that you can increase or decrease the ingredients according to your taste.


But if you don’t want to be splashy and or do it the original way, the following from Jacques Pepin is also delicious:

“Julia’s authentic Caesar salad is excellent, but I love Gloria’s almost-Caesar
salad, the one my wife makes at home. She mixes all the dressing ingredients
together first – oil, lemon juice, Worcestershire, seasonings, chopped garlic,
egg, and anchovy fillets in little pieces – and then tosses it with the broken-up
Romaine leaves. And she tosses in some crumbled blue cheese, either Roquefort
or Stilton, as well as Parmesan. She made this for me when we first met, and I
have never wanted to change it.”


Margot’s Oven Poached Salmon with Dill Sauce

Standard

DSCN0729 DSCN0735 DSCN0742

before poaching                             after poaching                     ready to eat


I love fresh salmon and when I find some well priced, I buy it immediately. I was really lucky to have found this King Salmon for the same price as the North Atlantic variety–$6.99/lb. What a deal!!!! I have many recipes for salmon but there are two which I prefer: oven roasted and this recipe which is oven poached. Both are simple and easy to prepare yet make for a very elegant looking and tasting dish. As such it is a fine one to serve for guests.


I many times serve my poached salmon with couscous or roasted fingerling potatoes (see my blog for vegetable roasting recipes) as shown in the third food picture above; they took about 20 minutes to get done in the 450 oven so see how easy this dinner can be because you can roast them during the same time that you oven poach the salmon. Sometimes I’ll serve this dish with our wonderful Hagerman fresh corn which I so easily cook in the microwave (see my blog for the easy recipe). For the greens I really love making my Lemon Lovers’ Asparagus recipe (also found on my blog) which features roasted asparagus and freshly cut and roasted lemon slices.


You can use any kind of nice looking and fresh salmon fillets but the King Salmon makes for a very fine dish indeed. You can roast fewer fillets or more so for instance for one fillet in a smaller baking dish, I reduce the specified amounts of wine, water, etc. mentioned below to 1/2 of what the recipe calls for. As well, because my fillet (shown in picture) is one luxurious inch thick and measures 4” X 4”, it took about 13 minutes instead of 10 minutes to poach. So, take this all in consideration if you poach fewer or more fillets and as well as to the thickness and size of each one. The trick here I think is to keep a close eye on it all. You definitely don’t want an overdone fillet. Lastly, this is a dish that does not have to be steaming hot when served. It is fine served at medium hot temperatures or even at room or cold temps.


In conclusion, I think that this is an easy meal to serve for just yourself or for a crowd of people without sweating the preparation because actually you can make it well before you serve it and serve it at room temp.


Ingredients for the salmon poaching:

  1. Four 6-8 oz. salmon fillets with the skin. I lift the salmon off the skin with a metal spatula.
  2. For 4 filets, use 2/3 C. white wine or white dry vermouth. Adjust the amount for less or more filets.
  3. 1/4 C. water –once again adjust if necessary
  4. Salt to taste
  5. 1 Tblsp. chopped FRESH dill and some more for presentation purposes
  6. 2 scallions, thinly sliced
  7. Lemon wedges for décor and individual use if desired

Directions for the oven poaching of the salmon:

  1. Pre-heat oven to 450 degrees F.
  2. Smear olive oil on a 7 X 11 nonreactive (glass, Pyrex, etc.) dish
  3. Place the fillets, skin side down, into your dish. Pour the wine and water over them, season lightly with salt and sprinkle the 1 Tblsp. dill and the scallions on top.
  4. Cover the dish tightly with aluminum foil and place in the preheated oven.
  5. Bake until just cooked through and flaky usually about 10 minutes however, if your fillets are quite thin, you might check after 5-7 minutes. Be sure not to cook them too long. Even if they look a bit underdone, remember, they will cook a bit longer when out of the oven.

Ingredients for the Dill Sauce:

  1. 1/4 C. sour cream
  2. 1/2 Tsp. Dijon mustard
  3. 1 Tsp. lemon juice
  4. 1 Tsp. chopped FRESH dill
  5. Ground black pepper to taste

Directions for the Dill Sauce:

  1. In a small bowl place the above ingredients and stir well.
  2. I place a generous dollop of the sauce on top of the salmon, but if you wish you could pass the sauce around and let people serve themselves. In that case, I do put some extra chopped fresh dill on top of the salmon for the presentation.


Margot is a self-taught enthusiastic & passionate cook. Having been an inn-keeper for 5 years at her own inn, she accumulated a lot of good recipes which she loves to share.


Be sure to take a minute to visit Margot’s blog http://blog.tempinnkeeper.com for over 200 more simple and delicious recipes. You also can call Margot for personal cooking help or hosting for small B&B kinds of food gatherings. Margot’s phone number is: 208-721-3551. Friend Margot on Facebook and also find her on Linkedin,Twitter,Pinterest and other social sites.


pic Pats oven poached salmon 6.14

Pat’s picture above of her oven poached Copper river salmon

 6/18/14  email from Pat below:

Hi Margot

Did your poached salmon with my Copper river salmon. It was outstanding !!!

Will do again in SV

Yummy. Pat


Israel Couscous Topped with Duck Egg and Parmesan Mustard Sauce

Standard


 DSCN0677 DSCN0684


Israel Couscous Topped with a Duck Egg and Parmesan Mustard Sauce

Serves 4

Breakfast does not always have to be the same if you get my drift, so one morning I thought that I wanted to enjoy some of those fabulous duck eggs that I had just purchased at our fabulous Wood River Sustainability Center (http://wrsustainabilitycenter.com/). I do hope that you all know about this center here in Hailey because it features the most wonderful local produce (and more) for you to buy and enjoy.


Pasta has always been one of my favorite foods and though I try to eat it in moderation, I do think that if you have pasta in the morning that’s probably the best time of the day to have it. I particularly enjoy the Israel Couscous and so here is a little dish that I created for a little brunch. By the way, if you have any of this left over pasta, you can sauté it quickly in some olive oil and it’ll become quite crunchy and excellent in a different way than you’ve had it in this dish.


So, this is the 1, 2, and 3 game plan: make the sauce first, then the asparagus, then the couscous and then put it together. I know, it looks like a lot of work, but really it isn’t—it’s actually a breeze to put together and best of all, it’s very yummy. Also think, you probably won’t make it on a daily basis—but then again, who knows?


Make the sauce first:

Ingredients for the sauce:

  1. 1 stick of butter (that’s not a daily thing either or is it?)
  2. 1/4 C. finely grated Parmesan
  3. 3 egg yolks (save the whites for my no churn ice cream recipe—look on my blog)
  4. 1/2 Tsp. salt
  5. 1/2 Tsp. dry mustard or 1/2 Tsp. Dijon (or more to taste)
  6. 1 Tblsp. lemon juice (or more to taste)

Directions for the sauce(easy, easy):

  1. Melt the butter and the Parmesan in a small saucepan over low heat or in the microwave but DO NOT LET IT BURN.
  2. Combine all the other ingredients in a blender and blend first and then drizzle in the butter/parmesan. The sauce will thicken. Taste and add in more whatever you wish. Transfer to a container and keep warm by putting the container in another bowl full of HOT water—stirring every now and then to keep smooth. It should be OK for the next 1/2 hour at least. Easy is the key to this good sauce.

Make the asparagus second (easy, easy again):

Ingredients for the asparagus:

  1. About 18 asparagus spears, trimmed and cut diagonally into 3/4 pieces
  2. 1-2 Tblsp. olive oil
  3. 1 minced garlic clove
  4. 1/2 Tsp. grated lemon peel

Directions for the asparagus:

  1. In a medium sized skillet, heat 1-2 Tblsp olive oil and add the asparagus, one minced garlic clove and the grated lemon peel. Sprinkle with S&P to taste and sauté until crisp-tender (about 3 minutes). Cover to keep warm.   Optionally of course you can oven roast the asparagus (see my blog for a full guide to oven roasting various veggies).

THIRD:Make the couscous and your 12 inch heavy skillet of some kind is the one you will be needing here.

Ingredients for the couscous:

  1. 1-2 Tblsp. olive oil
  2. 1 minced garlic clove
  3. 1 & 1/3 C. Israel Couscous (NOT the other kind)
  4. 2 C. vegetable broth (you’ll used 1 3/4 C for sure but may need some more)
  5. S&P to taste
  6. 4 duck (or other) eggs but honestly if you can get your hand on a duck egg—you’ll never forget that rich fabulous taste
  7. !/2 C. freshly grated Parmesan—for last minute topping
  8. 1/3 C. chopped chives (optional-for last minute topping)
  9. Paprika for last minute topping


Instructions for the couscous, eggs and the rest of the deal:

  1. In a 12-inch iron skillet (or something similar), heat 1-2 Tblsp. olive oil over medium heat. Add the couscous and sauté until most of couscous is golden brown (about 5 minutes)
  2. Add 1 3/4 C. vegetable broth, increase heat and bring to a boil. Reduce heat immediately to a medium-low, cover, and simmer until the liquid is absorbed and the couscous is tender (about 10 minutes). Watch to see that more broth might not be needed and if so add tiny bits (by tablespoons) until the pasta is done. When done, turn heat to very low and add and toss the asparagus into the couscous. Make 4 large indentations for the duck eggs.
  3. Break the eggs in your indentations and still over low heat, place the cover on the skillet and let the eggs cook (about 5 minutes—here in the mountains). They should be ready when the whites have congealed.
  4. At that point, take the skillet off the heat and sprinkle it all with the Parmesan ( and chives if you wish) and of course, a nice sprinkling of that lovely paprika.


SO__NOW______Bon Appétit (French) et Mange(Italian)   So there you go, a bit of multilingual whatever and what more could you expect from a Swiss woman?


Margot is a self-taught enthusiastic & passionate cook. Having been an inn-keeper for 5 years at her own inn, she accumulated a lot of good recipes which she loves to share.


Be sure to take a minute to visit Margot’s blog http://blog.tempinnkeeper.com for over 200 more simple and delicious recipes. You also can call Margot for personal cooking help or hosting for small B&B kinds of food gatherings. Margot’s phone number is: 208-721-3551. Friend Margot on Facebook and also find her on Linkedin,Twitter,Pinterest and other social sites.


Collards (or other dark greens such as kale or chard) With Onion, Garlic and Tomatoes

Standard


DSCN0709

Now honestly, isn’t this a picture for an artist to paint?

Collards (or other dark greens such as kale or chard) With Onion, Garlic and Tomatoes

Serves 1-2 (I can easily eat it all in one sitting)

Our grocery stores in town have almost gotten to the point that when I look at their produce, I think that I’m back in California—the salad bowl of the world. Everything looks so delicious and I do love my veggies. So, when I see those huge big collard leaves in a large bunch for really such an economical price, I cannot resist. It used to be that the rule was boil these dark leaved things like mad—long and hard. Well, of course very few people liked them. There was no taste left. So, here’s the way I cook them: easy and fast which results in a very healthy and delicately tasting treat. This is a colorful vegetable presentation that can compliment most any meal.


Ingredients:

  1. 1 Large bunch of Collards(or kale or chard) well cleaned and rough chopped even the stems except maybe for the very,very tough ends of the stems
  2. 1 onion-rough chopped
  3. 1-2 garlic cloves-rough chopped
  4. 1-2 fresh tomatoes—I’ve been using Roma’s lately- quartered
  5. 1/4 C. olive oil
  6. S&P to taste
  7. Optional: fresh sliced mushrooms that have been already sautéed in either olive oil or butter and kept warm to place on top of your veggies
  8. Some freshly shaved or grated Parmesan


Directions:

  1. In a large skillet heat the olive oil.
  2. When the oil is heated, place the onion and garlic cloves in the oil for just a minute or two and then add the greens. Stir them well and place a cover on the skillet.
  3. Cook the mixture about 5 minutes—stirring every now and then. It should be just a bit under done but if not cook a bit longer —-but not too long. Keep tasting and S&P now to your taste.
  4. Add the tomatoes, cover and cook about 1-2 minutes longer. You want them to just be warm.
  5. To serve, either top with your prepared mushrooms and Parmesan or with just the Parmesan.
  6. Enjoy———


Margot is a self-taught enthusiastic & passionate cook. Having been an inn-keeper for 5 years at her own inn, she accumulated a lot of good recipes which she loves to share.


Be sure to take a minute to visit Margot’s blog http://blog.tempinnkeeper.com for over 200 more simple and delicious recipes. You also can call Margot for personal cooking help or hosting for small B&B kinds of food gatherings. Margot’s phone number is: 208-721-3551. Friend Margot on Facebook and also find her on Linkedin,Twitter,Pinterest and other social sites.