Monthly Archives: February 2015

Margot’s Beet & Beet Salad and Greens

Standard

beet in basket #1 beet salad

Margot’s Beet and all about beets

Roasted Beet Salad with Orange Vinaigrette and Nuts—serves 4

Lots of us don’t like beets because of the poor maligned red beet. Well, frankly I sort of agree. I am not crazy about the red beet unless it is very fresh and mild tasting. I do however like the other colored beets which are now so prevalent in our grocery stores. So, here is a recipe for a salad that you can vary to your heart’s content and totally ignore if you just want to eat the roasted beets by themselves. Additionally, DO NOT THROW AWAY THOSE BEET GREENS—because they too are delicious. No waste here!!!! As a little aside about the benefits that beets offer free of charge to our bodies think about this: they are a powerful antioxidant, reduce inflammation, are packed with vitamins and promote a healthy circulation and cardiovascular system. Some say that they are nature’s Viagra. So, now, will you eat beets?

Ingredients:

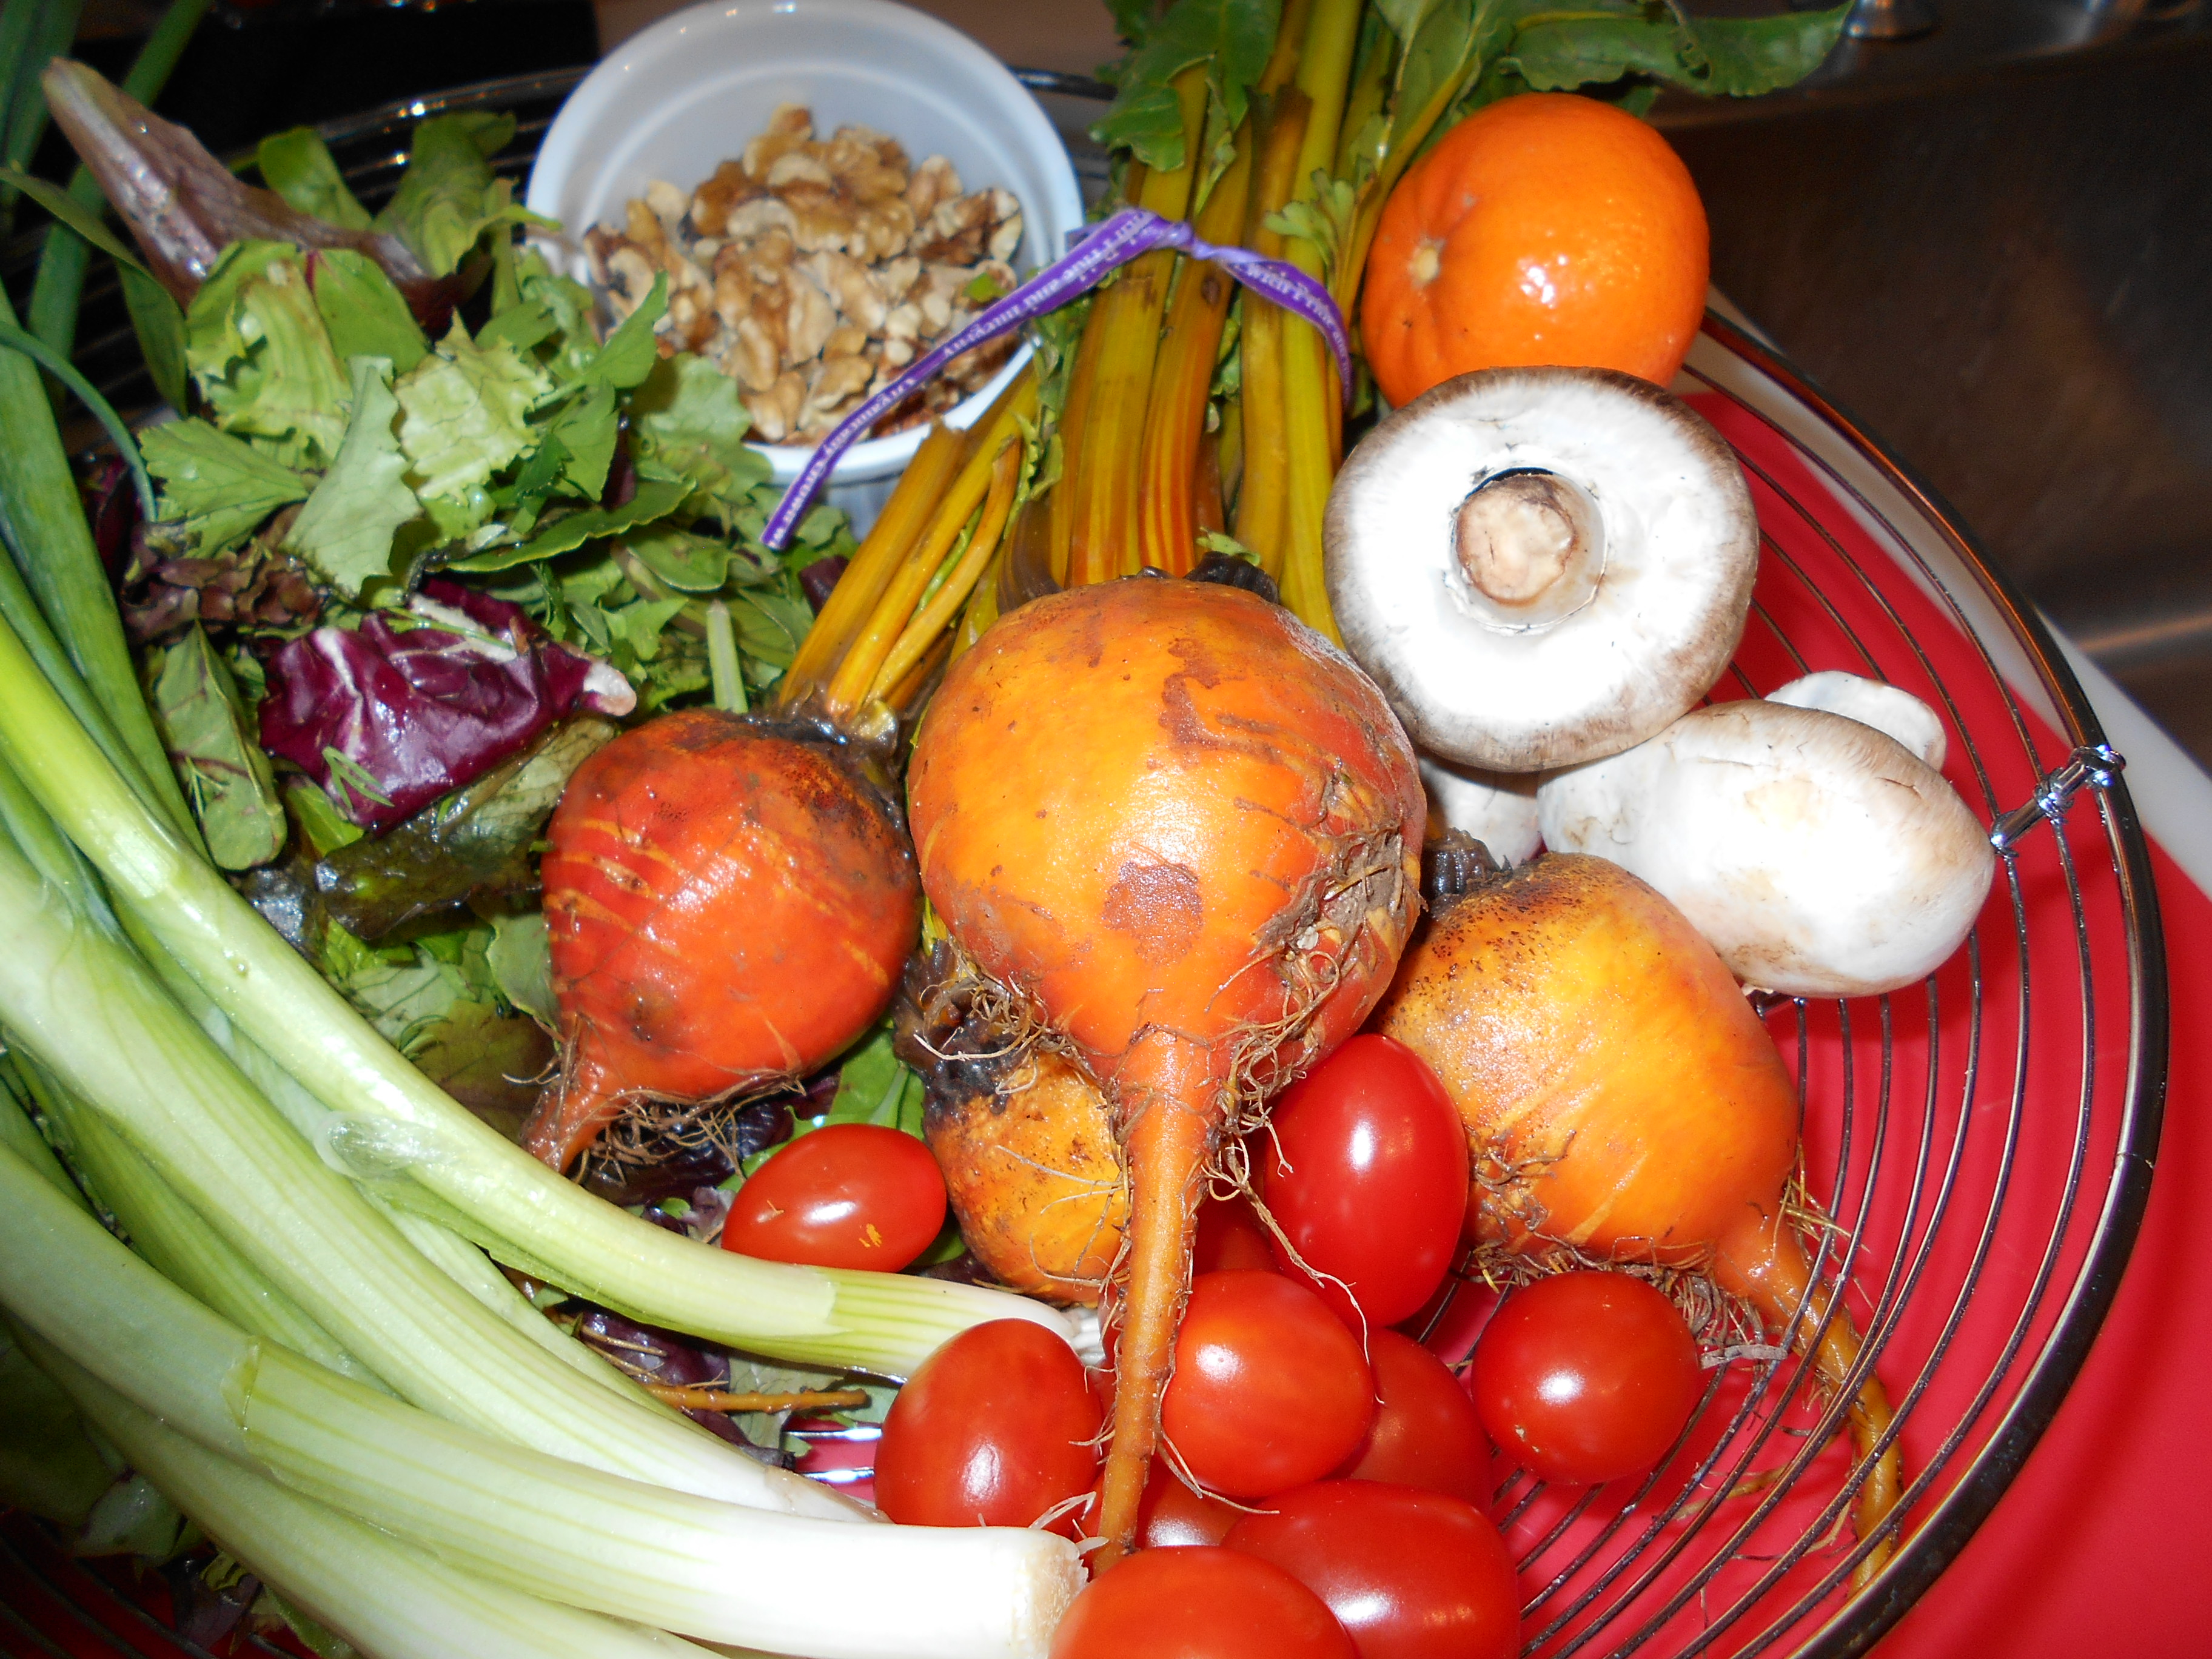
  • 1 bunch medium sized beets-preferably sized about the same-stem cut off but leave about 1 inch worth on each beet; scrub beet thoroughly.
  • Fresh lettuce, kale, spinach whatever kind of greens your heart desires
  • Scallions—one bunch will do (optional)
  • Baby tomatoes (optional)
  • White mushrooms (have you noted how healthy mushrooms have all of a sudden become) (optional)
  • 1 medium sized orange and/or 4 tangerines or 1 lemon (you will zest and juice these except for the tangerines which you might want to juice and zest but also you will use some for segments in the salad.)
  • 1/2 Cup olive oil
  • Fresh thyme (optional)
  • S&P to taste
  • Honey (optional)
  • 1/2 cup toasted walnuts (but they can be pecans as well)
  • 1/2 cup goat cheese crumbles (optional)

Directions:

To roast the beets do the following:

  • Pre-heat oven to 400F.
  • Place each beet in 2 pieces of foil, sprinkle some olive oil and S&P on them wrap well in the foil. Put foil opening at the top and place on a baking sheet.
  • Bake from 45 minutes to 1 ½ hour—depending on how fresh the beets are. Around here, mine get done in 45 minutes. To test if the beet is done, carefully open the foil (watch out for the steam) and stick a sharp knife into it. If it goes in easily, it’s done.
  • So now, you can if you wish take the skin off (try a paper towel or a sharp knife), slice it and place more butter or olive oil on top and devour.
  • But if you are going to save the beets for your salad, put the beets in the tin foil in your frig to cool. They’ll stay good for several days.
  • I slice mine horizontally however it’s up to you how you wish your beets to look in your salad. You might like to cut them in cubes.

While the beets are cooking, make your vinaigrette:

  • In the olive oil, add the zest of one orange, or lemon or even two tangerines.
  • Also, add the juice of one orange,one lemon or 2 tangerines.
  • You might want to add some honey—but I didn’t.
  • You might want to add some thyme
  • You might want to add some S&P
  • You can whisk this, put it in the blender and just shake it well.

I also added some homemade croutons that I had made from my beer bread recipe. So good!!!!! Later for that. But of course you could add cooked couscous, lentils, whatever. Anyway, I am sure that I don’t need to tell you how to assemble your salad—so just go for it and use your imagination. I love pretty colors and often take pictures of my food presentations. I would love to see some of your pictures so don’t forget to send me some.

This salad could be a whole meal or just a light side to a lovely dinner you’ve invented.

beet greensbeet greens

OK—now for your well washed beet greens:

  • Cook uncovered for about 2 minutes in a pot of lightly salted boiling water.
  • Drain in colander under very cold water to stop the cooking process. Once cooled, chop coarsely.
  • In a large skillet, heat some olive oil over medium heat. Stir in some garlic and red pepper flakes (I use these lot) and stir them well in the heated olive oil (about 1 minute and till fragrant).
  • Stir in the greens, season with salt to taste and cook just until greens are hot and taste good.
  • I serve them with a side of lemon wedges.

Once again: NO WASTE HERE!!!!! and so healthy.

Bon Appétit-From Margot’s Table to Yours

For more excellent recipes visit http://blog.tempinnkeeper.com and email margot@eyeonsunvalley.com for small group catering needs or even for help inventing in the kitchen.

Crepes, The Easy & Painless Way

Standard

# 1 crepes to eat

Crepes, The Easy and Painless Way

No measuring is daring and it can be fun. It’s certainly the quick way to cook and you might be surprised at how well you can do this.

Crepes are a good substitute for morning pancakes and they certainly are good for lunch, dinner or dessert. They are so versatile. So, it’s up to you with what you want to fill or top them: ricotta cheese and berries? Jam? Veggies and cheese? Chicken bits with a lovely sauce over it all? Or topped with a delicate orange or lemon Crepe Suzette sauce? Variations are endless and fun to invent. You can even have an array of fillings on the side and let guests or your family invent themselves. What I myself had this morning were crepes filled and topped with ricotta and fresh berries. Yum, they were delicious!

I could go on and on about fillings and toppings but what I am giving you here is just the basic crepe recipe. The trick with this recipe is to use the SAME SIZED cup or glass for placing the eggs, flour, milk and butter because you are going to eyeball your amounts within these four vessels. A vessel that holds about 2 cups (oops—I shouldn’t have said that—sorry) will make enough crepes for 4. My picture showing my vessels with the ingredients are for half of the listed ingredients i.e. 1/2 a vessel of eggs, 1/2 vessel flour, slightly less than 1 vessel full of milk & 1/8th vessel of melted butter.

I use a Teflon crepe pan but if you don’t have one, then make sure to put a little oil or butter in your pan first. I like to make sure my pan is quite hot (when an entered droplet of water sizzles). If your first crepe doesn’t turn out quite right, fear not because you’ll know whether to turn the heat up or down to make the next one right.

To keep your crepes warm, you can have a double boiler top all ready to put them in; or wrap them in foil or in a dish covered with foil in a 200F or 250F oven. I also have had left over batter which when whisked again make fine crepes the next day. You also can freeze left-over already made crepes. So see how versatile these guys are?

#2 cups full bowl whisk yes

Ingredients:

  • Eggs-1 vessel full
  • All-purpose flour-1 vessel full
  • Whole milk-1 ¾ vessel full
  • Melted unsalted butter-1/4 vessel full
  • Pinch salt
  • Pinch baking powder (optional)
  • Pinch powder sugar (optional
  • Drop or so vanilla (optional)
  • Lemon or orange zest (optional)

Instructions:     #3 crepe in pan

  • In a bowl that has a pouring spout is the best, whisk well or beat with electric beaters the eggs.
  • Add the remainder of the ingredients. Whisk or beat till you have a smooth batter.
  • Heat your crepe pan or a small size skillet. Add a bit of the batter, just enough to partially cover the bottom because then you want to roll your pan around so the batter slides smoothly over the whole pan bottom. You don’t want a thick crepe. You want a crepe that is fairly thin.
  • Cook until the edges begin to brown—anywhere from 30 seconds to 1 minute. Flip over with a spatula and cook for another 30 seconds or more. You can peek to say how brown the bottom of the crepe is getting.
  • Pile them up on your oven warmed platter and cover; or place in the top of your double boiler that is warm by boiling some water in the bottom part.


Bon Appétit —-From Margot’s Table to Yours

 Want some more recipes or small group catering: visit http://blog.tempinnkeeper.com or email Margot at margot@eyeonsunvalley.com


Ricotta Kisses, Italian Style, For Your Honey On Valentine’s

Standard


Italian Kisses

Ricotta Kisses, Italian Style, For Your Honey on Valentine’s  

Easy to whip up and yummy to eat, this will certainly be a treat for you and your honey. Celebrate Valentine’s here in the good ole’ US of A with an Italian twist (Baci Di Ricotta). This recipe can make about 30-40 kisses and goes very well with coffee, espresso or even a nice liqueur.

Ingredients:

  • 1 cup whole milk ricotta
  • 2 eggs
  • 1/2 Tsp. vanilla extract –but this can vary like almond, rum, liquorish, etc. Use your imagination.
  • 1/2 C. flour (best to use unbleached flour but all purpose also will do)
  • 1 ½ Tsp. baking powder
  • Pinch of salt
  • 1 Tblsp. sugar (superfine is the best but regular if sifted is OK)
  • 1/2 Tsp. ground cinnamon but again you can vary like nutmeg, etc.
  • Grated orange or lemon zest (optional)
  • Vegetable oil for frying—I use Canola oil
  • Confectioner’s sugar for last minute dusting

Instructions:

  • In a medium bowl and with a whisk (or you can use your electric beater) beat the egg and then add the ricotta and extract.
  • Place the dry ingredients in a sifter
  • When the liquid mixture is blended till smooth sift in the dry ingredients and mix again so that you have a smooth batter.
  • Next is the slightly tricky part, but fear not, you can do it.
  • Pour the canola oil in a large skillet so that there is about 3/4 inch of oil in it and heat oil over medium heat till the oil is about 350F degrees if you have a candy thermometer, or when you drop a small piece of bread in the oil, the bread will be browned in 40 seconds or so. At this point, test one kiss to see that it does not brown too fast and too much. If it does, turn the heat down, wait a minute and try another kiss. You want your oil to be just perfect heat wise. Visually, your kisses should puff and turn golden brown on one side after about one minute—and then when you turn it over with a slotted spoon, it should brown in another minute.
  • Place about 5 or 6 kisses at one time in your pan so that you are not overwhelmed.
  • When your kisses are browned nicely, place them on a paper toweled lined platter to drain.
  • Let them rest for several minutes; pile them on a pretty platter in a rough pyramid and sprinkle, through a fine-meshed sieve, some confectioner’s sugar over them.
  • Happy Valentine’s and Buon Appetito.
  • These kisses are best devoured immediately; however you can pop them, PRE-SUGARED, on a wire rack over a cookie sheet in a 300F oven and keep them warm for up to 1 hour.
  • As well, I have stored left-over’s in my refrigerator in a closed container and then the next day reheated them on some foil in a 300F oven for about 10 minutes and they certainly still tasted good; not as good as when first cooked but good enough. So, don’t throw those left-over’s away—that is if you have any.