Monthly Archives: June 2013

Tongue and Potatoes Baked in a Mustard Horseradish Sauce

Standard

tongue w. mustard horseradish sauceTongue and Potatoes Baked in a Mustard Horseradish Sauce

Serves 2-6 depending on the tongue-one large and a couple of small ones

The beef tongue cost $20 (I remember long ago buying a tongue for just a dollar or two) and the 4 small pork ones were priced at $3.27 so as far as I was concerned, the decision was easy.  This dish turned out very tasty indeed so give it a try.  I know the recipe seems a bit tedious (3 steps) and it can be a bit of work, but if you enjoy tongue (and many won’t even realize that it is that) and a very lovely horseradish and mustard sauce, you’ll really appreciate the results.

STEP 1:Ingredients for boiling the tongue:

  1. One fresh beef tongue (3 lbs.) but I cooked my 2 lbs. of 4 pork tongues
  2. 1 Tsp. salt
  3. 1 onion studded with 3-4 cloves
  4. 6 sprigs of fresh parsley
  5. 3 celery stalks with leaves
  6. 2-3 peeled carrots cut in large pieces to put in the very beginning of the boiling of the tongue.
  7. 3-4 more peeled carrots reserved to put into the stock the last half hour (to be used for your final presentation so when tongue is done save these to warm up just before serving your tongue platter).
  8. Few whole pepper corns
  9. 1( or more) bay leaf
  10. Water to cover (and watch to see if you need to add more after an hour or so)

STEP 2:Ingredients for the mustard horseradish sauce: (this makes about 1 cupful and you might need more; you can always use this delicious left over sauce over something else—even poached eggs)

  1. 3 Tblsp. sweet or salted butter
  2. 2 Tblsp. flour
  3. 1/2 to 1 tsp. Dijon styled mustard (per your taste buds)
  4. 1/2 to 1 tsp. prepared horseradish (per your taste buds)
  5. 1-2 Tsp. capers (optional)
  6. 1 C. of some strained tongue broth


STEP 3: Ingredients for the final baking and serving:

  1. 1 or more baking potatoes cut in medium size pieces
  2. Brussels sprouts cut into fourths (optional)
  3. Mushrooms-sliced thick (optional)
  4. Cauliflower-some of the florets (optional)
  5. Chopped parsley for garnish
  6. Capers for garnish (optional)

STEP 1:Instructions for boiling the tongue:

  1. Place the tongue and the listed ingredients in STEP 1  in a tall pot and bring to a boil.  Reduce heat, cover the pot and simmer until the tongue(s) are fork tender—about 2 ½ to 3 hours.
  2. Remove the tongue(s) from the water and cool slightly. DO NOT START THROWING AWAY THE STOCK AND THE LAST BUNCH OF CARROTS THAT YOU HAVE BOILED.  Strain the stock (you can discard the old carrot, onion, etc.) and put the reserved now strained stock back in the same pot for further potential use; set aside your last bunch of boiled carrots to be reheated briefly for the final presentation.
  3. When the tongue(s) have cooled a bit, if need be, cut off the bones and gristle at the thick end; slit the skin from the thick end to the tip on the underside.  Use a paring knife to loosen the skin at the thick end pull and peel off the skin from the thick end to the tip.  The pork tongue skin is definitely harder to pull off than that of the beef, so don’t be alarmed.  You’ll just loose a bit more of the meat.  (Well, it didn’t cost that much did it?)
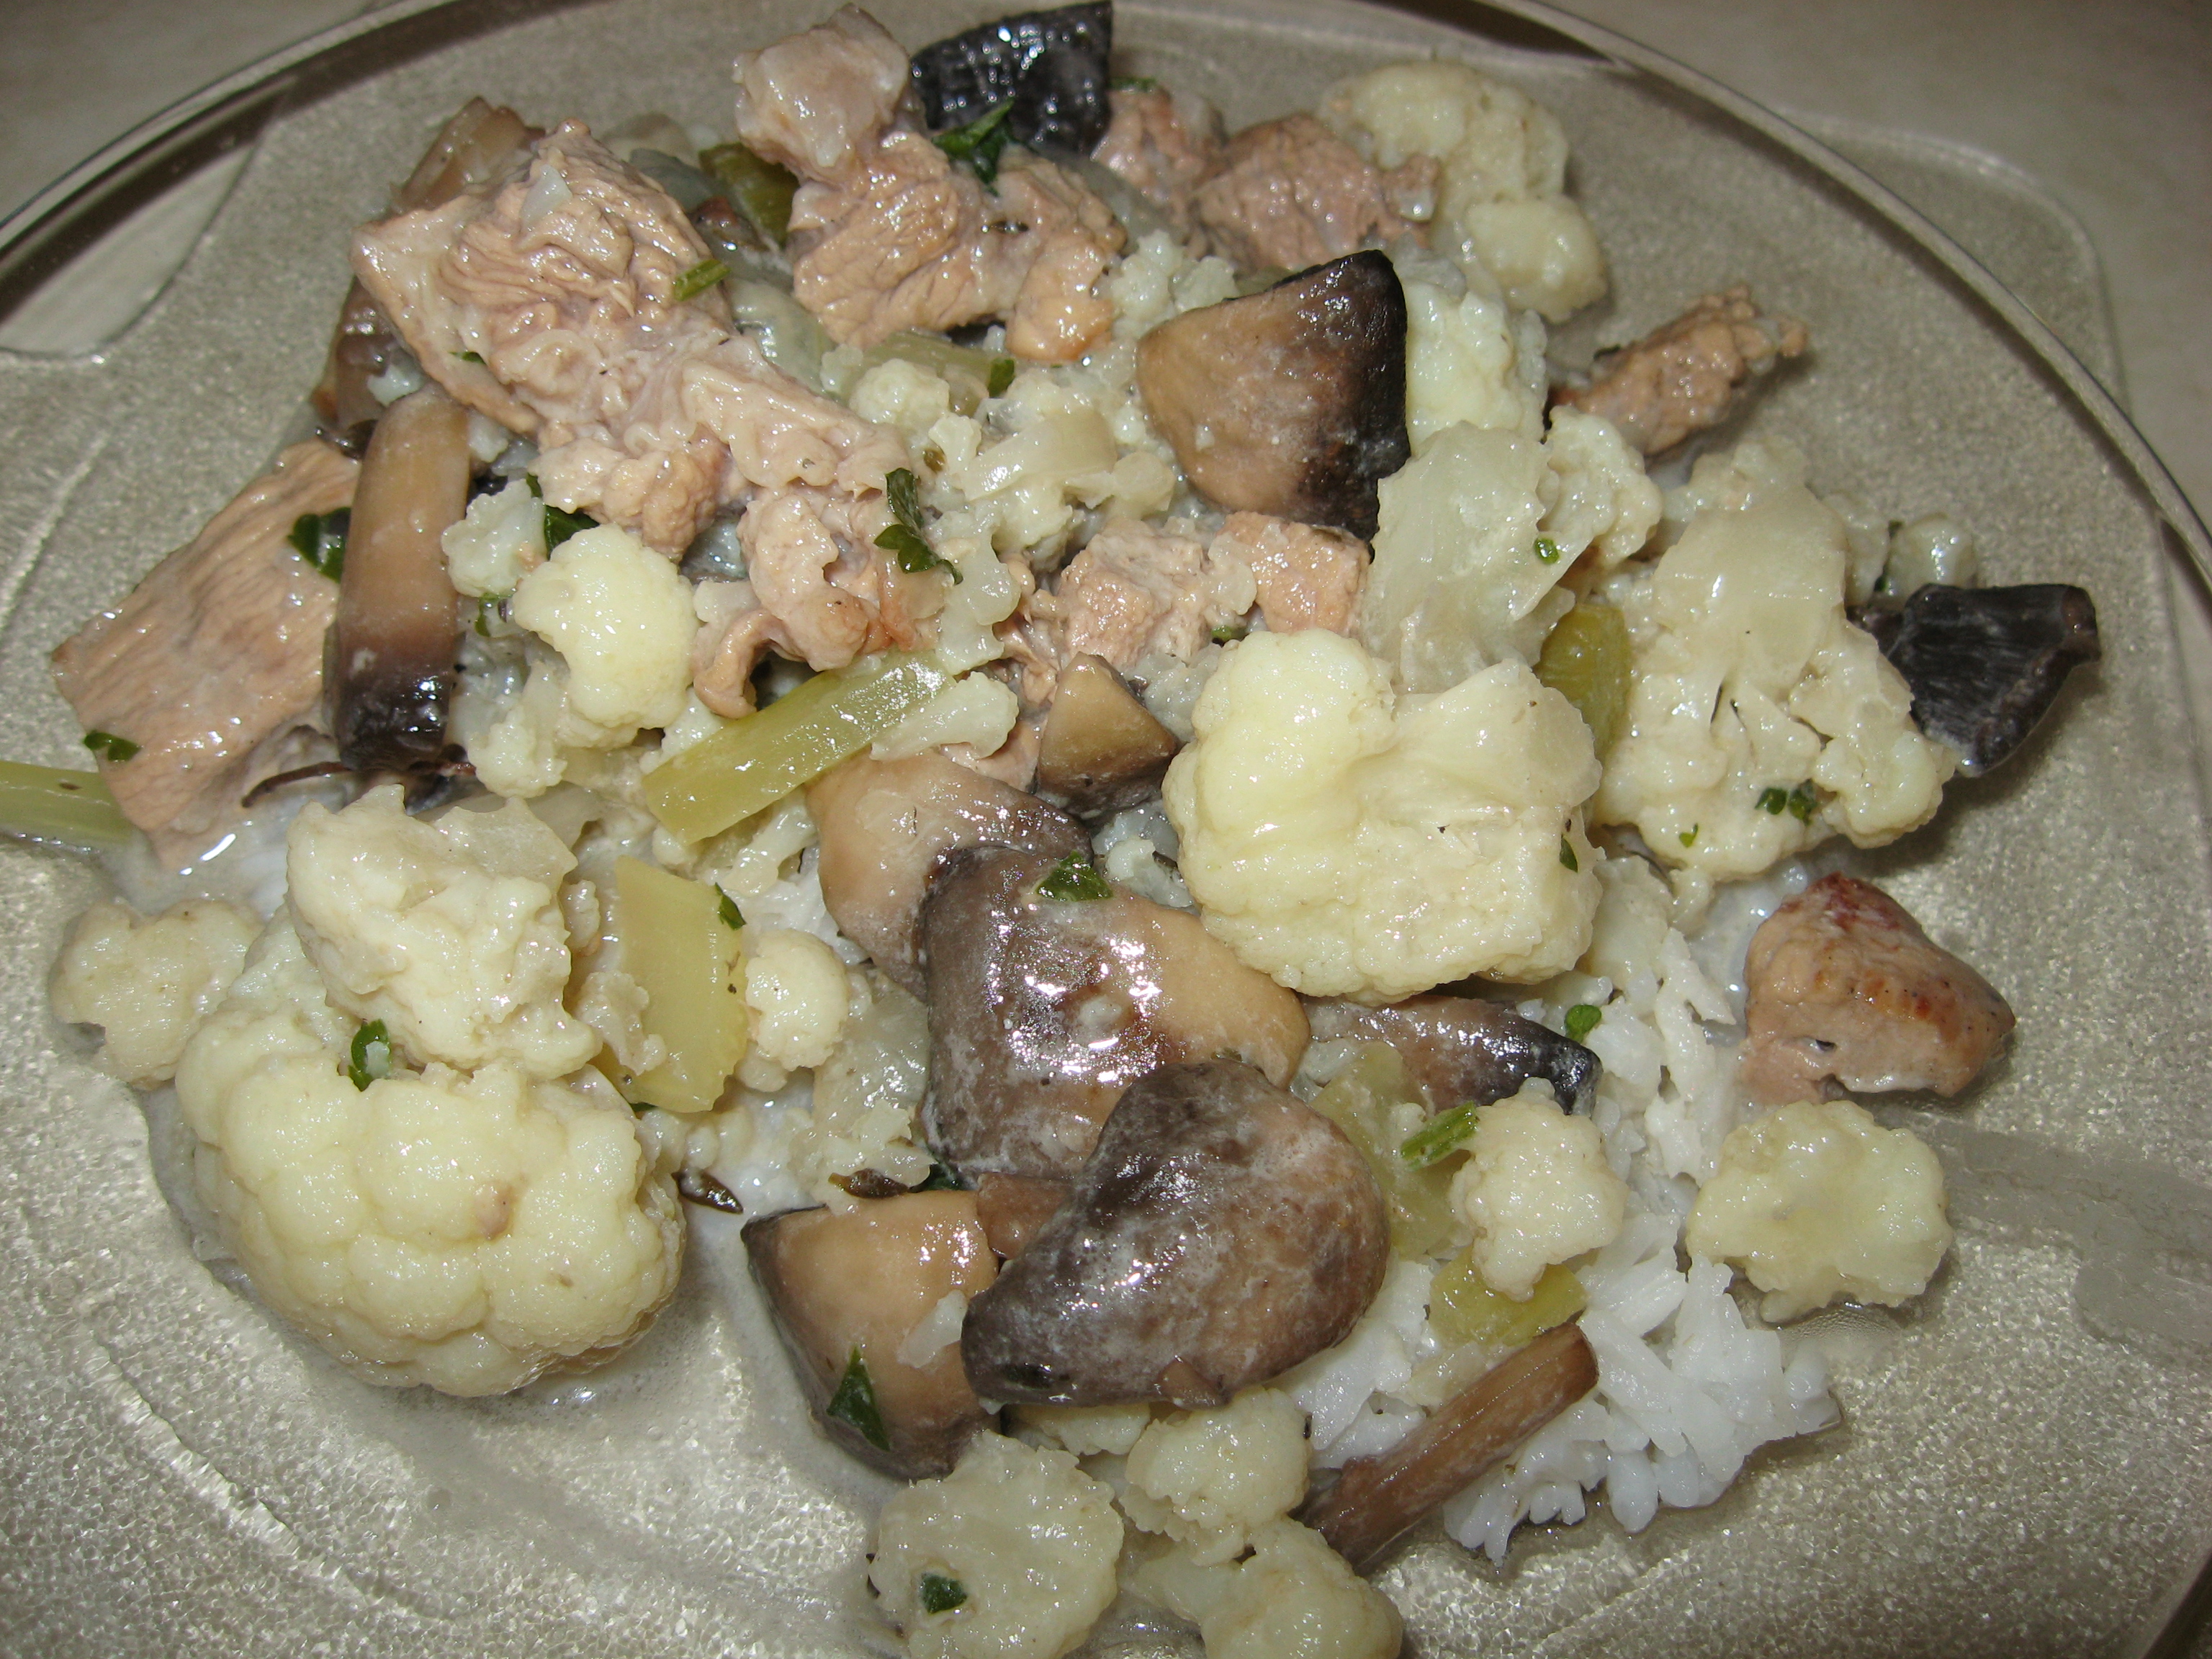
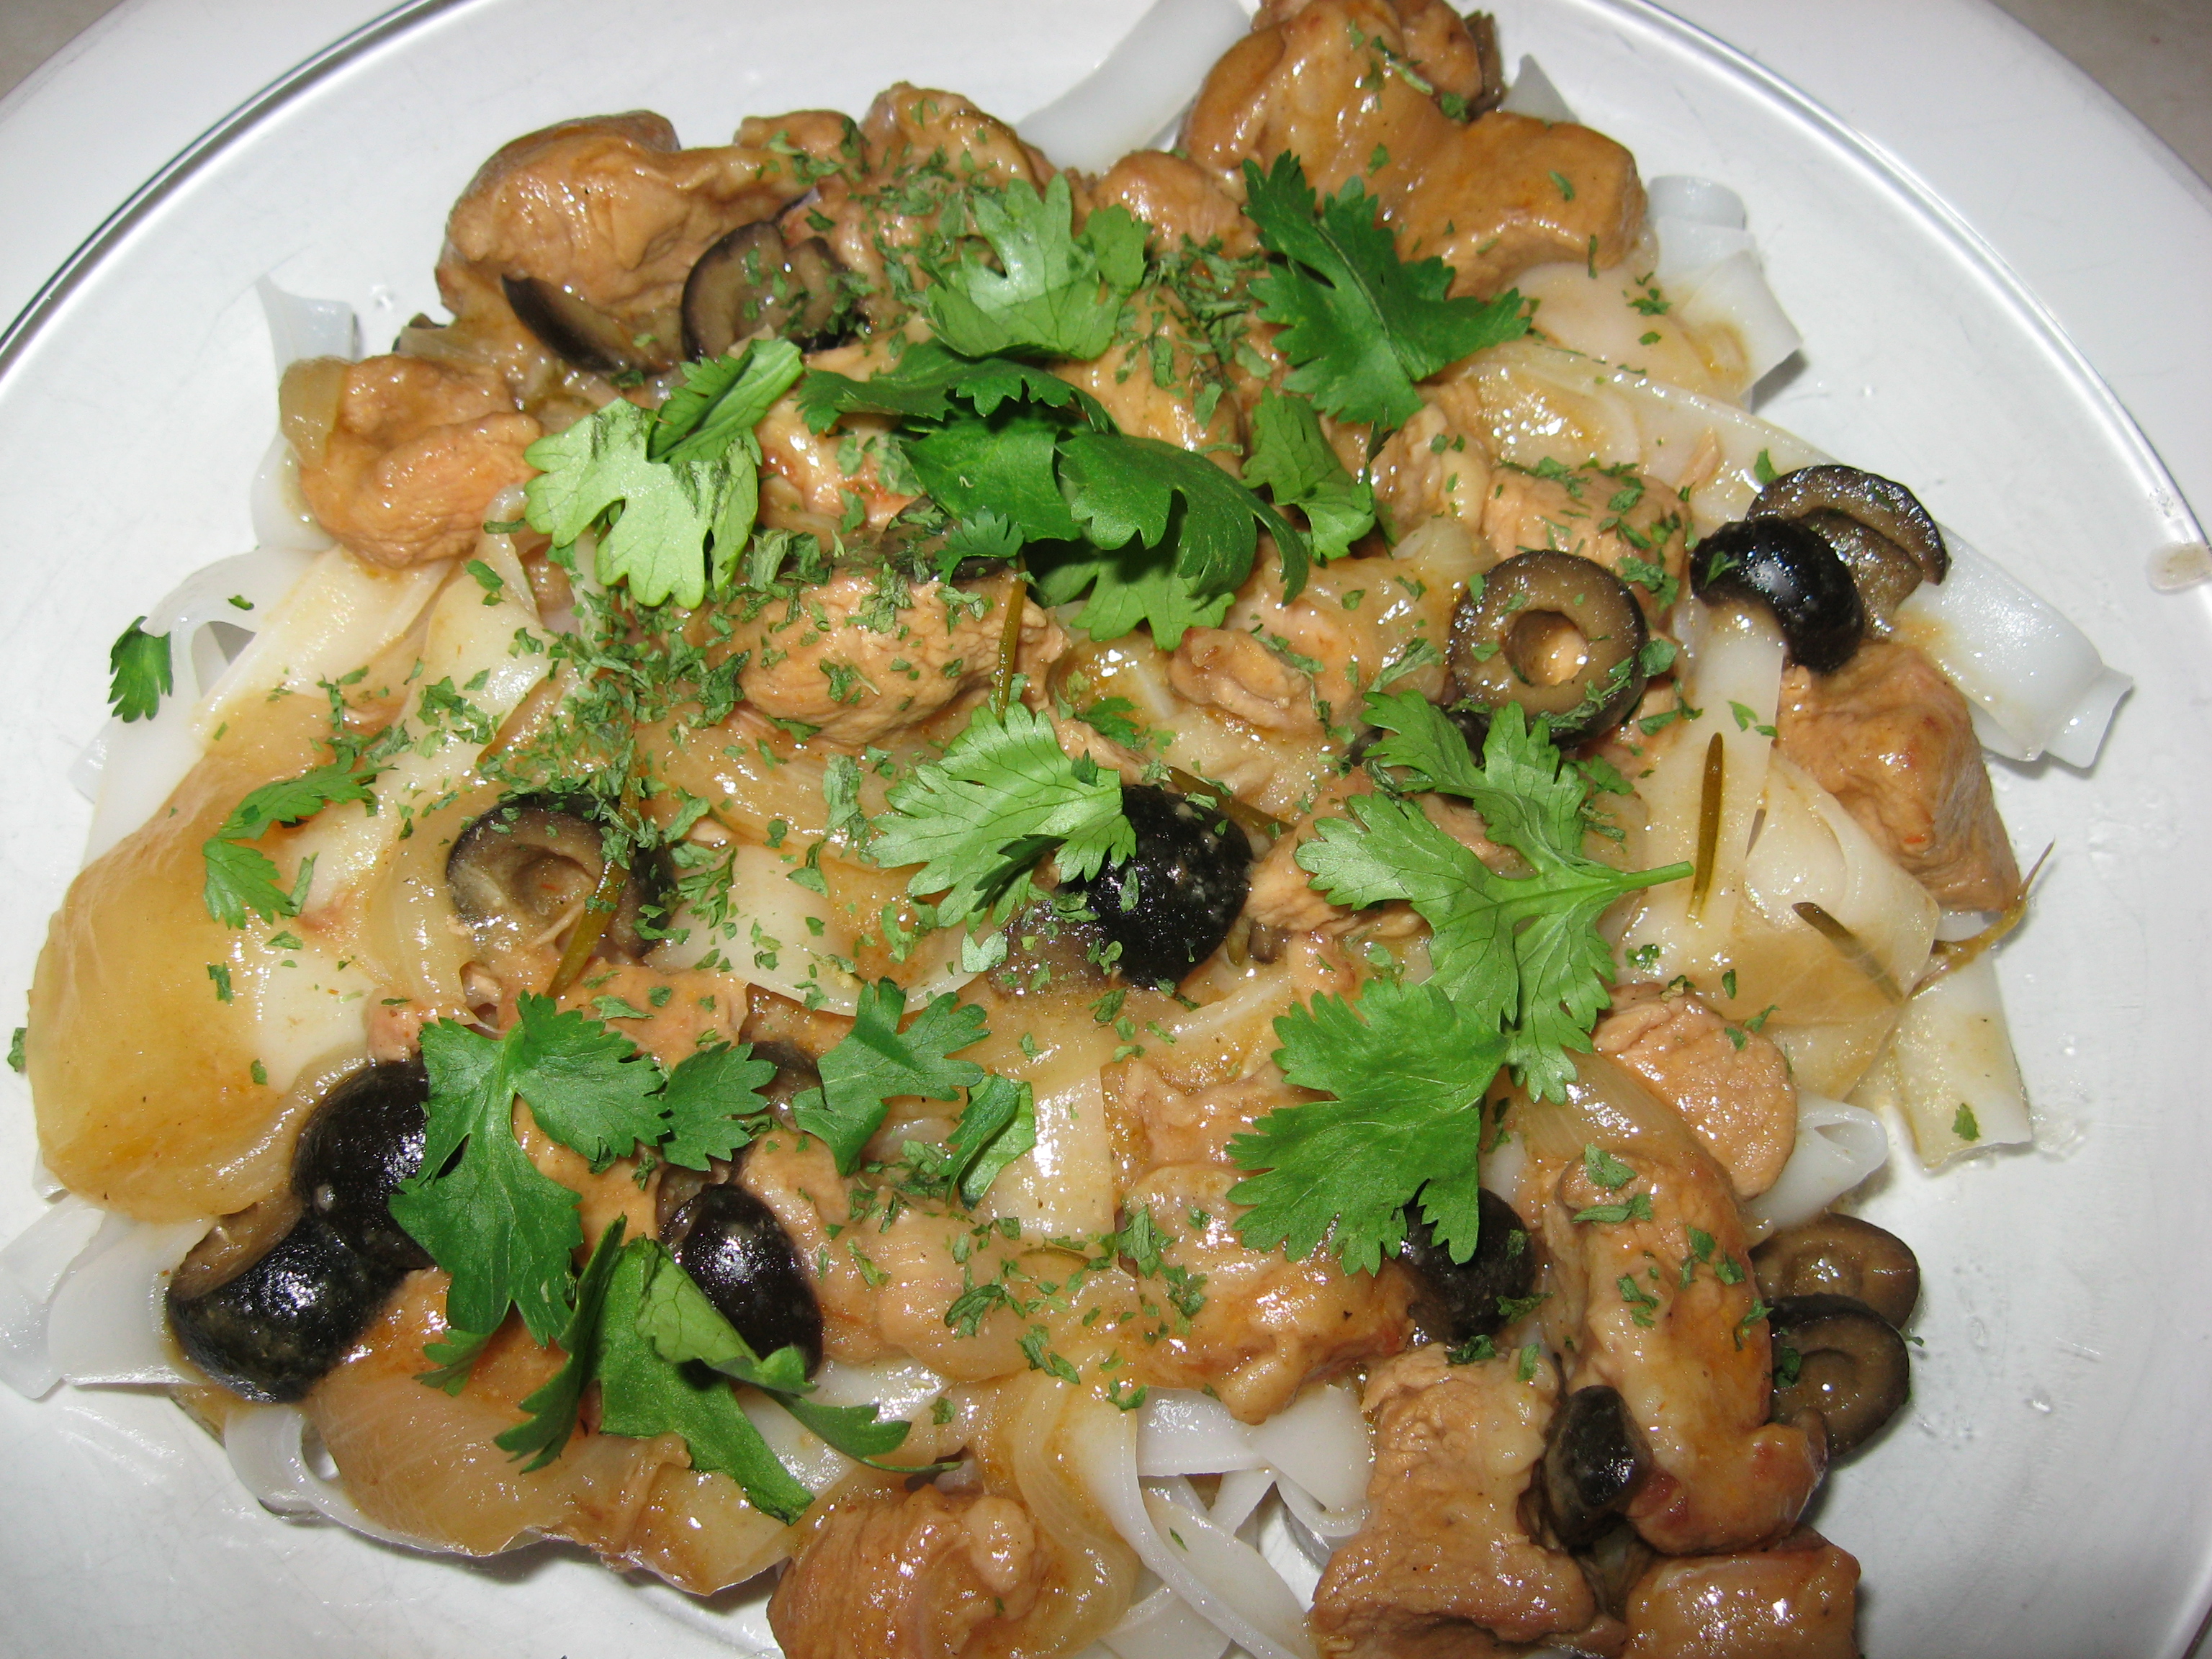
  4. Slice the tongue(s) in somewhat thick slices and place in a baking dish.

STEP 2:Instructions for the mustard-horseradish sauce: (You might have to double this amount if you have a lot of tongue slices).

  1. Preheat oven to 375F  for the baking of this dish for preparation for STEP 3.
  2. In a medium sized skillet or pan, melt the butter and add the flour.  Stir over medium heat till well blended. Add the horseradish and mustard and optional capers, stir till blended and add the tongue stock. Bring to a boil, reduce the heat to a simmer and simmer till sauce is smooth and thickened.

STEP 3: Instructions for the baking and final preparation:

  1. Place the tongue slices, potatoes and optional veggies in STEP 3 listed ingredients into an appropriate correct  sized baking dish to fit it all in. Pour sauce over all.
  2. Cover well and bake in a 375 degree pre-heated oven for 50 to 60 minutes.
  3. Remove all to a pretty platter (it could be silver—oh so passé I know) and top it with chopped parsley and optional capers and surround it with your saved, set aside and briefly reheated boiled carrots. ( hint: The carrots could be reheated in your leftover stock if you bring the stock back to a brief boil. Or if you wish you could cook the carrots in the stock 30 minutes before your tongue oven dish is done. )

Roasted Cornish Game Hens and Grapes

Standard

pic grapes

Roasted Cornish Game Hens and Grapes

Serves 4


This is a very light and deliciously healthy dish and if presented correctly, a gorgeous looking one as well.  So enjoy and go for it!!!!! Perfect for just you if you cook just one hen or for guests—if you cook more of these little guys. 


Ingredients:

  1. 1 ½ lbs. mixed red and green seedless grapes
  2. 8 shallots, root intact and halved if large
  3. 6 sprigs thyme, plus leaves for hens
  4. 2 Tblsp. olive oil
  5. S&P
  6. 4 Cornish game hens-1 to 1 ¼ lbs. each


Directions:

  1. Preheat oven to 450.
  2. On a rimmed baking pan, toss the grapes and the shallots with the thyme sprigs, oil, 1 tsp. salt and ¼ tsp. ground pepper.
  3. Nestle hens among the grapes on the baking sheet, breast side up.  Brush hens with some more olive oil and season them liberally (or as you wish) with some more S&P; lastly sprinkle them with thyme leaves.
  4. Roast the hens in your preheated oven basting them occasionally with pan juices until an instant-read thermometer inserted in the thickest past of the leg (avoiding the bone) registers 160 degrees—30 to 35 minutes but could be as long as 45 minutes.  So watch diligently but try not to overcook.
  5. Serve on a pretty platter surrounded by the grapes and shallots. I usually serve this dish with a side of wild rice which has been enhanced with some of my favorite green fresh veggies such as snappy pea pods or long string beans—but it could be any kind of veggie that you love including maybe some more colorful ones.  Imagination is always a good ingredient to use for this kind of presentation.

Chicken or Rabbit–au Vin–Up to you

Standard

Zivi’s Lapin au Vin

Feeds 4-6

I do love this dish made with rabbit, however, you can easily make it with chicken.

Ingredients:

  1. 1 large FAT PLUMP rabbit—cut up in pieces (or chicken)
  2. 1/4 C. flour
  3. S&P to taste
  4. 1/4 Tsp. Paprika
  5. 4 Tblsp. combination of butter and olive oil
  6. 1/2 onion—chopped
  7. 1 garlic-diced (optional)
  8. 1-2 C. chicken stock
  9. 1/2 to 3/4 C. hearty red wine
  10. 1-2 bay leaves
  11. Thyme, Basil or Rosemary to taste (optional)


Directions:

  1. Wash and pat dry the rabbit.  In a bag, place the flour, S&P and paprika, shake to mix well; put rabbit in bag and shake once again till rabbit is well coated.
  2. In a heavy such as a cast iron deep sided skillet or pot, heat the butter/olive oil; stir in the onion and garlic for about 4 minutes, over medium heat, till soft and glistening.  Remove to a side plate.
  3. If you need more butter/olive oil at this point, add some.  Make sure the oil is hot before adding the rabbit.  Brown thoroughly on all sides over medium heat (about 5-8 minutes).  Be sure your heat is not too high so that you are not burning the rabbit.
  4. Add the stock, wine, set aside onion and garlic and bay leaves and other optional spices if you wish and place a cover on the pot.
  5. Cook at a simmer for about 1 hour. Do check it every now and then to see if it might need more stock or wine.
  6. I serve this with white rice and a nice fresh vegetable.

Zucchini au Bon Gout

Standard

Simple, Easy, Fresh and Healthy plus Lovely to Look At.  That’s what this recipe is all about.

Zucchini Au Bon Gout

Serves 8

Ingredients:

  1. 1.       8 small whole zucchini, scrubbed and trimmed
  2. 2.       2 C. peeled ,chopped tomatoes (canned & drained is fine)
  3. 3.       1 C. bread crumbs, cooked in butter until crisp or packaged if need be
  4. 4.       S&P to taste
  5. 5.       Grated Parmesan


Directions:

  1. Preheat oven to 450
  2. Simmer the zucchini in a little water until BARELY tender (8 to 10 minutes depending on the size). Drain and cool.
  3. When the zucchini are cool, cut in half lengthwise.  If need be, scoop out the seeds from each half and invert the halves to drain.
  4. In a baking dish, arrange the zucchini, cut side up, and fill the cavities with equal parts chopped tomatoes and croutons.  Sprinkle with S&P and cheese.
  5. Bake until heated through.  Then brown under the broiler just before serving.


Patty’s Plumped Raisin Oatmeal Cookies

Standard

raisinsPatty’s Plumped Raisin Oatmeal Cookies

Makes about 45 two-inch round cookies

I was over at Patty’s helping her do a little cooking.  She’s a terrific cook herself having been a home economics teacher, but she had a little handicap—a broken clavicle.  OUCH!!!  She introduced me to these fabulous cookies that her son, at age 7, (some 50 years ago) had introduced to her.  He had cut out this recipe from a magazine and asked mom to make them.  So, there you go; even younglings read recipes.  I think that these cookies turned out really tasty—and probably just due to one unique factor: the plumping of the raisins.

Ingredients:

  1. 1 Cube of butter, softened—sweet or salt your choice
  2. 1/2 C. Brown sugar-dark or light—up to you
  3. 1/2 C. White granulated sugar
  4. 1 Egg
  5. 1 Tsp. Vanilla
  6. 1 C. Flour
  7. 1 Tsp. Baking soda
  8. 1 Tsp. Ground cinnamon (optional)
  9. 2 C. Quick cooking oats
  10. 1 C. Plumped raisins (let the raisins sit in warm water for about an hour or so)
  11. 1/2 C. chocolate chips-optional–however if you do use them, reduce the amount of raisins to about 3/4 C.

Directions:

  1. Pre-heat oven to 350
  2. In a medium size mixing bowl, cream the butter and the 2 sugars. (You can cream by hand with a fork or with a mixer.)
  3. In a small cup, beat the egg with the vanilla (you can use a fork or a whisk) and add to batter. Mix well.
  4.  Whisk the flour with the soda and cinnamon and add to the batter.
  5. Add the oats to the batter.
  6. Drain the raisins and add them to the batter.
  7. The batter will be very thick, so it’s easiest to form 1- inch balls with your hands and place them on Teflon cookie sheets or sheets which are lined with parchment paper. You can line the balls up 3 in a row in a line of 5.
  8. Bake in pre-heated oven for about 12- 14 minutes.
  9. Let cool for about 5 minutes and then remove to a rack to cooPatty's Cookies 1 Patty's Cookies 2l.
  10. Try not to eat them all at once.
  11. For a little variation, try putting 1/2 Tsp. vanilla and 1/2 Tsp. almond with butterscotch chips and milk chocolate chips along with 1/4 Tsp. anise seeds.  You can even introduce shredded coconut and chopped nuts.  It’s a very versatile recipe.

Blanquette de Poulet

Standard

chickens

Blanquette de Poulet

Serves 4-6

My mother was not that crazy about cooking however, every Sunday, this is what she made.  So, of course, I grew very fond of it and now have to make it so as to remind myself about the good and sociable Sundays that she created around this dish.  She teamed this up with fresh veggies or sometimes, I hate to say, canned, a nice salad and her really splendid rice, a sort of risotto. To top off our mid-Sunday repast, she served her excellent open faced apple tart or a zabaglione or some home made meringues with ice cream.  To start off the whole affair, it was either a slice of cantaloupe or canned fruit cocktail. The cantaloupe would be doused by our European friends with sugar.  So, now when I mention the canned stuff, you’ll know that the era was the 40’s and 50’s.  This is not a complicated dish and it’s the sauce that makes it—or at least that’s what I think. Blanquette equates to a totally white sauce in French culinary terms. There is also a more famous version of the blanquette—Veal en Blanquette. The recipe for that is a bit different.  Anyway, here’s to memories and I hope that you’ll enjoy this dish.


Ingredients:

  1. 1 nice sized whole chicken, rinsed
  2. Water–enough to cover the whole affair
  3. 2 or 3 carrots, peeled and cut into large pieces
  4. 2-3 celery stalks, washed and cut in half or thirds
  5. 1 onion-peeled and cut into quarters
  6. Several cloves of garlic-peeled and chopped
  7. 3-4 sprigs of garlic
  8. Some peppercorns
  9. A couple sprigs of fresh thyme or tarragon or rosemary—your choice of one
  10. S&P to taste
  11. 2 Tblsp. flour
  12. 2 Tblsp. butter
  13. 1 C. heavy cream (but ½ and ½ will do it except it won’t taste as wonderful)
  14. 2 egg yolks put in a small bowl that will also hold the heavy cream
  15. 1/2 Lb. small mushrooms, sautéed in a bit of butter (optional)


Instructions:

  1. In a large pot, place the chicken, water to cover and the ingredients mentioned from item #3 through item #10.  Bring to a boil and simmer, covered for at least one hour or till chicken is done. (You can also put all of these ingredients except the carrots in a large cheesecloth bag and place that in the stock).
  2. Set aside the chicken and carrots. Strain the stock, discard the strained ingredients (or the cheesecloth bag) and put the stock back in the pot.
  3. Bring stock to a boil and reduce to a slower boil until broth is reduced about 2/3rds.
  4. In a small bowl, cream the butter and flour (I do this with a fork) and add a bit of the hot broth and mix well till smooth and no lumps remain.
  5. Add the flour/butter mixture to the broth in the pot and boil 1-2 minutes.
  6. In the meantime, mix the cream with the yolks with a whip. If you wish, you can add some lemon juice to this mixture.  As I remember, mother didn’t.
  7. Reduce heat of broth till barely simmering and add the cream/yolk mixture. DO NOT LET BOIL or it will curdle (YUK!)
  8. Whip the broth until it’s nice a smooth.
  9. Place the chicken on a platter with the mushrooms and carrots around and pour the sauce over all.  Or if you would rather, serve the chicken, carrots and mushrooms plain and put the sauce in a gravy boat and let your guests pour the sauce themselves on their individually plated dishes.


P.S.  There are many other excellent and a bit more complicated recipes for Blanquette de Poulet however the one I gave you is the one my mother made and frankly, I enjoyed the simplicity of it because it made the sauce really stand out.    

Veal Stew With Mushrooms, Cauliflower, Onions and Sour Cream

Standard

veal stew in skillet

stew on plate

Veal Stew With Mushrooms, Cauliflower, Onions and Sour Cream

6-8 servings

I do love veal.  It’s a bit pricey but it has such a delicate flavor (as opposed to its parents) that I’ll many times bend my budget to accommodate it.  There are a lot of good recipes for veal, however, this is one that I really like because it makes the dish go round a bit more; that’s because there are plenty of good included veggies here.  So here you go:

Ingredients:

  1. 1/4 or more C. of flour for dredging
  2. S&P to taste to add to the flour
  3. 3 lbs. boneless veal stew meat
  4. 1/2 C. olive oil
  5. 3 medium onions, peeled and cut into quarters
  6. 1 C. sliced celery
  7. 1 ½ C. hot water
  8. 1/2 C. white wine or vermouth
  9. Thyme to taste (dried or I used several threads of the real stuff)
  10. 1 small head of cauliflower, broken in small flowerettes
  11. 12 small mushrooms, quartered
  12. Butter
  13. 1 C. sour cream
  14. 1/4 C. chopped parsley

Directions:

  1. In a medium sized bag, shake the flour with the S&P and then put the veal pieces in it and shake some more to coat them all evenly.
  2. In a heavy deep skillet, add the olive oil and heat.  When heated, add the stew meat and brown on all sides (about 5-8 minutes).
  3. When meat is browned, add the onions, celery, hot water, wine and thyme.  Simmer stove stop with a tight lid for 1 ½ hours.
  4. After 1 ½ hours, add the cauliflower and simmer for 1/2 hour more.
  5. Before the stew has finished simmering for the 2 hours, in another skillet, add and heat some butter so that you can brown the mushrooms.
  6. When the stew is cooked and the mushrooms browned, add the mushrooms to the stew along with the sour cream and parsley.  Stir so that the mixture is well blended BUT DO NOT LET BOIL!!
  7. This is excellent over rice or noodles.


For easy access and printing of this and past recipes, visit Margot’s blog http://blog.tempinnkeeper.com  Call Margot for personal cooking help or hosting

 @ 721-3551.

Margot is a self-taught enthusiastic & passionate cook. Having been an inn-keeper for 5 years at her own inn, she accumulated a lot of good recipes which she loves to share.


Fusion Veal Stew

Standard

Fusion Veal Stew-(a little Italian, German, Greek, Vietnamese, & Mexican Influencing)

Serves 6

Fushion Veal

Now, don’t turn up your nose at this combination because it really tastes good and is pretty healthy as well.  Fusion is fun and often can yield wonderful results.  This is a yummy veal stew that I served over Vietnamese My-Tho Large Noodles (Wide Oriental Style) to save calories.  They are half the calories of normal noodles and were easy to prepare (noodles was the German/Vietnamese influence).  I used fresh cilantro,( I sort of always think Mexican for this green topping even though I know a lot of other nationalities use it for their culinary cuisine as well)  for the topping because I didn’t have fresh parsley and it turned out to be a nice tasty addition. The olives are the Greek or Italian influence.  So, here’s the recipe for you brave and adventuresome readers:


Ingredients for the stew:

  1. 2 Lbs. lean veal stew meat (I found some very well priced at Atkinsons’)
  2. Flour for dredging
  3. S&P to taste and to add to the flour for the dredging
  4. 1/4 C. olive oil
  5. 1-2 Cloves garlic-chopped
  6. 1 Small onion, sliced
  7. 2/3 Tsp. dried rosemary or twice that amount of fresh
  8. 1/2 C. dry white wine (I used white vermouth)
  9. 1 Tblsp. tomato paste
  10. 1 C. or more of  hot chicken stock
  11. 12 pitted black ripe olives, sliced
  12. Chopped parsley or cilantro


Directions for the stew:

  1. Pre-heat oven to 300
  2. Dredge the veal with the flour, S&P
  3. In a heavy oven proof skillet, over medium high heat, bring the olive oil to a light sizzle.  Add the veal to it and brown well over medium heat (about 5 minutes). Then add the onion and garlic and cook 3 minutes more stirring often.
  4. Add the rosemary, wine, tomato paste and the hot chicken stock so that the veal is totally covered with the liquid.
  5. Cover and bake two hours.  After one hour peek in to see that there is enough liquid and if not, add more wine and chicken stock.
  6. After 2 hours add the sliced olives and bake half hour more.
  7. Sprinkle parsley or cilantro over before serving.

rice noodles fusion veal

Directions for the My-Tho Wide Large Noodles:

  1. Place the amount of the dry noodles you wish to serve in a tall container (I used a juice container that would safely hold boiling water).
  2. About 5-10 minutes before you will be serving the veal, pour BOILING water over the noodles and stir every minute or so.  Keep tasting because you don’t want the noodles to get mushy. When they are firm but just right to eat (5- 10 minutes) drain them in a colander and run cold water over them so as to stop their cooking.  Put them back in the container and add some olive oil.  Stir well.
  3. They won’t be really hot but when you put the stew on top, you won’t notice the difference except that they will be half the calories of regular noodles.


For easy access and printing of this and past recipes, visit Margot’s blog http://blog.tempinnkeeper.com  Call Margot for personal cooking help or hosting

@ 721-3551.

Margot is a self-taught enthusiastic & passionate cook. Having been an inn-keeper for 5 years at her own inn, she accumulated a lot of good recipes which she loves to share.

Cupcakes, Nice and Easy

Standard

cupcakes 2cupcakes

Cupcakes-Coconut, Almond,  Chocolate, Lemon-The Easy Way

Makes 18-24 cupcakes

This is a super simple recipe that results in very light and rich tasting cupcakes.  They way you want them to taste is up to you—————-

Ingredients:

  1. 4 eggs
  2. 2/3 C. white sugar
  3. Dash of almond or vanilla extract or lemon zest  (optional)
  4. 1 ¼ C. all-purpose flour
  5. 1 Tsp. baking powder
  6. 3/4 C. total of the following 3 condiments—combination and amount to equal 3/4 C. wished for chosen by you (ie, it could be solely 3/4 C. coconut; or 1/4 C. coconut and 1/2 C. almonds; so-on-for the light flavor, don’t over dose):
    1. Shredded coconut
    2. Chopped or slivered almonds
    3. Chocolate chips
  7. 8 Tblsp. unsalted butter, melted

Directions:

  1. Combine the 4 eggs, sugar and optional extracts and beat for about 5 minutes until mixture is very thick, pale and forms a ribbon.
  2. Sift the flour with the baking powder .
  3. In the egg mixture, fold in some of the flour mixture and then some of your condiment selection and continue doing that till all folded in.  Lastly, fold in the melted butter.  Fold in well till you can’t see the butter any longer.
  4. Put the dough in the refrigerator for 25 minutes.  By that time, the mixture should be quite thick.
  5. When you’ve put the dough in the refrigerator, pre-heat the oven to 450. As well, spray your muffin pans or line them with paper cupcake liners.  I really like the latter.
  6. After 25 minutes take your mixture out of the refrigerator and scoop the dough out to fill the muffin pans/or liners till each is filled about 3/4 of the way full.
  7. Place on the middle rack in the 450 degree oven and bake for 5 minutes.  Turn the heat down to 400 and bake for 5-7 minutes longer or until the tops are golden brown and a toothpick will come out clear.
  8. Let cool at least 10 minutes before serving.
  9. Try not to eat them all at one sitting.

For easy access and printing of this and past recipes, visit Margot’s blog http://blog.tempinnkeeper.com  Call Margot for personal cooking help or hosting

 @ 721-3551.

Margot is a self-taught enthusiastic & passionate cook. Having been an inn-keeper for 5 years at her own inn, she accumulated a lot of good recipes which she loves to share.


Florentine Crusted Quiche

Standard

crustless quiche

crustless missing one piece

Florentine Crusted Quiche

Serves 6


It’s nice to enjoy a really tasty quiche that you know is totally healthy for you as well as light caloric wise.  Thinking about this crust, which is made with spinach, chard, or any of that similar green leafy veggie, Catherine de Medici of the early 16th Century comes to mind.  She was an amazing woman for her time and age and still today would be.  When she became queen of France, she so loved her spinach that she insisted it be served for every one of her meals.   Catherine originally haled from Florence, Italy and therefore, her many spinach dishes created and made with spinach by her French chefs were named Florentine.   So full circle here—you can see why I’ve named this quiche Florentine Crusted Quiche.

Crust Ingredients:

  1.  2 Tblsp. Olive Oil
  2. 1/2 Onion sliced very thin
  3. 1 ½ C. thinly sliced mushrooms
  4. 1 C. washed and packed chopped spinach, chard or any other green that suits your fancy
  5. 1/2 Tsp. salt and black pepper
  6. 2 Tblsp. cornmeal
  7. 2 Tblsp. water

Filling Ingredients:

  1. 6 eggs
  2. 1/2 C. milk or half-half or cream—can be fat-free—up to you.  Of course, the richer the yummier
  3. 1/4 Tsp. salt and black pepper
  4. 1/4 Tsp. nutmeg or another of your favorite spice to accommodate your cheese choice
  5. 3/4 C. of your favorite shredded cheese
  6. 3/4 C. diced ham or bacon bits or whatever suits your fancy (optional)

Directions:

General Initial Directions:

  1. Pre-heat the oven to 350.   Place one rack in the middle position.
  2. Oil or spray a 9-inch cooking dish that will accommodate a quiche.

Crust Directions:

  1. In a large skillet heat the olive oil and then add the onion stirring till nice it is brown and glossy (about 3-4 minutes); then add the mushrooms and stir them until well moistened and browned  (about 5 minutes); then add your greens and S&P and cook till the greens are nicely wilted; then add the cornmeal and water and stir till the total mixture is well blended.
  2. 2.       Press the above on the bottom and up the sides of your prepped cooking dish.

Filling Directions:

  1. Beat eggs, cream and S&P thoroughly.
  2. Fold in cheese and diced ham or bacon.
  3. Pour filling into your prepared dish.

Very Final Directions:

  1. Place the quiche on the middle rack in the oven for about 1 hour.  Test the middle for it being done with a toothpick or fine knife for it to come out clear.
  2. Let the quiche sit for 10-15 minutes before serving.