Monthly Archives: June 2012

Granny Smith Green Apple Clafouti

Standard

Granny Apple Clafouti 001Granny Smith Green Apple Clafouti

8 servings

It was a leisurely gorgeous Sun Valley Sunday with two dog walks with Hugo, my toy poodle,  and a glorious bike ride North on Hwy.75, so I had planned a really nice dinner for myself—shrimp and linguine with an olive oil/butter/garlic/fresh parsley sauce; however, my tooth, yes that one, the sweet one, was craving a desert.  I had just bought some nice green Granny Smith apples and so had that in mind.  Actually, what I had in mind was a memory of my mother’s every Sunday fabulous apple pie that she made.  So, I thought something less complicated like a clafouti would be very good.  And it was!!! Well, I didn’t eat the whole thing————but I could have.

Ingredients:

3 to 4 Granny Smith or Pippin apples

1 lemon- rind finely grated

¼ C. Marsala Wine (or Madeira)

3 eggs

2/3 C. half & half

1/3 C water

1/2 C. granulated sugar

1/2 C. all-purpose flour

5 Tblsp. melted sweet butter

1/2 Tblsp. vanilla

1/2 Tblsp. almond extract—(if you don’t want the almond flavor, just use 1 Tblsp. vanilla)

1/8 Tsp. salt

1/4 C. currants or raisins (optional)

1/4 C. slivered blanched almonds (optional)

Powdered sugar for dusting

Instructions:

  1. Preheat oven to 350.
  2. Pam-spray a shallow 2-quart baking dish.
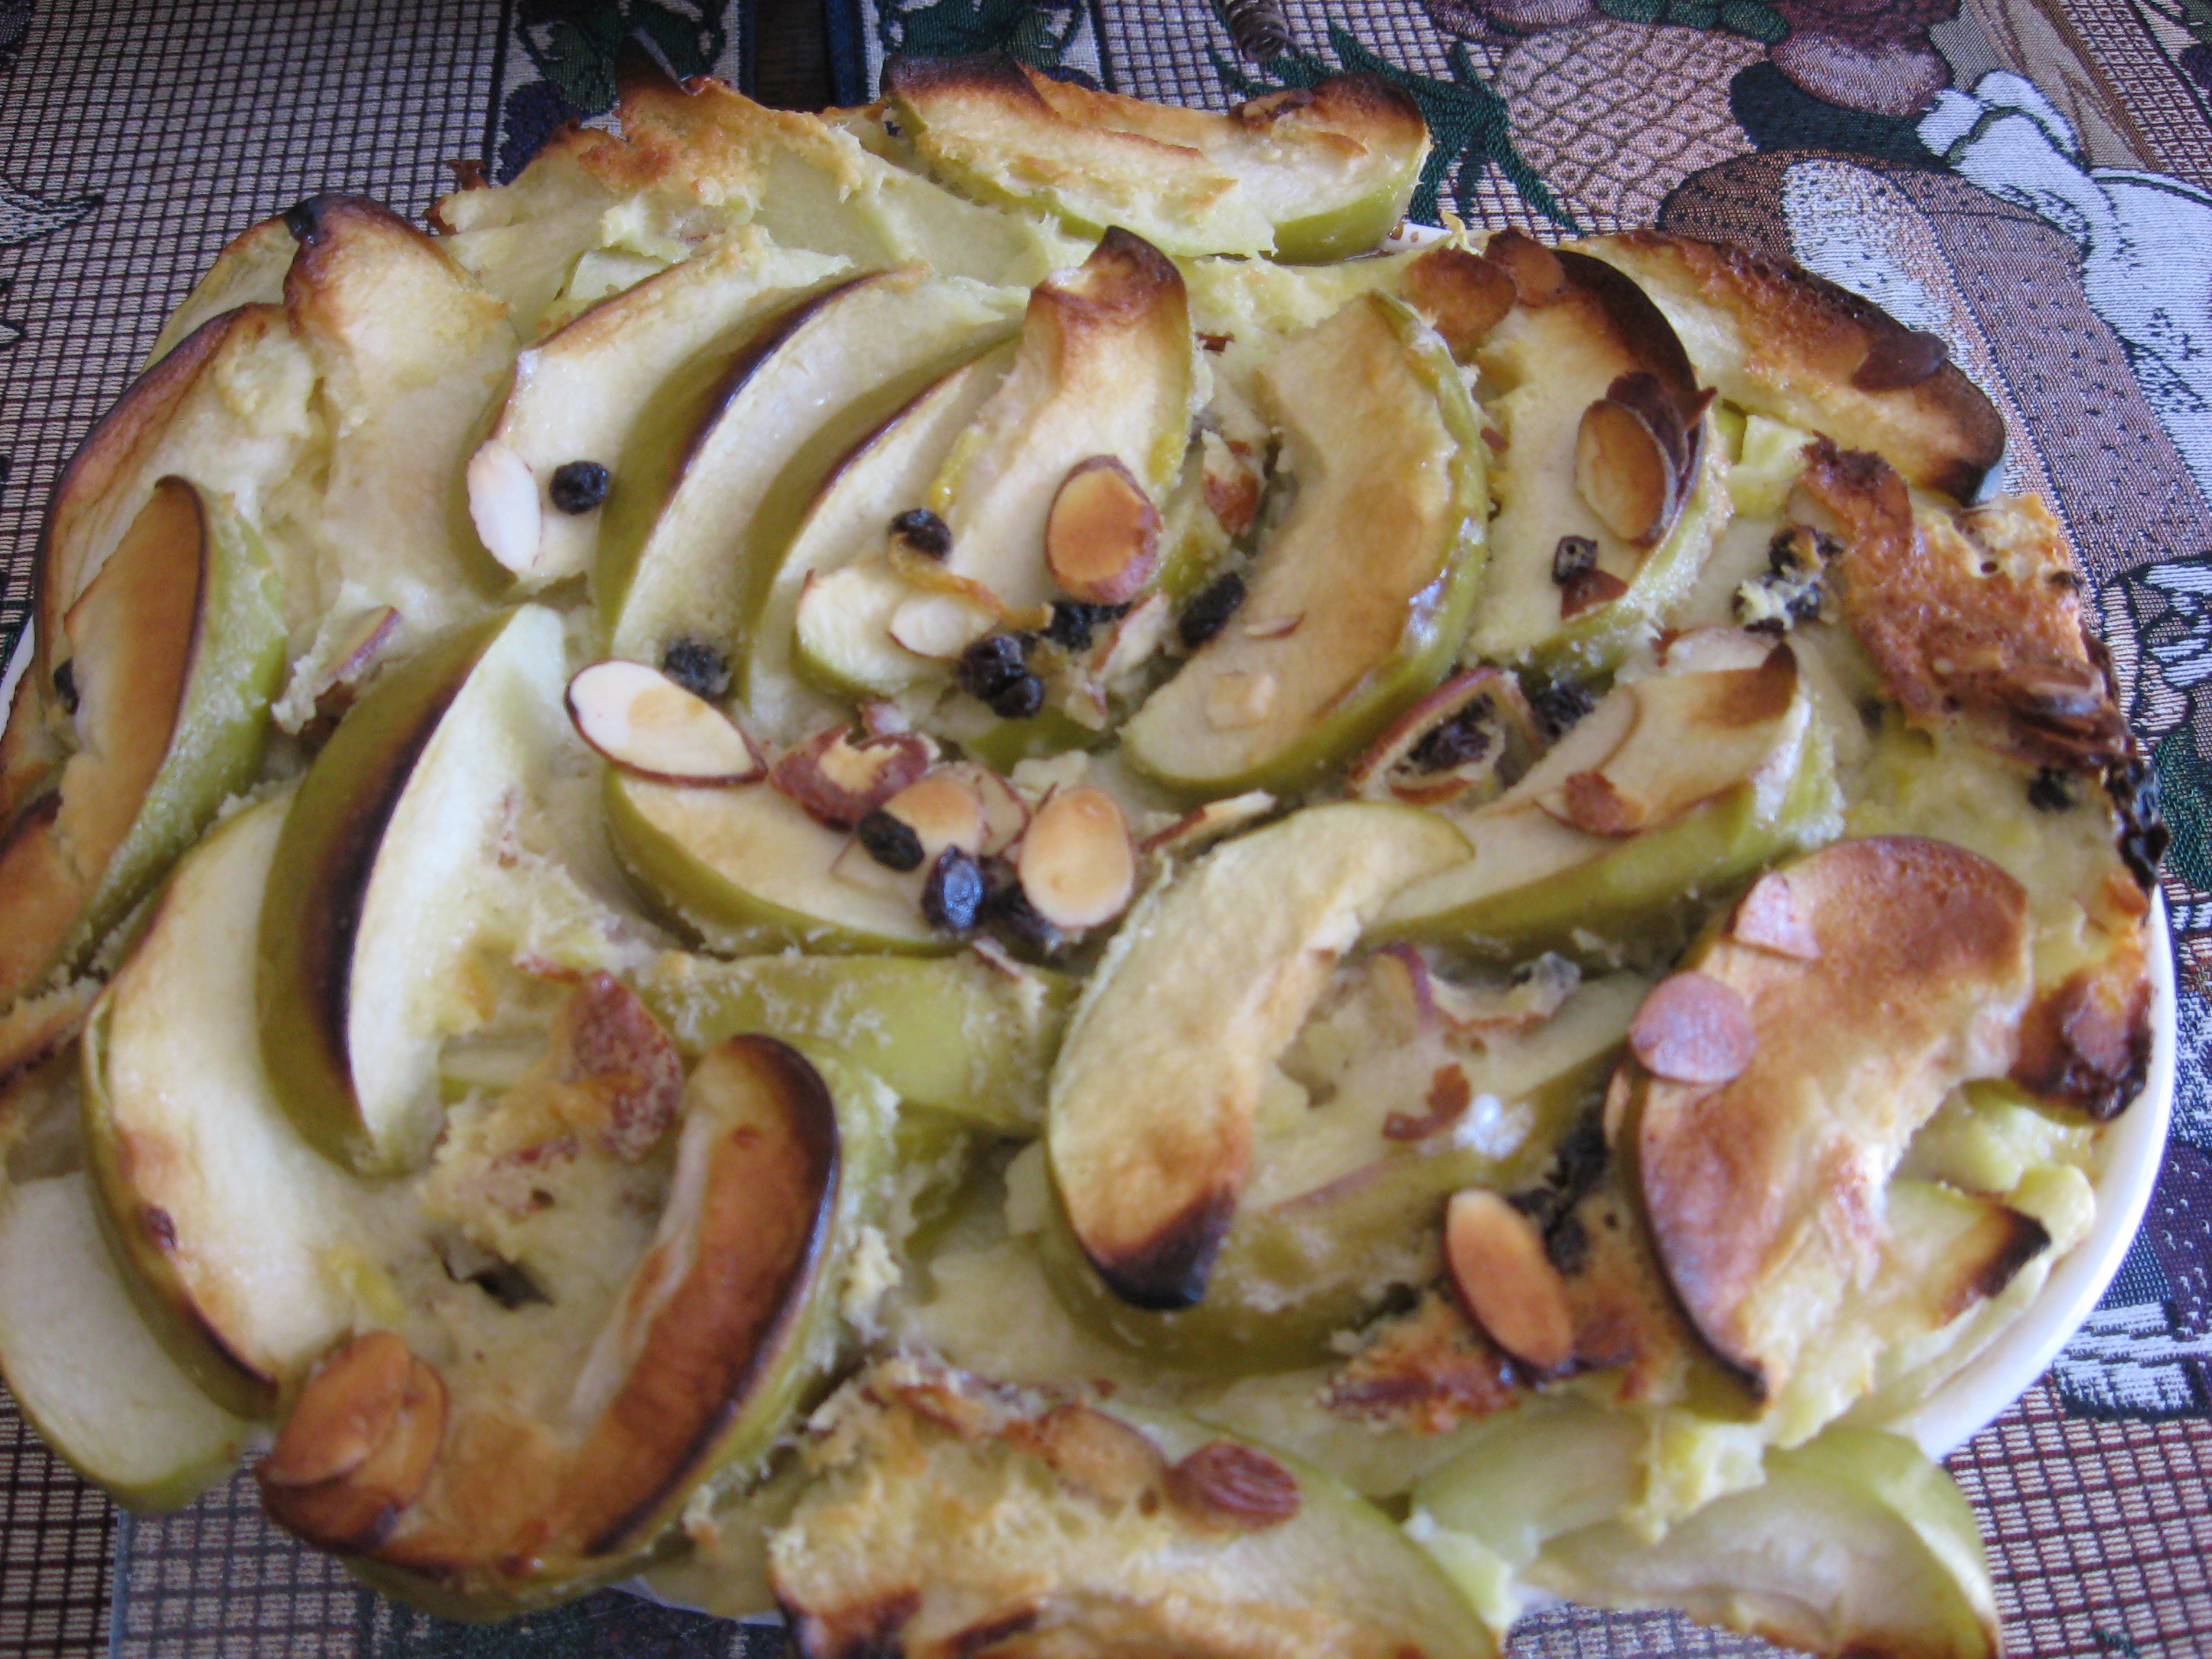
  3. Pare and slice apples in thin slices. I leave the skin out—but that’s up to you.
  4. Drop the apples in a medium sized bowl and pour over them the Marsala and the  grated lemon rind. Mix and let stand 10 to 15 minutes or longer if you wish.
  5. In a blender, combine eggs, milk, sugar, flouw, melted butter, vanilla, almond extract, and salt; whirl until smooth.  With a slotted spoon, transfer the apples to the baking dish. Pour remaining wine into egg mixture and whirl again to blend.
  6. Lightly mix into the fruit the almonds and currants/raisins.
  7. Pour egg mixture over fruit.
  8. Bake in the preheated oven on the middle or top third rack until puffed and set to the touch in the center—55 to 65 minutes.  It’ll settle slightly as it is cooling.
  9. Sprinkle powdered sugar over the top before serving.
  10. I also serve European Style yogurt (Straus) with it.  But ice cream or crème fraiche will do as well.

Pear Clafouti or Pear Cobler—for a friend in need

Standard

pears in a bowlJust what I love—getting an emergency email from a friend who needs a recipe-quick- please!!!

 Subject: Pear Tart
>>
>>
>>> Hi,  I am at my friends house for dinner and we were remembering a pear
>>> desert we used to make like peach cobbler but healthy with pears.  Do you
>>> ever make anything like that ?? Maybe pear,almond?  Thanks, J
>>
Answer from Margot
>> This is not exactly a tart, but it’s delicious.  It’s a Clafouti—a
>> French peasant dish using the left over fruit from their orchards.
>>
>> 1 1/2 lbs pears (I leave the skin on and slice thin)
>> 1/4 C. sweet white wine such as madeira
>> 3 large eggs
>> 1 C. whole milk
>> 1/2 C. granulated sugar
>> 1/3 C. all-purpose flour
>> 3 Tblsp. unsalted butter, melted
>> 1 Tblsp. almond extract (or 1/2 vanilla and 1/2 almond)
>> 1/8 tsp. salt
>> Powdered sugar for dusting
>>
>> 1. Preheat oven to 325.  Butter or pam spray a shallow 2-quart baking
>> dish.
>> 2. Place sliced pears into a bowl.  Add wine and mix gently.  Let stand 5
>> minutes
>> 3.  In a blender, combine eggs, milk, sugar, flour, melted butter, almond,
>> and salt.  Whirl till smooth. With a slotted spoon, transfer fruit to
>> buttered baking dish.  Pour remaining wine and juices into egg mixture and
>> whirl again to blend.  Pour egg mixture over fruit.
>> 4.  Bake calfouti in upper third of the preheated oven until puffed and
>> set to the touch in the center–55 to 65 minutes.
>> 5.  Serve warm (it will settle slightly as it cools). Sprinkle powdered
>> sugar over the top before serving.
>> 6.  Ice cream or creamy yogurt or sweet creme fraiche over it makes it
>> extra yummy
>> 7.  You can also add some raisins or currants with pears when soaking in
>> the wine. And you can add some slivered almonds on top at the end.
>>
>> Bon Appetit!!!!
>>
>> Here’s a Cobbler recipe I just got on-line that you might try:
>>
>> 1/2 Cup butter
>> 1 C. flour
>> 1 1/2 tsp baking powder
>> 1 C whole milk
>> 1 C sugar
>> 1/2 to 1 tsp tsp almond (or vanila) extract
>> 2 C. sliced pears (or can be peaches)
>>
>> Preheat oven to 350
>>
>> Place butter in 13 X 9 inch baking dish.  Place dish in oven to melt
>> butter. Mix flour, baking powder, and salt in large bowl.  Stir in milk,
>> almond or vanila extract and sugar to form batter.  Revmove baking dish
>> from oven and pour batter into it.  Spoon pears (peaches) and any juices
>> evenly over batter. Bake until batter rises and brown on top–about 30
>> minutes.
>>
>> YUM!!!!
>>
>>
>>
>>
>> >>

Lentils and Kale Delight-Think Single

Standard

Lentils & Kale Delight—Think Single

Servings: for one or possibly two people


I am a single person with a wonderful toy poodle and a lovely Green Singing Finch. Most of my days, I eat my main meal in the middle of the day (following my Swiss heritage I guess) and a little something more in the evenings.  This is a wonderfully EASY, quick, tasty, and healthy dish to make for your evening meal (or any time of the day for that matter)

Ingredients:

1/2 C. lentils (the packaged brown kind)

1 or 2 chopped garlic (I actually use the jar kind)

1/3 C. chopped red onion

4 or 5 sprigs of whole parsley

1 or 2 sprigs of fresh thyme

3 or more mint leaves (chopped)

1/2 Tblsp. cumin seeds

2 C. chicken broth

1 C. or more of chopped fresh kale

Shaved Parmesan cheese for topping

Additional ingredients you can add are:

One diced boiling potato to make a perfect protein with the lentils (you might want to add a bit more liquid if so).

For the naughty at heart, a bit of diced bacon from the start.

In a good sized pot, place the above mentioned ingredients and bring to a nice simmer. Place a lid on top but tilt it—and simmer for anywhere from 20 to 25 minutes depending how tender you wish the lentils and kale to be.  You can adjust the herbs to your taste. I felt that I didn’t need to add S&P—but do whatever inspires you.  That’s what cooking is all about—a little experimenting and lot of enjoying.  Use a lot of the right side of your brain when it comes to cooking.  It should be creative and fun.

Place in a beautiful soup bowl and top with freshly shaved Parmesan.

By the time I have cooked this, my toy poodle is hungry for his meal. So of course, I give him a bit of chicken stock and parmesan, all of which he loves and well appreciates. Then for Bandit, the bird, he gets some fresh kale.

For easy access and printing of this and past recipes, visit Margot’s blog http://blog.innkeeper.com  Call Margot for personal cooking help @ 721-3551.

Margot is a self-taught enthusiastic & passionate cook. Having been an inn-keeper for 5 years at her own inn, she accumulated a lot of good recipes which she loves to share.


Minty Salad

Standard

Minty Salad

(This recipe serves 4 but you can easily make more or less)

I love fresh salads however, I must admit, I have not thought much about using chopped fresh mint in them.  This healthy ingredient has just recently been brought to my attention and so of course I had to look up (once again) to see the beneficial health properties that it contains.  They are briefly among others that aren’t mentioned: a relief for indigestion, heartburn and IBS symptoms; an antioxidant; a bacteria and fungus inhibitor; breathing, respiratory and congestion aide; a mild sedative and combatant for bad breath.  And besides all of that, it smells so fresh and adds a special zest to a salad. I think that as I, you will really enjoy it.  So, this is a salad that I’ve concocted to share with you.

Ingredients:

Fresh mint chopped (about ½ C)(or more if you wish)

1 C. watercress leaves-stemmed

1 C. baby arugula

1 C. chopped green cabbage

1/3 C. chopped red onion

5 or more baby tomatoes sliced

1/2 fresh avocado bits (I spoon mine out of the shell.  Don’t throw it away and keep the seed. Put it back together as if it were never cut, wrap it in seran wrap, put in frig. for further use.)

Further ingredients that you can add are:

Chopped hard boiled egg

Shrimp

1/4 C. cooked Millet

Parmesan cheese shaved or goat cheese

For the dressing I use:(please use the amounts that suit your individual taste)

Rice Vinegar

Olive Oil


Bon Appetit


For easy access and printing of this and past recipes, visit Margot’s blog http://blog.innkeeper.com  Call Margot for personal cooking help @ 721-3551.

Margot is a self-taught enthusiastic & passionate cook. Having been an inn-keeper for 5 years at her own inn, she accumulated a lot of good recipes which she loves to share.


Salmon and Corn Chowder with Fava Beans

Standard

Salmon and Corn Chowder with Fava Beans

Serves 4 generous servings.

Have you noticed?  Our wonderful Hagerman Corn is back.  It’s plentiful and priced right.  YUM!! I say.  Salmon has also been well priced lately and the weather is sort of cool so that makes me think of a good chowder.  Here’s one I like a lot and darn it, when I make it, it’s like potato chips—I can’t stop eating when I should.

Ingredients:

1/4 pound sliced bacon, cut crosswise into thin strips

1 onion, chopped

4 boiling potatoes—I used the white kind, I didn’t peel, cut into ½ inch dice

3 C. chicken broth

1 3/4 Tsp. salt

1/4- 1/2 Tsp. dill

1/4 to 1/2 Tsp. thyme or several sprigs

1/4 Tsp. fennel seeds

1 or 2 bay leaves

1/4 Tsp. coarse style pepper

4 ears corn kernels (you can use frozen, but why?)

1 lb. salmon filets—with skin taken off

1 Cup fava beans (you can substitute lima beans or even green peas)

3/4 C. half and half (I do use this and don’t use milk)

for a topping, you can use chopped chives or scallion tops

Directions:

In a LARGE pot, cook the bacon till crisp.  Remove it with a slotted spoon and drain on paper towels.  If necessary, pour off all but 1 Tblsp. of the fat (my bacon was so lean, I had to add a little olive oil) and add the onion.  Cook over moderate/low heat, stirring occasionally, until translucent (about 5 min.)

Add the potatoes, broth, drained bacon, and the S&P and the other herbs to the pot and simmer, covered for 10 min.  Put the corn kernels in the pot and cook, covered, until the potatoes and corn are just done (about 5 minutes more).

Add the salmon, fava beans and bring back to a simmer.  Don’t overcook the fish! At this point, stir in the half-and-half and serve the chowder topped with the chives and with a crusty baguette.

Note: It’s even better the next day.


Spicy Meatball Curry

Standard

Spicy Meatball Curry

Serves 4

I loved traveling through India. It was so exotic and the people so loving. Also I thought that the food was terrifically good as well as healthy.  You just had to watch where you ate. Now, I often add curry and similar spices to my foods. Here is one recipe that I really think is tasty.  You don’t often think of India and meatballs since it seems to be more traditionally an Italian or even Hungarian dish, however, India has a myriad of recipes for their meatballs—some stuffed with hard-boiled eggs, others with dried plums and raisins.  So, here’s my take on an Indian Meatball Curry.  It’s a two step process with a lot of versatility and tasting as the dish progresses.  All depends on your taste buds.

Ingredients for the meatballs:

1 lb ground turkey (I use freshly butchered ground turkey, but if you insist, you can use beef or lamb)

2 chopped garlic cloves

Salt to taste

1/4 C. chopped fresh mint leaves

1/4 C. chopped fresh parsley

1 ¼ tsp. paprika

1 ¼ tsp. ground cumin

1/2 tsp. coriander seeds (you can also use the ground variety; I prefer the seeds)

1/4 C. plain bread crumbs

2 Tblsp. olive oil

A 2 inch piece of ginger, peeled and grated

4 Tblsp. chopped onion

Meatball direction:

Combine all the meatball ingredients and with damp hands, form about 24 meatballs.  At this point you can refrigerate them for several hours to have the ingredients meld but if you don’t have the time to do this, don’t bother.  They will still be very tasty.

Ingredients for the curry sauce: (This is the shortcut way and I think it’s very good and easy.)

One Kitchens of India Paste for Butter Chicken Curry in the 3.5 oz. package

2 C to 3 C water (or a bit more if you wish the sauce to be a little thinner and less spicy)

1 two inch stick of cinnamon

4 Tblsp. plain yogurt (I use the Greek kind and it can be either fat or non-fat)

4 whole cloves

2 to 4 heaping Tblsp. of medium heat Chipolte Salsa (depending how spicy you wish it to be)

2 or more tablespoons of currents or raisins

Sauce direction:

1. Put sauce ingredients in a large skillet and slowly heat on top of stove on medium heat.  Stir till all ingredients are well blended and simmer with a tight fitting top for about 5 to 10 minutes.

2. Then add meatballs in a single layer in the sauce and simmer with the top on for 50-60 minutes.

3. Shake pan occasionally or very gently stir being careful to not break up the meatballs.  I turn the meatballs over in the sauce very carefully about 3 times during the whole cooking time.

Serve with rice or Nan.  Top this dish with a generous dab of  yogurt to set off the spices and decorate it with some left over mint and parsley.

Blueberry-Pecan Cake for a Happy Father’s Day

Standard

Blueberry-Pecan Cake

Just in time this recipe is coming to you for a Father’s day treat. The establishment of Father’s Day has an interesting convoluted history.  In 1910, Sonora Smart Dodd, whose father, William Jackson Smart, was a Civil War Veteran, told her pastor that fathers should have a similar holiday as mothers did. Her father was a single parent who reared his six children in Spokane, WA. And she was in great admiration of him. She originally wanted it on her father’s birthday, June 5, however because there wasn’t enough time for the pastors to arrange their sermons, the holiday was deferred to the third Sunday of June. The holiday never really caught on however, in 1913 a bill was introduced in Congress for the national recognition of Father’s Day.  Congress resisted because they felt that the holiday would become too commercialized. President Coolidge recommended it in 1924, but once again is was defeated by Congress.  In 1957, Maine Senator Margaret Chase Smith wrote a proposal accusing Congress of ignoring fathers for 40 years and pointed out that it wasn’t fair to celebrate only one parent—the mother. So finally, in 1966, President Lyndon B. Johnson issued the first presidential proclamation honoring fathers and designating the third Sunday in June as Father’s Day.  However, the day wasn’t made a permanent national holiday till 6 years later when President Richard Nixon signed it into law in 1972.  Whew!!!!  Finally!!!!

A Happy Father’s Day to all Fathers everywhere.

Ingredients:

Non-stick cooking spray

2 tsp. all-purpose flour

5 Tblsp. butter

3/4 C. granulated sugar

2 large eggs

2/3 C. low-fat buttermilk

2 tsp. grated orange rind

1 tsp. baking powder

1/2 tsp salt

1 ½  tsp.vanilla extract

1/2 tsp. almond extract

1/4  tsp. baking soda

1 ½ cups all-purpose flour

2 C. fresh or frozen blueberries (you can use as little as 1 C)

1/3 C. finely chopped pecans (but you also can use walnuts)

2 Tblsp. sifted powdered sugar

Instructions:

Preheat oven to 350 degrees

  1. Coat a 9-inch round spring form pan with cooking spray and dust the pan with 2 tsp. flour
  2. Place butter in a large microwave-safe bowl. Cover and micro on high 1 minute or until butter is melted
  3. Add granulated sugar, stirring with a whisk.
  4. Add eggs, stir well.
  5. Stir in buttermilk and next 6 ingredients (buttermilk through baking soda); stir well
  6. Lightly spoon 1 ½ C. flour into dry measuring cups and level with a knife. Add flour to mixture, stirring just until blended. (Do not over stir.)
  7. Stir in blueberries and pecans/walnuts.
  8. Spoon mixture into prepared pan, spreading evenly.
  9. Bake at 350 for 45 minutes or until lightly browned and a wooden toothpick inserted in the center comes out clean.
  10. Cool 10 minutes in pan on a wire rack.
  11. Sprinkle with powdered sugar and cut into wedges.
  12. Bon Appetit

Are you a frustrated, overworked or timid cook? Call Margot for help @ 721-3551

& please feel free to email her @ TempInnKeeper@mindspring.com or to visit her blog for more recipes including these: http://blog.TempInnKeeper.com

Margot is a self-taught enthusiastic & passionate cook. Having been an inn-keeper for 5 years at her own inn, she accumulated a lot of good recipes which she loves to share.


Strawberry Sauce With A Bit Of Zing

Standard

Strawberry Sauce With A Bit Of Zing

I couldn’t resist.  At Albertsons, they were selling, (while they lasted), a pound of California strawberries for such a good price that I bought more than what I, one person, should have.  So, besides eating them just plain, I can make some of my fabulous European styled jam; I can freeze them; I can make crisps, etc.; or I can eat them quick and easy this very special way. This sauce is delicious and just right to satisfy a sweet tooth at anytime of the day or night.  You can serve it with pancakes, ice cream, yogurt, puddings, pound cake, or pick at it just plain.

Ingredients:

1 lb. of fresh strawberries sliced or thriced

1 tsp. lemon juice

1 tsp. lemon zest

2 tablespoons brown sugar (I used the raw kind) divided in 2 batches

1/3 C. balsamic vinegar (I add just a wee bit of rice vinegar to this)

Instructions:

In a saucepan add the vinegar, 1 Tbsp. sugar and lemon juice.  Simmer over medium heat until thickened, about 4 minutes.

Place strawberries in a pretty bowl and add the other 1 Tbsp. sugar, lemon zest, and lightly toss. I actually pick up the bowl and give it several up and down shakes.

Add the sauce when a bit cooled to the strawberries, lightly toss again and enjoy. (I find that this sauce is even better if it sits in the frig for a couple of hours.)

Are you a frustrated, overworked or timid cook? Call Margot for help @ 721-3551

& please feel free to email her @ TempInnKeeper@mindspring.com or to visit her blog for more recipes including these: http://blog.TempInnKeeper.com

Margot is a self-taught enthusiastic & passionate cook. Having been an inn-keeper for 5 years at her own inn, she accumulated a lot of good recipes which she loves to share.


Jam, The European Way

Standard

Jam, The European way


Now that Harvest is here and all of the wonderful local fruits are available at the farmers markets and stores, I start making jams—even very small amounts. The local peaches, plums and tomatoes (yes) are DIVINE!! Even though a bit pricy, it’s worthwhile to use the tastiest fruit when making jams. I’ve made jam many different ways, but this is the one I like the best because the taste of the ingredients turns out so realistically fresh.  It’s also a very easy method and makes the house smell really good.  So give it a try and with this recipe, the sugar herewith is at a minimum so you don’t have to worry about ingesting too many calories.


1. Cut your fruit into smaller pieces, pit them, or with berries you can leave them whole if you wish, or with large strawberries, cut them into smaller pieces.

2. For each cup of cut fruit, use 1/4 cup of refined white sugar.

If using apricots, peaches or nectarines, squeeze a bit of lemon juice on them.  If using mangoes, squirt a bit of lime juice on them.  If using tomatoes, add a bit of lemon and if you wish some gingerroot or preserved ginger or stick cinnamon. Yum!

3. Toss your fruit with the correct amount of sugar in a large skillet that you will be using on the morrow or in a large bowl.  Place either one covered in the refrigerator overnight.

4. Next day, place your skillet with the fruit and sugar in it on top of your stove without any lid and bring it to a very low simmer.  Let it low simmer from half hour to 1 hour or more.  Be sure to keep an eye on it and to stir it at least every 10-15 minutes. When I use just 1-2 Cups of fruit, I notice that the jam can finish in just 15 minutes. As well, sometimes the pectin in your fruit may be of high caliber therefore you don’t have to cook it as long.

5. After low simmering the appropriate amount of time that you deem , I take a teaspoon of the cooked jam out, stick it in the freezer for a couple of minutes and then take the teaspoon out to see if the consistency is what I would want in the end product.  If so, take the skillet off the burner and let it sit till cool.

6. Then, you can put it in your jam jars and seal them—or you can put it in jars without sealing and refrigerate them. They’ll last quite awhile in the frig without being sealed. However, in either case, I bet they won’t last long because this European way of making jam is so tasty.

7.  The way I seal my jars is the following: In a tall large pot filled with enough water to sustain my jam jars which also are filled with water I boil them for about 12 minutes; I boil my tops in that pan or another one; I let everything cool down before putting my jam in the jars. I think that’s the old fashioned way because if you have a dishwasher which can heat up to sterilization, you certainly can sterilize them there. I think you can also sterilize in the microwave—but I do it the old fashioned way. When the jam is in the jar, I pour melted paraffin on top and let it set. (Melt the paraffin according to the directions on the paraffin label.) Then I place the tops on the jars and label and date them.


Bon Appetit


 Are you a frustrated, overworked or timid cook? Call Margot for help @ 721-3551

& please feel free to email her @ TempInnKeeper@mindspring.com or to visit her blog for more recipes including these: http://blog.TempInnKeeper.com

Margot is a self-taught enthusiastic & passionate cook. Having been an inn-keeper for 5 years at her own inn, she accumulated a lot of good recipes which she loves to share.