Tag Archives: dinner

Baby Back Spare Ribs with Pineapple and Molasses

Standard

spareribs


Baby Back Spare Ribs with Pineapple and Molasses

Serves 4-6

Ingredients:

  • 16 baby back pork spareribs (could be a little more or less)
  • Finely grated zest and juice of 1 lime
  • 3 tablespoons soy sauce
  • 3 green Thai chilies or other small hot chilies, roughly chopped
  • 1 two-inch piece of ginger, peeled and thinly sliced
  • 2 tablespoons peanut oil or any other kind of oil that you like, even coconut oil. Additionally, because I do like the taste of peanuts, I melt 1-2 tablespoons of chunky peanut butter to add to the oil.
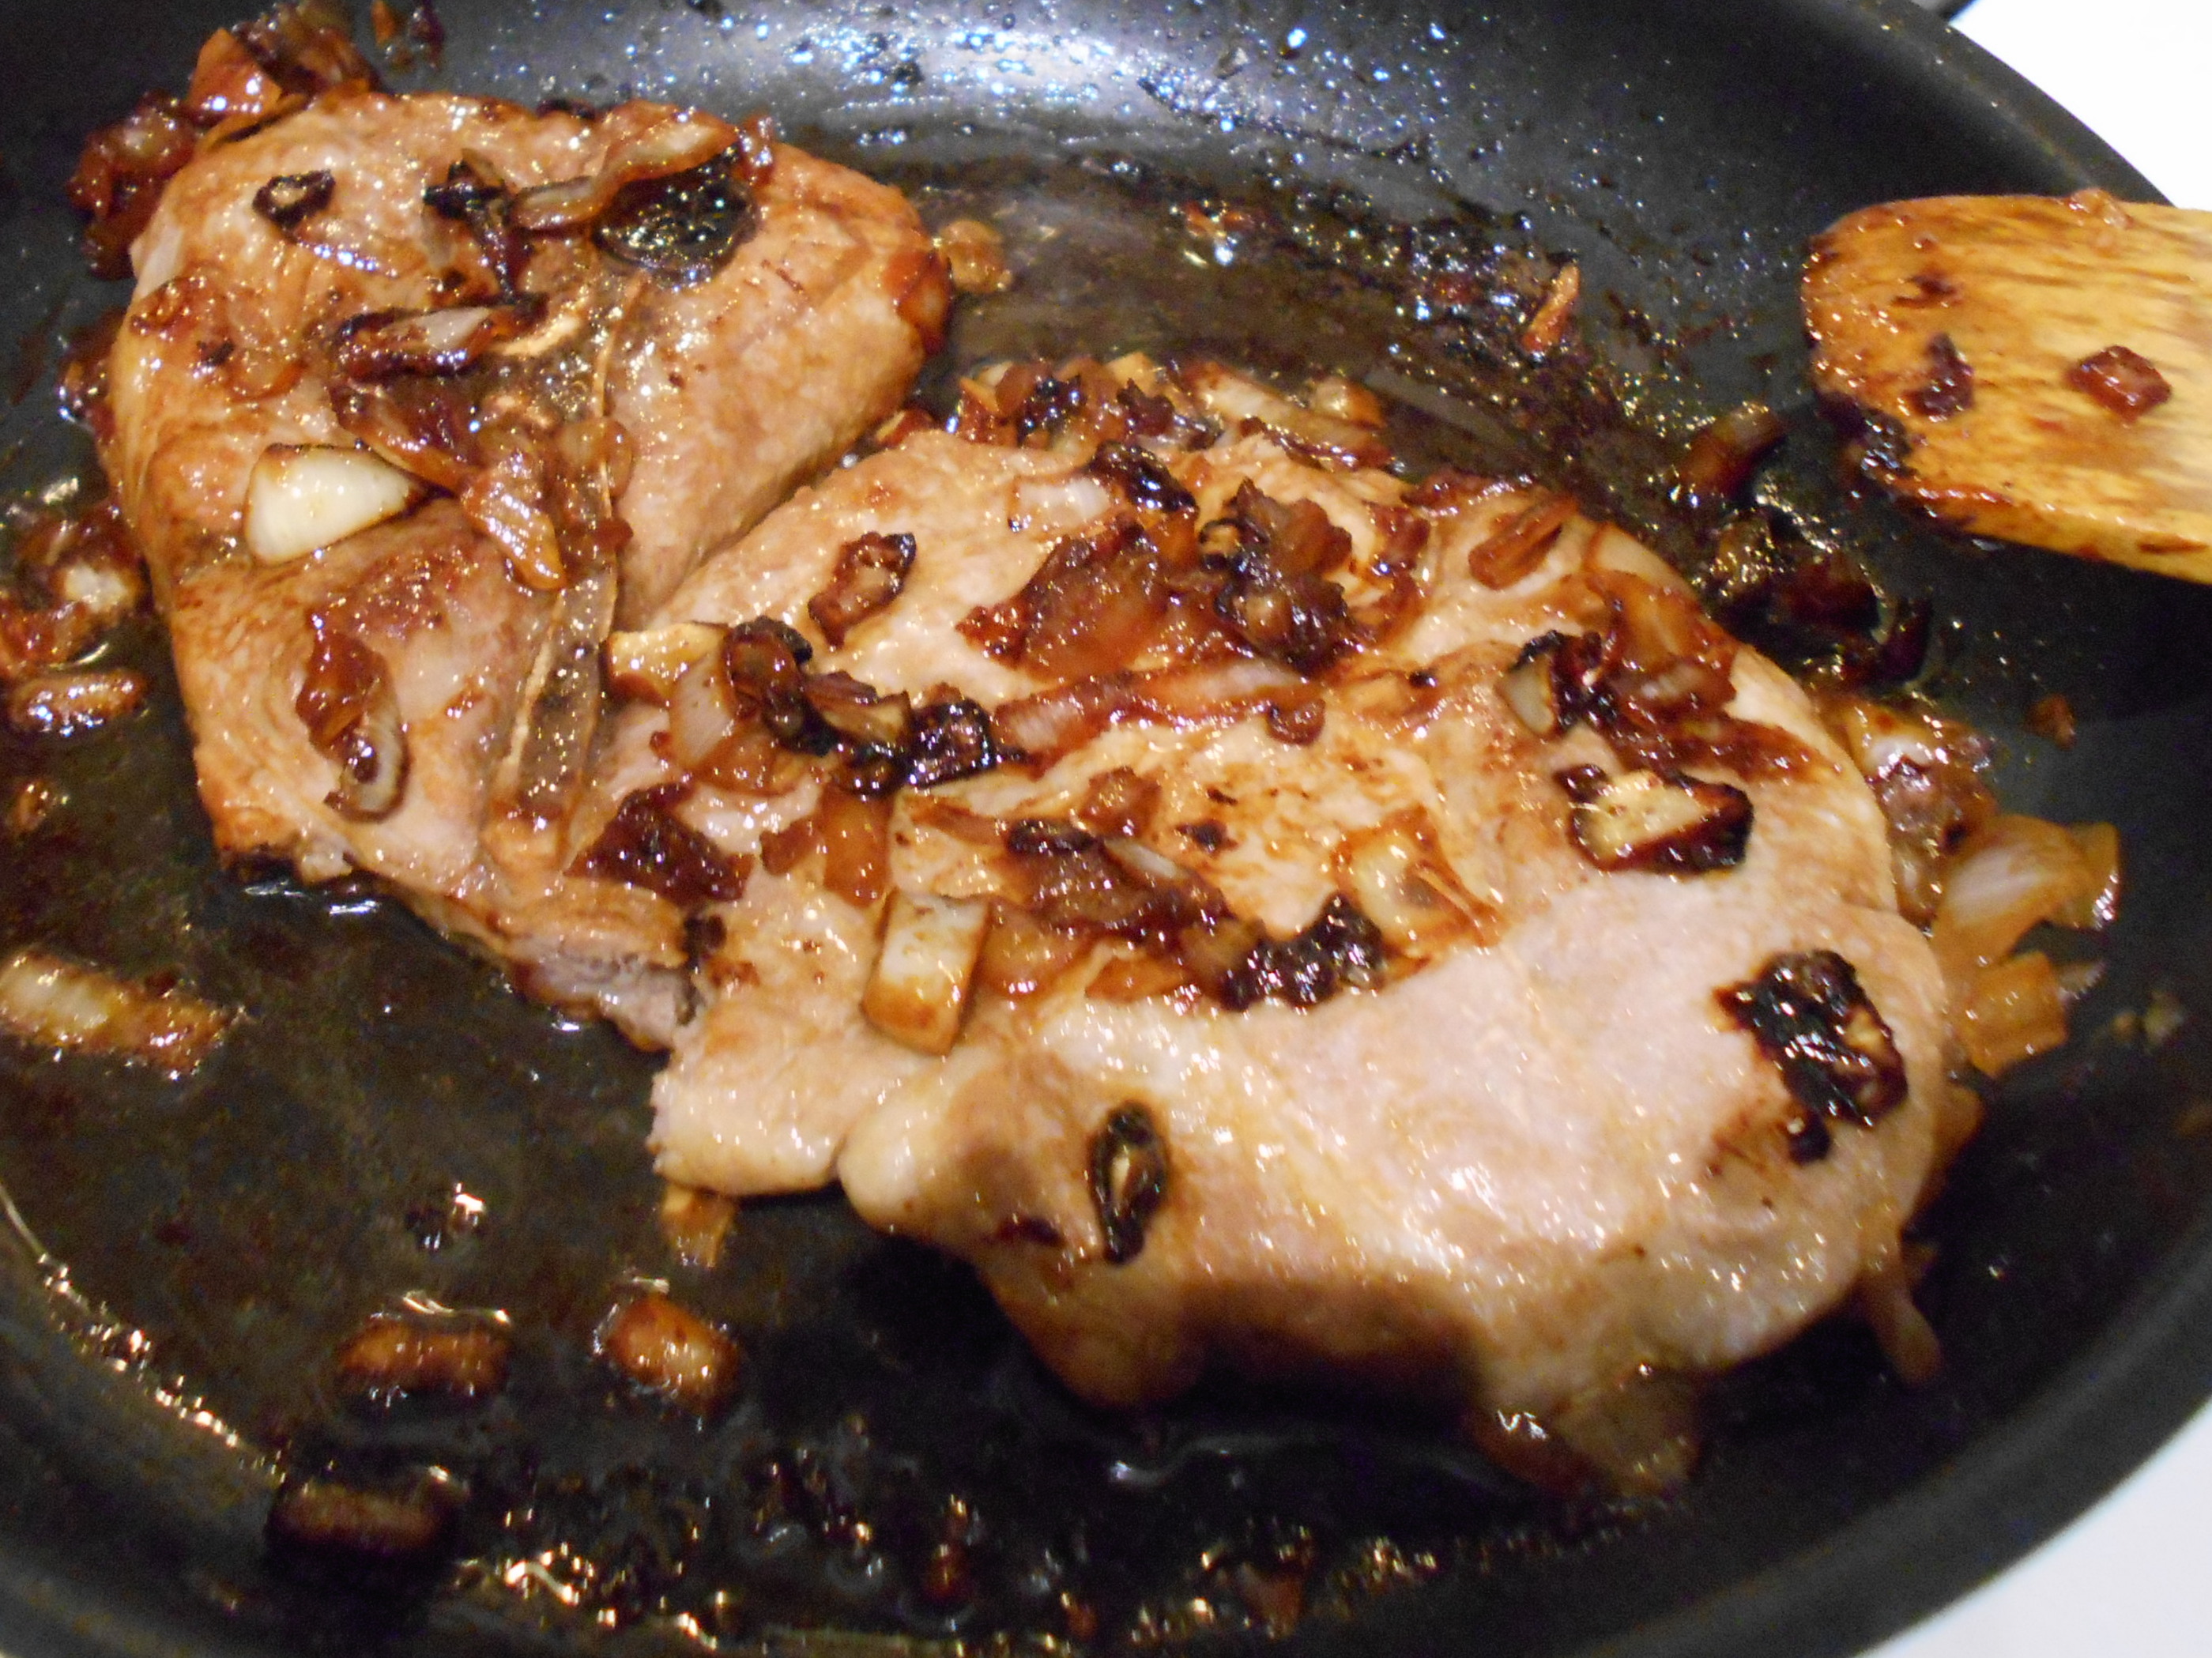
  • 2 tablespoons molasses plus 2 more tablespoons molasses for the very last preparation of the sauce.
  • 2 star anises
  • 1 cinnamon stick, broken in two
  • 1 onion, peeled and cut into eighths
  • 1/2 cup canned pineapple juice or 1/2 cup crushed pineapple with it’s juice (I prefer the latter)

Preparation

  • In a bowl, combine the lime zest and juice, soy sauce, chilies, ginger, oil and 2 tablespoons molasses. Add the star anise, cinnamon and pineapple juice or the crushed pineapple, and stir to mix well.
  • In a large plastic bag, place the onion eighths in first and then the rest of the liquid marinade. Put in the ribs (you might have to have cut the rack in half or thirds for it to fit into the bag properly), seal well, shake and turn over and over several times to make sure the marinade gets on both sides of the ribs; then refrigerate overnight. Every now and then, I turn the bag over just so the ribs are for sure well marinated.
  • Remove the ribs from the refrigerator, and pour the contents of the bag, including the marinade, into a roasting pan. Allow the ribs to come to room temperature.
  • Heat oven to 400F and cover the pan tightly with foil, place in oven, and bake for 1 hour, turning the ribs once halfway through cooking.
  • Remove the pan from the oven (leave oven on), discard the foil, and carefully spoon only the liquid from the pan into a saucepan. Return the pan to the oven, and continue to bake the ribs uncovered.
  • Add the remaining 2 tablespoons molasses to the liquid in the saucepan and place stove top over medium heat. Cook until the mixture is foamy and syrupy, about 10 minutes.
  • Remove the ribs from the oven and remove the star anise and cinnamon sticks; pour the saucepan’s sauce over the ribs, turning them until they are well coated.
  • Transfer everything to a large platter, and serve.
  • I serve this with rice and coleslaw or some kind of greens like mustard or collards.
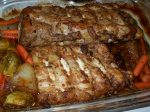
  • Sometimes unconventionally and as shown in the picture, I’ll add carrots and even cut Brussels sprouts to the ribs as they bake. It’s an easy way to add your veggies and these two in particular go nicely with the sauce. You can use your imagination here however you might like to be more conventional and only bake the ribs by themselves.


Standard

Cassoulet, the easy way     serves 6-8 finis Originally the cassoulet originated in the South of France and was named after the traditional earthenware pot, a casserole vessel that was used specifically for it.  It was a “peasant’s” dish and utilized all sorts of left-over’s.  It was a slow cooking dish that traditionally contained pork, sausages, goose, duck, mutton, pork skin and white haricot beans.  But it has transformed itself by cooks worldwide to now even containing fish.  This is such a versatile dish and it can be quite healthy.  It can be a little time consuming due to the chopping of the veggies and the browning of the meats so give yourself a minute or two to this creative dish.  The end result will be well worth it.  Also, if you wish to vary the meats such as using pork, go for it. The fun thing with this dish is that you can make it your own by using your imagination with many different kinds of variations.

Ingredients for the cassoulet pictured above:

  • 2 lbs. lamb shoulder slices (bone in)
  • 1 ½ lbs. organic chicken thighs-skin on
  • 12 ounces Cajun Style Andouille Smoked Pork Sausages-cut crosswise in large 1 inch or more slices
  • Bacon-chopped about 1/4 cup or so.
  • 1 shallot, 1 yellow onion, 2-4 garlic cloves–all finely chopped
  • 2 large peeled carrots, 1 large peeled turnip, 1 large peeled rutabaga, 1 large peeled parsnip, several celery stalks with their tops all chopped in large chunks
  • 1-14.5 ounce can of chopped tomatoes—do not drain and 2 tablespoons tomato paste
  • 2 or more 15 ounce cans of cannellini white beans—drained, placed in a colander and well rinsed with cold water
  • 1-3 cups of organic chicken (or beef) stock (I used chicken but beef is good too.)
  • At least 1/4 cup white wine or white vermouth (taste as you go)
  • Seasonings: use as you please and pinches only: all spice, cardamom, coriander, nutmeg, paprika, cayenne, cloves, ginger, nutmeg, a pod of anise.
  • Herbs: sprig of Rosemary, thyme, bay leaf, chopped parsley or even dry parsley flakes
  • Olive oil—could be up to 1/2 cup

Directions:

  • Pre-heat oven to 350F
  • Place your 10 inch cast iron skillet on top of the burner
  • Place all of your meats in a separate bowl—if you wish you can S&P them.
  • Place your finely chopped shallot, onion and garlic cloves in a small bowl or maybe like I did you’ve made it easy for yourself and used your Cuisinart.
  • Place all of your chopped root veggies in a bowl
  • Open your chopped tomatoes can and remember the 2 tablespoons of tomato paste.
  • Drain and rinse the cannellini white beans and place in a bowl.
  • Heat the skillet over medium heat and cook the bacon in it (about 5 minutes). When the bacon is done, scoop the bacon bits out but leave the bacon drippings in the pan.
  • Over medium heat, add 2-3 tablespoons of olive oil to the bacon drippings and gently sauté the onion, shallot and garlic (about 5 minutes) till softened. Remove the ingredients to a separate dish.
  • Now, still over medium heat, add to the skillet the chopped veggies and sauté them till slightly brown—stirring every now and then.
  • Remove the veggies to its separate bowl.
  • To the skillet, still over medium heat, add the meats (maybe in several sessions) and brown, turning every now and then (about 10 minutes)
  • Remove the meats to its separate dish.
  • Over medium heat in the skillet add the chopped tomatoes with its liquid, the tomato paste, the onion, garlic, shallot and 2 cups chicken broth and bring to a slight boil. Add which ever spices you like tasting as you go.  Add the white wine or vermouth.  Keep on tasting.  Add the herbs.  If you like the sauce—go for it.
  • At this point add the beans, meats and veggies. Now if you need some more liquid add some more stock but you don’t want the mixture to be drowning in the liquid.  If you have too much liquid, spoon it out.
  • Place the whole skillet, UNCOVERED, in the pre-heated 350F oven and bake for 1 hour. Watch every now and then to see that your liquid has not evaporated.  If so, add some more chicken stock.
  • Serve with crusty French bread and wine of course.

veggiesmeat-browningbefore-the-oven


Oven Baked Fresh Pork Hocks and Veggies Serves 3

Standard
Oven Roasted Pork Hock plated

Oven Roasted Pork Hock plated

pork-hocks-roastedOven Baked Fresh Pork Hocks

This is a German inspired dish.  It’s called Eisbein in Northern Germany and Schweinshaxe in the southern part.  My inspiration is not totally authentic because I’ve added more root vegetables to it;  for fall time cooler weather this is a perfect dish.  It’s nice to serve for the family and even guests.  Not only is it quite healthy, but it’s also super economical.  The dish shown here cost me $13 (including the sauerkraut and optionals) for 3 generous servings.  And that cost is here in the Sun Valley, Idaho region where prices are a bit more than in other lower lying areas.  If you wonder from where the “hock” comes, let me tell you: it’s the part of the pig where the foot was attached to the leg.

Ingredients:

  • 3 Fresh Pork Hocks
  • 1 or 2 onion(s)-sliced thin
  • 4-6 garlic cloves, halved or quartered
  • 1 leek sliced thin
  • 3 celery sticks roughly chopped or even diced
  • 1/4 C. olive oil
  • Sea salt and ground pepper to taste
  • 3 bay leaves
  • 1/2 Tsp. juniper berries or some rosemary (I used about two small sprigs but you can use dried as well—maybe 1 Tsp. full) and 1 Tsp. or more of fresh lemon juice or you can use some gin (use your discretion for this)
  • 4 C. or less of heated beef stock (if cumin is your thing, you can add a little of that to the stock)
  • 2 cinnamon sticks
  • Additions if you wish
  • 3 white potatoes – quartered or in large chunks
  • 3 carrots peeled and cut in large chunks
  • 3-4 Brussels sprouts—quartered
  • 1 parsnip- peeled and cut in large chunks
  • 1 turnip peeled and cut in large chunks
  • Serve with separately heated sauerkraut and if you didn’t use the potatoes in the dish, those can be cooked separately and served with the “kraut” and the hocks.

Directions:

  • Pre-heat oven to 425
  • In a roasting pan that you can easily cover, spread the onion, celery, garlic cloves and leek on the bottom.
  • Place the pork hocks on top of the veggies and pour the olive oil over the hocks and pepper and salt both sides but make sure the hocks are rind side up before placing in oven.
  • Pour on 1 C. beef stock
  • Place in 425 oven and bake for about 25 minutes or till the rind is crispy.
  • Remove the pan from the oven and turn the oven down to 350.
  • At this point of the recipe, I did check every half-hour to make sure the stock had not totally evaporated. If so just add more.  Also you can baste the meat every half-hour.
  • Probably all of the stock has evaporated which mine did; so add 2 more C. of beef stock. Add the juniper berries or fresh lemon juice and rosemary sprigs (or gin), the 2 cinnamon sticks and bay leaves.  I also added the optional parsnip and turnip at this stage.
  • Cover and bake for 1 hour.
  • Then add the optional potatoes, carrots and Brussels sprouts. You might need more beef stock at this point so add another cup.
  • Cover and bake for another hour or until the meat is easily removed from the bone. However, don’t over cook or the hook will become tough.


Pork Steak, Economical & the Easy and Delicious Way for a Dinner Fix

Standard

 pork steak

Pork Steak, Economical & the Easy and Delicious Way for a Dinner Fix

6 servings


Pork steaks present such an economical value and can be so tasty. Here is a very easy way to fix them and I am sure that you will enjoy them greatly. A side of fried potatoes or even a potato salad along with coleslaw would be a perfect accompaniment.


Ingredients:

  1. 6 Pork Steaks or 3 large ones like the one I cooked (shown in picture)
  2. 1/4 C. Butter
  3. 1/4 C. Soy Sauce
  4. 1 Bunch green onions or one medium regular onion, chopped
  5. 2 cloves garlic, minced

Directions:

  1. In a large skillet, melt the butter and mix in the soy sauce.
  2. Sauté the onions and garlic until lightly browned
  3. Place the pork steaks in the skillet, cover, and cook 8-10 minutes on each side.
  4. Remove cover and continue cooking 10 minutes or to an internal temp of 145 degrees in the chops.

pork steak

Want a recipe? Take a look at http://blog.tempinnkeeper.com

Baked Trout with Sour Cream Parmesan Sauce

Standard

 all in one pan end result


Baked Trout With Sour Cream Parmesan Cheese Sauce

Serves 4

I love Idaho trout and yesterday, I was in the mood for just that. I also was in the mood for an easy dinner fix and that’s what this was. I sliced some new baby potatoes very thin and added some olive oil and sliced onions plus herbs and put them in aluminum foil which I folded to close. I did the same for some broccoli crowns but you could have used squash, whatever. The trout I made as this recipe calls for and left the aluminum foil open. Into the oven it all went and voila, 25 minutes later a glorious meal. I made the trout with the larger amounts written for the sauce but actually wished I had only used 1/2 of the amounts because frankly that was too much sauce for me. So, that’s why I put the amounts of the ingredients the way I did. If you like a lot of sauce use the larger amount and if you are not a huge sauce person, go for the lesser amounts.

Ingredients

  • 1 pound trout fillets
  • 1/2 to 1 cup (8 ounces) sour cream
  • 1/8 to 1/4 cup grated Parmesan cheese
  • 1/2 to 1 tablespoon lemon juice
  • 1/2 to 1 tablespoon finely chopped onion
  • 1/4 to 1/2 teaspoon salt
  • Paprika

Directions

  • Place fish in a greased shallow 3-qt. baking dish.
  • In a small bowl, combine the sour cream, cheese, lemon juice, onion and salt; spread over fish. Sprinkle with paprika.
  • Bake, uncovered, at 350° for 20-25 minutes or until fish flakes easily with a fork.

Pork Chops-stove top and baked featuring cumin and mustard; easy and delicious

Standard

cumin baked pork chop

Pork Chops—stove top and baked featuring cumin and mustard— easy and delicious

This particular recipe serves 4 however it can just serve one or more than 4 if you have a very large skillet.

Ingredients:

  • 4 8-ounch thick pork chops
  • 1 Tsp. kosher salt
  • 4 Tsp. grainy Dijon mustard
  • 2 Tblsp. crushed cumin seed or ground cumin will do as well
  • 1 Tsp. cracked black pepper
  • 1 Tsp. canola oil and another generous tsp. or more for the iron skillet (or any skillet that can be used stove top as well as in the oven)

Instructions:

  • Preheat oven to 450 degrees.
  • In a small bowl mix the salt, mustard, cumin, black pepper and 1 tsp. canola oil
  • Spread the mixture above on both sides of the pork chop
  • Stove top, heat the other Tsp. canola oil in the iron skillet
  • Put the pork chop(s) in the heated skillet and brown for 2 minutes on each side.
  • Put the skillet in the pre-heated oven and bake until the chops are just cooked through—about 12 minutes but it can be before, so watch carefully. You don’t want your chops to be tough.
  • There you go—easy and delicious.
  • Now, that you have the basic recipe, try to imagine other variations to spread on your chops and let me know what you like the best.

Bon Appétit—From Margot’s Table to Yours and http://blog.tempinnkeeper.com


Crepes, The Easy & Painless Way

Standard

# 1 crepes to eat

Crepes, The Easy and Painless Way

No measuring is daring and it can be fun. It’s certainly the quick way to cook and you might be surprised at how well you can do this.

Crepes are a good substitute for morning pancakes and they certainly are good for lunch, dinner or dessert. They are so versatile. So, it’s up to you with what you want to fill or top them: ricotta cheese and berries? Jam? Veggies and cheese? Chicken bits with a lovely sauce over it all? Or topped with a delicate orange or lemon Crepe Suzette sauce? Variations are endless and fun to invent. You can even have an array of fillings on the side and let guests or your family invent themselves. What I myself had this morning were crepes filled and topped with ricotta and fresh berries. Yum, they were delicious!

I could go on and on about fillings and toppings but what I am giving you here is just the basic crepe recipe. The trick with this recipe is to use the SAME SIZED cup or glass for placing the eggs, flour, milk and butter because you are going to eyeball your amounts within these four vessels. A vessel that holds about 2 cups (oops—I shouldn’t have said that—sorry) will make enough crepes for 4. My picture showing my vessels with the ingredients are for half of the listed ingredients i.e. 1/2 a vessel of eggs, 1/2 vessel flour, slightly less than 1 vessel full of milk & 1/8th vessel of melted butter.

I use a Teflon crepe pan but if you don’t have one, then make sure to put a little oil or butter in your pan first. I like to make sure my pan is quite hot (when an entered droplet of water sizzles). If your first crepe doesn’t turn out quite right, fear not because you’ll know whether to turn the heat up or down to make the next one right.

To keep your crepes warm, you can have a double boiler top all ready to put them in; or wrap them in foil or in a dish covered with foil in a 200F or 250F oven. I also have had left over batter which when whisked again make fine crepes the next day. You also can freeze left-over already made crepes. So see how versatile these guys are?

#2 cups full bowl whisk yes

Ingredients:

  • Eggs-1 vessel full
  • All-purpose flour-1 vessel full
  • Whole milk-1 ¾ vessel full
  • Melted unsalted butter-1/4 vessel full
  • Pinch salt
  • Pinch baking powder (optional)
  • Pinch powder sugar (optional
  • Drop or so vanilla (optional)
  • Lemon or orange zest (optional)

Instructions:     #3 crepe in pan

  • In a bowl that has a pouring spout is the best, whisk well or beat with electric beaters the eggs.
  • Add the remainder of the ingredients. Whisk or beat till you have a smooth batter.
  • Heat your crepe pan or a small size skillet. Add a bit of the batter, just enough to partially cover the bottom because then you want to roll your pan around so the batter slides smoothly over the whole pan bottom. You don’t want a thick crepe. You want a crepe that is fairly thin.
  • Cook until the edges begin to brown—anywhere from 30 seconds to 1 minute. Flip over with a spatula and cook for another 30 seconds or more. You can peek to say how brown the bottom of the crepe is getting.
  • Pile them up on your oven warmed platter and cover; or place in the top of your double boiler that is warm by boiling some water in the bottom part.


Bon Appétit —-From Margot’s Table to Yours

 Want some more recipes or small group catering: visit http://blog.tempinnkeeper.com or email Margot at margot@eyeonsunvalley.com


Onion Soup the Slow Cooker Way

Standard


onion soup 1

SLOW COOKER ONION SOUP (6 Servings)

 Here’s a yummy soup that will warm your bones, body and soul

 January here in our snowy valley is always a good time to have a repast to warm up the bones, body and soul. After a hard day’s skiing either on our BCRD cross country trails or down-hilling on Mt. Baldy, a delicious hot soup that is easy to make because most of it will be cooking while you are skiing is very desirable indeed. And by the way, you can also after caramelizing your onions, take half of them out and freeze for future use on pizzas, etc. and so just make half of this recipe for your soup.

For the caramelized onions:

  • 8 cups thinly sliced yellow onions, (about 2 very large onions or 4 medium sized ones)
  • 10 to 12 clove garlic, minced or 8 garlic minced garlic gloves and 2 thinly sliced shallots
  • 4 tablespoon olive oil or peanut oil and 2 tablespoons melted sweet butter
  • Salt and ground black pepper to taste

For the soup:

  • 1 Tablespoon all-purpose flour
  • 1/2 cup dry sherry
  • 1/4 cup white wine or white vermouth
  • 2 teaspoons fresh thyme or 1 teaspoon dried
  • Sprig fresh rosemary
  • 4 cups good beef broth (I like the Better Than Bouillon brand but there are others however, of course, the best is the one you’ve made with beef bones, etc. at home)
  • 1/2 to 1 cup mushroom broth which is different than most recipes but I like it in this soup (optional)
  • 2-3 cups water
  • 1 tablespoon lemon juice (a last minute deal option—I like it)
  • 3 egg yolks (a last minute deal option and it will make your soup a bit creamier—I like this too)
  • 6 or more thin slices baguette, toasted in a 400 degree oven until golden and quite dry and more slices for your bread basket—and you could just toast it in your toaster to make things easier.
  • 1/2 cup grated Gruyere, Parmesan, Romano, Swiss or any kind of the MUST cheese you can envision for this dish.
  • Serving idea: This wonderful soup plus a green salad, a basket of more baguette slices and a side board filled with an assortment of good cheeses and dried meats would make a great meal at any time of the day—even one to break the day’s fast.

Directions:

  • Coat a 4-quart or larger slow cooker with some melted butter.
  • Add the onions, (shallots), garlic, oil and melted butter.
  • Toss well, and then season with a bit of salt and pepper.
  • Cover and cook on low for about 5 hours, until the onions are richly colored and sweet. After the first hour toss the onions and you can do this one another time in about 3 hours if you wish. I also place a paper towel under the lid to absorb the extra moisture.
  • Once the onions are ready, sprinkle them with the flour and stir until well-combined. Then add the sherry and vermouth or white wine.
  • Then add the bouillons & water (which should be well heated in the micro) and the herbs; cover and cook for another 4 hours on low or 2 hours on high.
  • Optional: Once the soup is done, stir in the lemon juice and adjust the seasoning.
  • Optional but very good: Beat the egg yolks in a small bowl and whisk in one ladle full of hot soup and then whisk in another ladle full in that bowl. Then add this concoction to the soup.
  • Set broiler to high when ready to eat. Ladle the soup into broiler-safe serving crocks. Top each crock with a thin slice of the toasted baguette and a heaping tablespoon of Gruyere. However, see below for additional hints
  • Hints: If you wish, you can place the toasted baguette on the bottom of the crock, ladle in the soup and then top with your choice of cheese; then place it under the broiler for a moment or two. Or you can just add croutons to the top of the soup, plus the cheese and broil it. Or leave out the bread and just top with cheese however no matter what you choose broiled cheese on top is a must. Decisions, decisions, decisions—and don’t forget to remove your herb sprigs before serving.
  • Place the filled crocks on a rimmed baking sheet lined with a bit of foil for easy cleaning and broil just until cheese is golden, 1 to 2 minutes.
  • Do not leave the crocks under the broiler unattended as they will burn quickly so watch carefully.
  • Serve with more toasted baguette slices or even just oven warm slices, a side board of assorted cheeses, dried meats and a green salad and of course, a cupo of vino or yes, even a good glass of bierre. Voila—magnifique!!!!

Don’t forget to check in on Margot’s blog: http://blog.tempinnkeeper.com for more than 200 recipes.

Enchilada with South of the Border Spaghetti Squash Filling

Standard

ss enchiladas 1ss plated enchiladas

South of the Border Stuffed Spaghetti Squash Left Over or just plain made stuffing for delicious Enchiladas

Maybe you don’t want a stuffed squash and have just made the stuffing and/or maybe you have served the stuffed squash and have some left over stuffing—so here is a delicious enchilada recipe using this stuffing:

Ingredients:

  1. 1 package of hand made thick styled corn tortillas (soft and flexible)—room temp
  2. 1 10-oz. can of medium (or hot if you like) enchilada sauce
  3. 1 C (or more) of shredded Mexican Styled Cheese
  4. 1 C (or more) sour cream

Directions:

  1. Pre-heat the oven to 350F.
  2. Oil an oven proof dish (the right size for however many enchiladas you will be making.)
  3. Spread a generous amount of the enchilada sauce on each side of the tortillas before filling them.
  4. Then, fill each tortilla with the cooked spaghetti squash filling, top with a tsp. of sour cream, some more cheese, roll carefully and place rolled side down in your dish.
  5. Do these with as much filling as you have to fill the tortillas.
  6. When your oven proof dish is filled, top the tortillas with more sour cream and cheese.
  7. Bake this dish uncovered in the pre-heated oven for at least 30 minutes but NOT till the enchiladas are dried out so watch carefully.
  8. Serve with a side of chopped green cabbage that has been mixed with white wine vinegar and salt (no oil) and topped with some avocado slices.

Once again, the recipe for the Filled South of the Border Spaghetti Squash

Ingredients:

  1. 1 medium spaghetti squash, halved lengthwise and seeded (save those seeds to roast in your oven. So yummy.)
  2. 2 Tsp. olive oil
  3. 1 chopped yellow onion
  4. 1 yellow (red or orange is OK as well) pepper, seeded and chopped
  5. 2 garlic cloves-chopped
  6. One 15-oz. can black beans, rinsed in a colander with water
  7. 1/2 C. corn (I used fresh, but frozen or rinsed canned is OK as well)
  8. 1/3 to 1/2 C. chopped cilantro
  9. 1 Tblsp. lime juice
  10. 6 Tblsp. medium enchilada sauce (or more if you wish—taste it first)
  11. 1/4 to 1/2 C. chunky salsa sauce
  12. 1 tsp. salt
  13. 3/4 to 1 C. of rough shredded 4 blend Mexican cheese (or something similar)
  14. Avocado slices for top garnish (optional)
  15. Sour Cream for top garnish (optional)
  16. Corn Tortilla’s for accompaniment

Instructions:

  1. Pre-heat oven to 375. In an oven proof dish, pour 1 C. of water in the dish and place your squash halves, flesh side down, in it. Place the dish in your pre-heated oven for about 35 minutes or until a sharp knife can pierce the skin easily. Take out of oven and let the squash cool for a little bit before you rake it with a fork to remove the strands—but careful, leave the shell in tack for the stuffing. Place the squash back in your dish (which now has no water) because you will be placing the stuffing in the squash and back into the oven for a bit. Turn the oven down to 350.
  2. I used my food processor to pulse quickly into chopped pieces the items listed in #3 through #5.
  3. In a large pot, over medium heat, place the olive oil and when heated, stir in the items #3 through #5 till softened and glistening (about 5 minutes). Then add the ingredients #6 through #12 and cook till well melded for about 2 minutes more.
  4. Place the stuffing you have just created in your shells and sprinkle each with the cheese.
  5. Place your dish back in the 350F oven for about 20 minutes.
  6. Voila—delicious. If you wish to garnish with the avocado slices and sour cream go ahead and do this now. And of course, some nice warm corn tortillas make for a wonderful accompaniment. As well, I’ve noticed that these two spaghetti squash recipes I have made taste even better the next day.

ss enchiladas 1 ss plated enchiladas

South of the Border Stuffed Spaghetti Squash

Standard


close up 1 south of the border 1 very close up

South of the Border Stuffed Spaghetti Squash

Here’s another yummy spaghetti squash dish that is easy to make and healthy to eat. It’s a vegetarian dish and I hope that you will like it as much as I have.

Ingredients:

  1. 1 medium spaghetti squash, halved lengthwise and seeded (save those seeds to roast in your oven. So yummy.)
  2. 2 Tsp. olive oil
  3. 1 chopped yellow onion
  4. 1 yellow (red or orange is OK as well) pepper, seeded and chopped
  5. 2 garlic cloves-chopped
  6. One 15-oz. can black beans, rinsed in a colander with water
  7. 1/2 C. corn (I used fresh, but frozen or rinsed canned is OK as well)
  8. 1/3 to 1/2 C. chopped cilantro
  9. 1 Tblsp. lime juice
  10. 6 Tblsp. medium enchilada sauce (or more if you wish—taste it first)
  11. 1/4 to 1/2 C. chunky salsa sauce
  12. 1 tsp. salt
  13. 3/4 to 1 C. of rough shredded 4 blend Mexican cheese (or something similar)
  14. Avocado slices for top garnish (optional)
  15. Sour Cream for top garnish (optional)
  16. Corn Tortilla’s for accompaniment


Instructions:

  1. Pre-heat oven to 375. In an oven proof dish, pour 1 C. of water in the dish and place your squash halves, flesh side down, in it. Place the dish in your pre-heated oven for about 35 minutes or until a sharp knife can pierce the skin easily. Take out of oven and let the squash cool for a little bit before you rake it with a fork to remove the strands—but careful, leave the shell in tack for the stuffing. Place the squash back in your dish(which now has no water) because you will be placing the stuffing in the squash and back into the oven for a bit. Turn the oven down to 350.
  2. I used my food processor to pulse quickly into chopped pieces the items listed in #3 through #5.
  3. In a large pot, over medium heat, place the olive oil and when heated, stir in the items #3 through #5 till softened and glistening (about 5 minutes). Then add the ingredients #6 through #12 and cook till well melded for about 2 minutes more.
  4. Place the stuffing you have just created in your shells and sprinkle each with the cheese.
  5. Place your dish back in the 350F oven for about 20 minutes.
  6. Voila—delicious. If you wish to garnish with the avocado slices and sour cream go ahead and do this now. And of course, some nice warm corn tortillas make for a wonderful accompaniment. As well, I’ve noticed that these two spaghetti squash recipes I have made taste even better the next day.