Category Archives: 12. Holidays

Chocolate Pear Custard Tart

Standard

hb tart lois decortart crust forked tart w.no decor

Above on your left is the tart decorated for Lois A. 90th B-D. Besides the bought decorations I used some violets from my garden.

The middle picture shows the crust, pierced and ready to go in the oven briefly.

The right picture shows the tart undecorated.

Chocolate Pear Custard Tart

This is truly DELICIOUS. It’s hard to stop eating it. It’s somewhat time intensive to make, but truly worth it. If you don’t decorate it, it looks a little bland so I do suggest placing some little eatable flowers on top or something else to make it look a bit more appealing. I have doubled this recipe and used a 13X9 Pyrex dish; it worked out just fine but I did bake it somewhere between 45 to 60 minutes. Remember, I am in altitude so for your first baking it’s a watch and see mode.

HINT: Poach the pears first; then do the custard; then make your crust; then put the whole deal together and bake; then cool. Told you it’s a bit time intensive but believe me it’s worth it.

Ingredients and hints for the pears:

For the pears that will go on top of the crust please do the following and do this before making the crust:

  1. 6 (or more) UNPEELED Bartlet pears, halved, cored and sliced into half-inch slices. The pears can be semi-ripe but not mushy!
  2. Poach 4 of the pears according to my recipe on this blog. Use the method on top of the stove and I did put in currents.
  3. Save the extra 2 sliced unpeeled and un-poached pears for the last topping to go on top of the poached pears before you pour the chocolate custard sauce over all.
  4. Also, what I did was to buy extra pears and I poached them as well. So, when I served the tart, I also served a separate bowl of poached pears for those who are gluten intolerant. Of course I also served my no-churn homemade ice cream. YUM!!!!!
  5. Mix some sugar and cinnamon together to sprinkle on the extra 2 pears you will be placing on top of the poached pears before you pour the chocolate custard sauce over all.


Ingredients for the chocolate custard:

  1. 1/3 C. semisweet chocolate chips
  2. 2 Tblsp. unsalted butter, melted
  3. 1/4 C. plus 2 Tblsp. whole milk
  4. 1 Tsp. almond extract
  5. 1/2 Tsp. salt
  6. 1 egg and 1 egg yolk
  7. 3 Tblsp. granulated white sugar
  8. 3 Tblsp. all purpose flour
  9. 2 Tblsp. unsweetened cocoa powder (I always buy the best for this)

Directions for the custard:

  1. Combine the butter and chocolate in a small saucepan over low hear, stirring until totally melted. Sir in the milk, almond and salt. Set aside.
  2. Combine the egg, yolk, sugar, flour and cocoa powder in the food processor or mixer bowl and process for about 2 minutes. Pour in the milk and chocolate mixture and continue to process until smooth and completely incorporated. Set aside for a bit.


Ingredients for the Crust:

  1. 1 package of Walker’s plain shortbread cookies
  2. 1 large egg
  3. 4 Tblsp. butter, melted and cooled
  4. 1/2 C. all purpose flour
  5. 1/3 C. granulated white sugar
  6. 1 Tsp. almond extract


Directions:

  1. Prepare the crust:
  2. Preheat oven to 350 degrees
  3. Place shortbread cookies in food processor and process until finely ground.
  4. Add the egg, melted butter, flour, sugar, salt and extract and process again until a soft, buttery dough forms.
  5. Remove dough, roll into a ball, wrap in plastic and chill in frig. for 20 minutes.
  6. Press the chilled dough into a greased 13” by 4” or a 9” round tart pan and score all over with a fork.
  7. Place tart pan on a cookie sheet and blind bake in the oven for 7 minutes.
  8. Remove from oven and let cool.
  9. Now you can place the poached pears on top of the crust and after you have done that, place the last 2 sliced unpeeled pears skin side up in a nice pattern. Sprinkle those with a bit of your mixed cinnamon/sugar.
  10. Pour the custard over all.
  11. Bake in your still heated 350 degree oven on the cookie sheet for 25 minutes or till the custard is set, firm and the crust is slightly golden.
  12. Let cool completely before serving.


Shrimp Bruschetta with Arugula and Wine

Standard

Shrimp Bruschetta with wine and arugula


Ingredients

Baguette slices or toast points

Topping:
3 tablespoons olive oil
1 large or 2 small shallots, thinly sliced
1 clove garlic, chopped
1 pound extra-large shrimp, peeled and deveined
Kosher salt and freshly ground black pepper
6 Roma tomatoes, chopped
1/4 cup white wine
1/4 cup low-sodium chicken stock
3 tablespoons chopped fresh tarragon leaves
1 packed cup arugula, chopped
1/2 cup mascarpone cheese, at room temperature

Directions

For the toasts or baguette slices: Put an oven rack in the center of the oven. Preheat the oven to 400 degrees F.
Arrange the bread/baguette slices in a single layer on a baking sheet and drizzle with olive oil. Bake until light golden, about 10 minutes. Cool for 2 minutes. Rub the warm toasts/baguette slices with the cut side of the garlic. Set aside.

For the topping: In a medium skillet, heat 3 tablespoons of oil over medium-high heat. Add the shallots and garlic and cook, stirring frequently, until soft, about 2 minutes. Season the shrimp with salt and pepper, to taste, and add them to the skillet. Cook until the shrimp are pink and cooked through about 3 to 4 minutes. Remove the shrimp and chop into 1/2-inch pieces. Set aside.

In the same skillet, add the tomatoes and season with salt and pepper, to taste. Cook over medium-high heat until the tomatoes start to soften, about 4 minutes. Turn the heat to high. Add the wine and scrape up the brown bits that cling to the bottom of the pan with a wooden spoon. Cook for 2 minutes. Stir in the stock and cook until most of the liquid has evaporated, about 2 minutes. Remove the pan from the heat and add the tarragon, arugula, mascarpone cheese, and chopped shrimp. Stir until the mixture is creamy. Season with salt and pepper, to taste.


Arrange the toasts/baguette slices on serving plates and drizzle with the sauce. Sprinkle with salt and pepper before serving.


The One Dish Oven Roasted Salmon with Asparagus, Fingerling Potatoes and Sliced Lemons

Standard

salmon dish ready to eat  salmon roasted,plated

The One Dish Oven Roasted Salmon with Asparagus, Fingerling Potatoes and Sliced Lemons

Serves 4

Oh my—so easy and so delicious. It’s a country style dish— not quite the elegant dish that my previous oven poached salmon presents however in a different way, every bit as excellent and certainly a bit more economical. This time I bought a nice fresh flown-in salmon fillet for $6.99/lb. It weighed a little more than 1 lb.; it was not super thick but just perfect for the making of this one dish meal.


Spring time does bring some of the best foods around such as the fresh salmon from WA and Alaska; and then there is the fabulous fresh asparagus that appears. Lucky are we that there is a continual wonderful array of lemons, dill and fingerling potatoes that arrive in our markets for us to purchase. We are so spoiled; sometimes I really feel guilty being able to enjoy these feasts on a daily basis. I truly think about those in other parts of this world who are going hungry—no food for them—no glorious markets and displays for them. I think about that a lot however, that doesn’t stop me from writing these recipes for all of us to enjoy. So, here I am with another yummy recipe for you to cook for your family and friends—and maybe when enjoying your repast, you could send out a little prayer for those who aren’t fortunate enough to be able to enjoy a repast such as this. Sorry to have become maudlin but I do think that prayers are important. Enough Margot—-and on to the good stuff!!!!


Ingredients:

  1. 1 lb. plus a bit more if you wish of a nice fresh salmon fillet—skin on
  2. 1 lb. fingerling potatoes, washed and cut in half
  3. 4 Tbsp. olive oil divided in two parts plus some more
  4. 1/2 lb. asparagus—medium sized- washed, ends trimmed (if you wish you can cut the asparagus in 1-inch pieces but I like to leave them whole. If your asparagus are pencil thin and in particular if you have cut them they may only need 12-15 minutes of baking so you might have to add them a bit after you’ve added your salmon and then continue cooking the dish.)
  5. 1 Tbsp. chopped fresh dill
  6. 1 strip of lemon zest and 1 tsp. grated lemon zest
  7. 1 garlic clove, coarsely chopped
  8. S&P to taste
  9. 1 lemon sliced thin
  10. 1 other lemon for garnish—cut into wedges
  11. Dill sour cream sauce if desired (combine 1/4 C. sour cream with 1/2 tsp. dill and 1 Tsp. lemon juice; I like it plain like this but if you insist, you could add a bit of Dijon)


Directions:

Place the asparagus, lemon slices, 2 Tbsp. olive oil, 1 Tbsp. chopped dill, 1 Tsp. grated lemon zest, garlic and a bit of salt in a plastic bag, close, shake and let marinade for at least 20 minutes up to 30 minutes. I also add a bit of my Gomasio (a sesame seed splash) to this mixture. For the Gomasio recipe please refer to my roasted vegetables on my blog: http://blog.tempinnkeeper.com

asparagus marinating

Preheat oven to 400F.

In a large Pyrex baking dish, place the cut potatoes with 2 Tbsp. olive oil and a bit of salt. Stir well and place in oven for about 10 minutes fingerlings in dish to roast
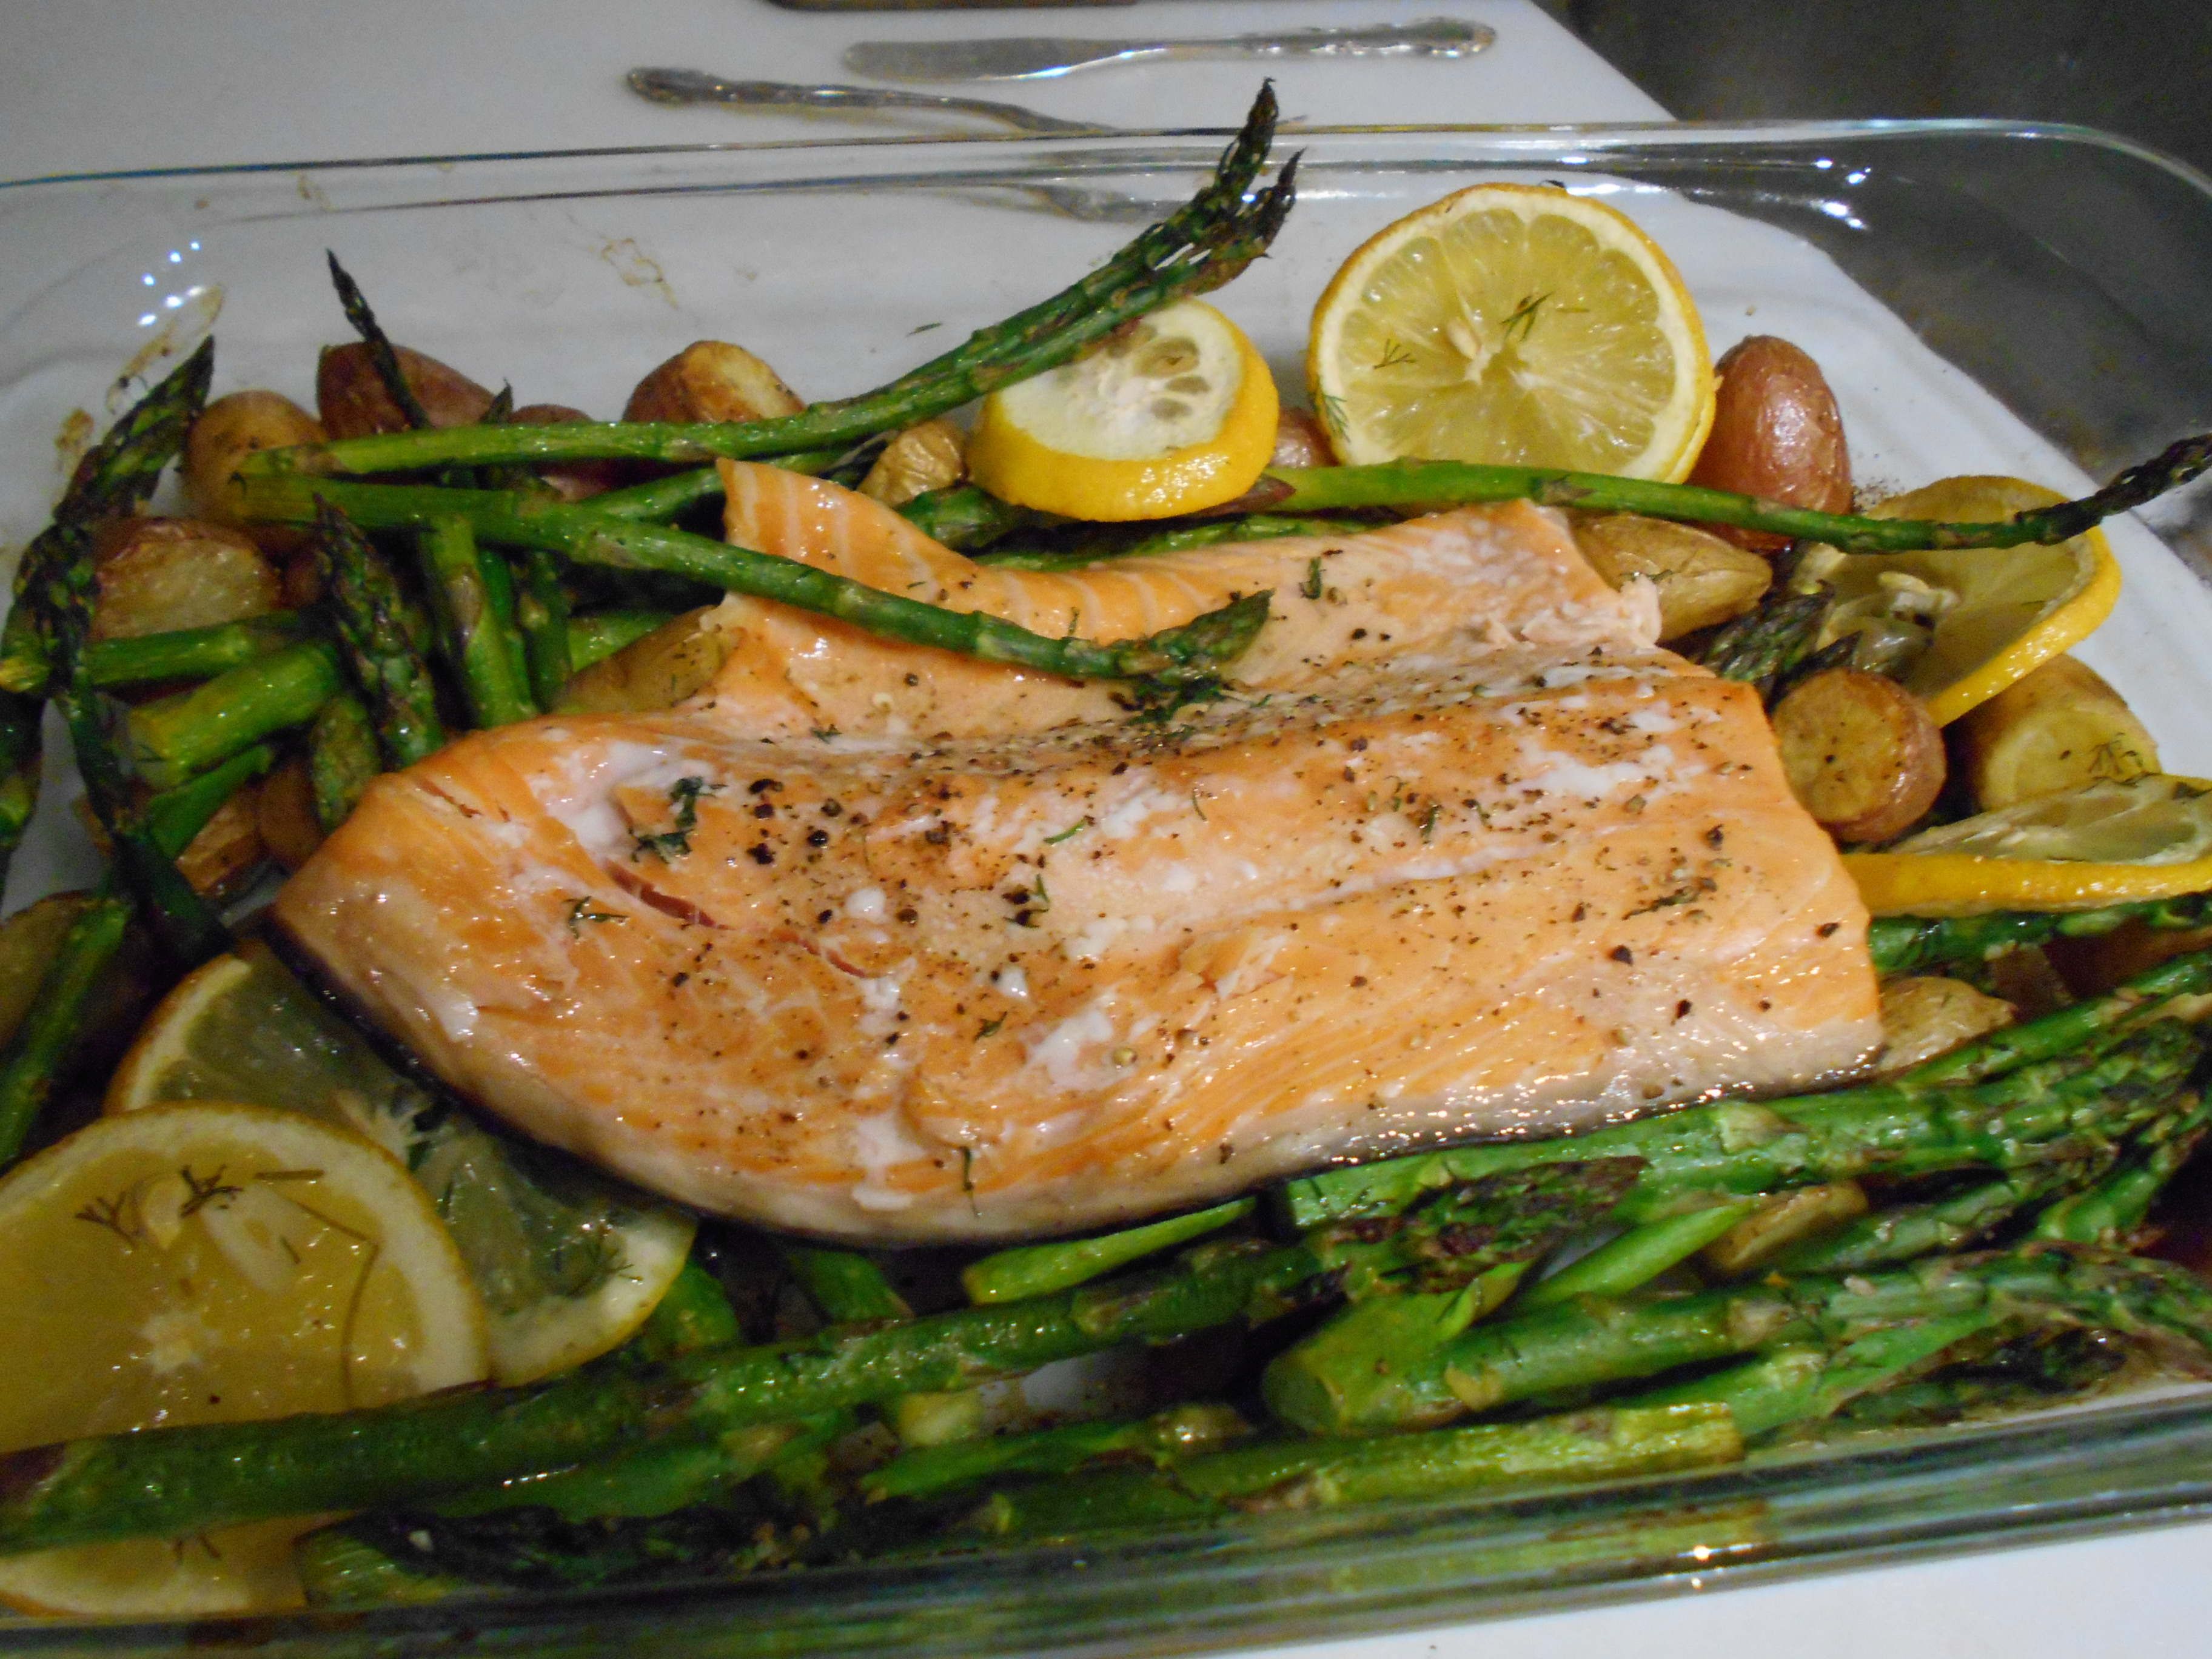
or until the potatoes begin to brown a bit. At this point, shake the dish and roast the potatoes for another 10 minutes.Take the dish out of the oven, push aside the potatoes to the side and place the asparagus mixture in the dish and mix it all; then place the salmon, skin side down, on top of all and brush some olive oil on top of the salmon.Isalmon,etc. in dish ready to go in ovenI roasted my 1 lb. plus a bit salmon for about 20 minutes. (See below for further baking instructions for salmon.) The salmon was divine, the asparagus not too done and the potatoes were perfect. I did serve the sour cream sauce (minus the mustard addition) with the dish. Also, before serving the salmon, if you wish, lift it off the skin with a metal spatula.

All in all, it was a delicious and easy dish to serve.

And best of all, the next day I had the Real Deal Caesar with the left over salmon, etc.


caesar,salmon,asparagus,potatoescaesar salmon lemmon


Please see below for “good rule of thumb’s “rules for baking salmon:

  • A good rule of thumb is that the salmon will bake about ten minutes per one inch thickness of your fillet. A two-inch thick fillet will bake for 20 minutes. A 1-1/2 filet will take 15 minutes and so on.
  • Check the salmon frequently. Start checking at about 10 minutes, and keep checking until the flesh of the fish is just barely an opaque pink.
  • As previously mentioned, salmon baked in a closed packet – whether parchment, foil or a covered dish – is likely too cook a bit more quickly. Check it starting at about ten minutes and re-cover the fish before continuing.
  • Remove the salmon from the oven as soon as the flesh becomes opaque. Serve immediately.

Cajun Shrimp Bruchettas

Standard

 Cajun Shrimp Bruschetta
Make the sauce the day before and refrigerate for the ingredients to meld well.
Serve on bruchettas or some good crunchy crackers; if you wish, spread some whipped cream cheese before topping with the sauce; be sure to place one good sized basil leaf as the very last topping.
Ingredients for sauce:
1. 1-2 tblsp. olive oil
2. 2 stalks celery, finely chopped
3. 1 small onion, finely chopped
4. 2 or 3 small garlic cloves minced
5. S&P to taste
6. Cayenne to taste
7. 1/4 C. finely chopped Basil
8. 3/4 to 1 C. bay shrimp—chopped
9. 1 C. canned crushed tomatoes or 3-4 fresh finely chopped Roma tomatoes

Ingredients needed for the finished product
a. Whipped cream cheese to spread on bruschettas before putting the shrimp mixture on.
b. Bruschettas that you have made or bought
c. Whole basil leaves for very last topping

Directions:
1. In a medium sized frying pan, sauté the celery, onion and garlic. Season with S&P and cayenne to taste.
2. Add the chopped basil, chopped shrimp and the canned crushed tomatoes if you are using that or the fresh chopped tomatoes if you are using that. Sauté over low heat uncovered for 5-10 minutes.
3. Place sauce on bruschettas or some nice crackers which, if you wish, have been spread first with whipped cream cheese; top it all with a large whole basil leaf.
4. Serve and enjoy.

Below are 2 ways to make your bruschettas: (PS—this is an Italian word so the “ch” is pronounced as a “k” for a totally correct pronunciation. )
1. Preheat oven to 450.
2. Slice the baguette on a diagonal into about 1/2 inch thick slices. Using a pastry brush, coat one side of each slice with olive oil. Place slices on a cooking sheet, olive oil side down. You will want to toast them in the top rack in your oven, so you may need to do these in batches depending on the size of your oven and baking sheet. Place the tray of bread slices in the 450 degree oven on the top rack. Toast for 5-6 minutes, until the bread just begins to turn golden brown. Watch carefully so they don’t burn. Serve olive oil side up.
3. Alternatively, you can toast the bread without coating it in olive oil first. Toast on a griddle for 1 minute on each side. Take a sharp knife and score each slice 3 times. Rub some garlic in the slices and drizzle half a teaspoon of olive oil on each slice. This is the more traditional method of making bruschetta.

Bread Pudding with Whiskey Sauce

Standard

DSCN0471

Bread Pudding with Whiskey (or whatever flavor you prefer) Sauce
Serves 8 to 10 serving
Ingredients:
• 1 pound loaf Soft French Bread Loaf or Challah bread,( crusts trimmed if you wish however I don’t do that), bread cut into 1-inch cubes.
• 8 eggs
• 1 ½ C. whipping cream
• 2 ½ C. whole milk
• 1 ¼ C. sugar
• Optional: Some whole caramelized (by you) pecans to add after you have baked the dish
• Optional: 1 drained can of fruit cocktail if you wish to make it “Deep Southern”. Sprinkle the fruit on the pre-baked pudding after you have poured the custard over it. Then press down all to make sure all is submerged. When serving in this manner, place a mint leaf on top of all.

Directions for Bread Pudding:
• Preheat oven to 350 degrees DSCN0473
• Lightly butter a 13X9X2-inch baking dish
• Arrange the bread cubes in the prepared dish
• In a large bowl, whisk the eggs, cream, milk and sugar to blend.
• Pour the custard over the bread cubes, and press the bread cubes gently to submerge.
• Let stand for 30 minutes, occasionally pressing the bread cubes into the custard mixture.
• Cover and refrigerate for at least 2 hours up to overnight.
• After 2 or more hours, remove dish from frig. and bring up to room temp.
• Bake until the pudding puffs and is set in the center, about 45 minutes. Here in our altitude it took almost 60 minutes.

Ingredients for your sauce:
• ½ cup whipping cream
• ½ cup whole milk
• 3 tablespoons sugar
• ¼ cup amaretto or whatever liquor you prefer
• 2 teaspoons cornstarch

Directions for the sauce:
• Bring the cream, milk, and sugar to a boil in a heavy small saucepan over medium heat, STIRRING FREQUENTLY.
• In a small bowl, mix the amaretto and cornstarch to blend and then whisk into the cream mixture.
• Simmer over medium-low heat until the sauce thickens, STIRRING CONSTANTLY, about 2 minutes.
• Set aside and keep warm.
• This sauce can be made 3 days ahead. Cover and refrigerate and re-warm before serving.

End result:
Spoon the bread pudding into bowls, drizzle with the warm amaretto sauce, serve, and don’t plan for any left-over’s.


Ground Lamb, Greens and Cheese Puff Pastry Torte

Standard

ground lamb and greens puff pastry tart

Ground Lamb, Greens and Cheese Puff Pastry Torte

Serves 6 to 8


It was the time of the Trailing of the Sheep Fest here in Ketchum, ID and just the sound of the baaaa’s made me hungry for a little lamb.  So, I found some nice ground lamb at Atkinsons’s and inspired by a recipe from my “Puff” cookbook by Martha Holmberg, I made this yummy dish.  Ground lamb is usually not that cheap but honestly, when you consider that I had so many servings of it for myself and even for a guest one evening, I bet that I didn’t spend more than $2.00 a night for my healthy and lovely meals.  I had a little salad on the side and a bit of my homemade coffee ice cream accompanied by our tasty fall pears; the whole repast was perfect. And by the by, I did have this dish several nights in a row and did NOT get tired of having it—because it was so light and flavorful.


This is a 3 part recipe—one for the lamb filling, one for the greens and one for the puff pastry assembly:


Ingredients for the lamb filling:

  1. 3/4 lb. to 1 Lb. ground lamb
  2. 2 Tblsp. for the lamb browning and another 2 Tblsp. olive oil for the sauce
  3. S&P
  4. 1 small onion, finely chopped
  5. 4 garlic cloves, minced
  6. 1/2 C. white wine or vermouth
  7. 1 C. chicken broth
  8. 1-14 oz. can whole tomatoes, drained HOWEVER RESERVE 1/4 C. of juice for later use
  9. 1-5 inch. sprig of fresh rosemary or 1 Tblsp. dried
  10. 1/4 Tsp. nutmeg
  11. 1 Tsp. balsamic vinegar
  12. 6 drops Tabasco or more according to your taste
  13. 3/4 C. plain breadcrumbs
  14. 1/3 C. finely grated fresh Parmesan
  15. 2 Tblsp. chopped oil-packed sun-dried tomatoes (optional)

Directions for the lamb filling:

  1. Heat 2 Tblsp. of the olive oil in a large skillet over medium heat.  Add the lamb, breaking it up so that there are no large pieces.  Season with S&P and cook till it’s no longer pink.  Remove the lamb and set aside.  Pour off the remaining grease.
  2. Add the remaining 2 Tblsp. oil to the skillet and place on medium-high heat.  Add the onion and cook stirring until very soft and fragrant—but don’t let brown (about 5 minutes). Add the garlic and cook for 30 seconds.  Add the wine and boil till the mixture is glazed (about 1 minute). Add the chicken broth, tomatoes and the 1/4 C. reserved tomato juice, rosemary sprig and 1/4 tsp. nutmeg.  Adjust heat to a lively simmer and cook until it has a nice thick consistency—like a marinara sauce (10-15 minutes).
  3. Remove from the heat, stir in the lamb, balsamic vinegar, hot sauce, breadcrumbs, Parmesan and optional sun-dried tomatoes.  Taste and adjust the seasoning with more salt, vinegar or hot sauce.  Set aside and if you wish this can be refrigerated and saved till the next day.


Ingredients for the greens:

  1. 1 Lb. (roughly) fresh Swiss chard, kale or spinach
  2. 1 Tblsp. olive oil
  3. S&P
  4. 1 Tblsp. sweet butter
  5. 1 Tblsp. all-purpose flour
  6. 1/4 C. half and half
  7. 1/4 Tsp. nutmeg
  8. 1 egg, well beaten

Directions for the greens:

  1. Clean well and rough chop the greens.
  2. In a large skillet or wok, heat the olive oil over medium-high heat, add the greens and toss with tongs until wilted; cook them until tender. Hint: if you are using kale, it will take longer than the chard or spinach, the latter which will take the least amount of time.  Squeeze out the juice from the greens by pressing against the side of the pan and pouring off the juices.
  3. Over medium heat add the butter to the greens in the skillet/wok and toss to blend ; then add the flour and toss to blend; add the half-and-half stirring frequently until the greens are coated by a nice creamy sauce (2-3 minutes).  Season with S&P to taste and nutmeg.  Taste, adjust the seasoning and stir in the well beaten egg.

Ingredients for the final assembly:

  1. One sheet puff pastry, unthawed—per package directions
  2. 1 C. crumbled feta or 1 C. grated parmesan plus 1/4  to  1/2 C. chopped ricotta—your choice
  3. 1 plum or juicy tasty tomato, thinly sliced
  4. 1-10” Pyrex pie dish or something similar which is oven proof (you don’t need to pre-oil)

Very Final Directions:

  1. Pre-heat oven to 375 degrees.
  2. On a lightly floured board, roll one sheet of pastry into a 14-inch square and transfer to your pie dish with the pastry edges sticking over the pie dish.
  3. Spread the bottom of the pastry with 1/2 of the cooled lamb filling ; spread half of the cheese of your choice next; top with the greens then repeat these layers once again ending with the greens and very lastly finishing with the sliced tomatoes.
  4. Crimp the edges from the pastry over the filling.
  5. Bake for 55 to 60 minutes till filling is hot and edges are browned; let it rest about 15 to 30 minutes before serving.
  6. If you have left over’s, you can reheat the remainders in the dish at the same oven temp for about 20 minutes.
  7. You can also pre-make the sauce and the greens without the final addition of the egg the day before and then add the egg to the greens and assemble it all the next day.
  8. If you wish to make it into a real pie, you can unthaw and roll out the second sheet of puff pastry and use that as your topping.  I frankly like the open face look and feel that the extra crust is unnecessary both for pretty presentation and calories.  However, if you choose to place a top crust, make sure to make slits in it  for the steam to escape before baking and cut the baking time by 10 to 15 minutes.

Eggs in Mini Pumpkins with Squash or Sweet Potato Hash

Standard

Eggs in Mini Pumpkins with Squash or Sweet Potato Hash

mini-pumpkin, egg and squash hashegg in mini pumpkin w sweet potato hash

Serves 4

Left picture with squash; right one with sweet potato

This is probably not a dish that you will make more than once or twice a year, but for around Halloween or Thanksgiving, it’s a colorful and yummy dish with which to surprise your family and overnight guests for a breakfast or brunch. It’s a pretty and unique dish to serve and I think just plain memorably fun.

Ingredients:

  1. 4 mini orange pumpkins (4 inches in diameter) which you’ve cut about 1/3rd of the way down, seeded and spoon-scraped clean the insides so that an egg will fit in nicely. The pumpkin inner flesh is delicious to eat with the egg. SAVE THE TOPS FOR DÉCOR and if they have a stem, all the better.
  2. 1-2 Tblsp. olive oil for the frying pan
  3. 1 small package cut up fresh squash and cut up even smaller by you into 1/2 inch diced pieces or 1 sweet potato peeled and coarsely shredded or grated.
  4. 1/2 C. onion or shallot, minced
  5. 1 red pepper cut longwise into slender strips
  6. 1/2 C. uncooked bacon, diced or Black Forest ham diced
  7. 1/2 C. olive oil
  8. 1/4 C. balsamic vinegar
  9. 1-2 Tsp. red chili flakes
  10. 2 cloves garlic, minced
  11. 2 Tblsp. fresh sage or rosemary, minced
  12. S&P
  13. 4 large eggs

Instructions:

  1. Preheat oven to 375 the day of serving.
  2. In a small bowl whip together the olive oil, vinegar, chili flakes, garlic cloves and sage or rosemary. Reserve about 2 Tblsp. to either brush on the bottom of the pumpkins before placing in an egg or to drizzle on top of your egg when the egg is cooked.
  3. In a medium sized frying pan, heat up the 1-2 Tblsp. olive oil and sauté the onion or shallot along with the red pepper strips until both are softened (about 5 minutes).
  4. Add the vinaigrette to the onion/red peppers and quickly add the sweet potato or squash; gently stir everything so well mixed.  Cook over medium heat, stirring occasionally, uncovered until softened and tasting pretty good (about 10 minutes).  At this point you can put a lid over the skillet to keep warm until you serve your egg/pumpkin or you can refrigerate it and reheat it with the pumpkins and eggs when you cook them. If you refrigerate the hash, let it come to room temp before putting in the oven with the pumpkins. Baking the hash in the oven will crispen the hash and you may prefer it like that.
  5. The day of serving, for the pumpkins, line a baking sheet with foil and place them on the foil lined baking sheet, cut side down.
  6. Bake the pumpkins on the sheet for 15 minutes. Remove from oven.
  7. Turn the pumpkins right side up on your baking sheet and if you wish, brush the inside of the pumpkins with a little of the leftover vinaigrette and season with S&P or save the vinaigrette for top of the egg drizzle when the egg is cooked. Crack one egg into the center of each pumpkin and if you wish to have a crisper hash or need to reheat your room temp hash, single layer that around your pumpkins.
  8. Return the baking sheet to the oven and continue baking until the eggs are almost set—around 15 minutes.  Start keeping a close eye on them about 10 minutes on and remember that when the pumpkin is out of the oven, the eggs will cook a bit more inside the hot pumpkins.
  9. To serve: Spoon the hash onto plates and nestle the pumpkins in the center. Lean one pumpkin top on the side of each pumpkin.  Drizzle a bit of the vinaigrette on top of the egg if you desire.

Lavender (Or Not) Puffs

Standard

Lavender (or Not) Puffs

Makes 3 dozen cookies

IMG_3890
lavender

(Puff in foreground of plate pictured above)

Here’s is cookie that everyone likes.  And—it’s so very easy to make.  It also freezes well.  So what more can you want———Furthermore, you can make them without the lavender.

Ingredients:

  1. 1 ½ C. all purpose flour
  2. 1/2 C. Cornstarch
  3. 1/4 Tsp. salt
  4. 1 Tsp. culinary lavender buds
  5. 1/4 C. confectioners/powdered sugar
  6. 1 Tsp. vanilla extract (the real thing is sure better than the imitation kind)
  7. 1/4 to 1/2 C. powdered sugar for last minute dusting

Instructions:

  1. In a medium sized bowl whisk together the flour, cornstarch, salt and lavender buds.
  2. In another medium sized bowl, beat the butter and sugar until creamy and smooth (about 2 minutes).
  3. Beat in the vanilla extract and then add the flour mixture and beat until just incorporated.
  4. Cover and put in the refrigerator for an hour until batter is firm. If it seems to firm when you have removed it from the refrigerator, let it sit out for a bit.
  5. Pre-heat oven to 350 and line cookie sheets with parchment paper.
  6.  Form 1-inch balls and place on your prepared cookie sheets about 1-inch apart.
  7. Bake for about 10-14 minutes (mine took 12 minutes here in Sun Valley) until the edges just start to brown.
  8. Remove from the oven and place on wire racks that have been placed above paper towels to cool for about 3-5 minutes.
  9. Put the extra powdered sugar in a fine strainer/sieve and sprinkle the tops of the cookies with the sugar.
  10. Place in an airtight container and they will keep for a couple of weeks.  I froze mine and they taste just fine out of the freezer.  You may want to refresh the powder sugar dusting before serving if they had been frozen.

Victorian Lavender Cookies with Rose Water Icing

Standard

Victorian Lavender Cookies with Rose Water Icing

Makes 4 dozen cookies

(In the left picture, shown in the foreground and not those with the jam)

 margot 244 (2) lavender

This is another cookie that I served at the Sept. 22, 2013 Sun Valley Harvest Festival’s Grand Tasting.  It was a big hit.  The combination of the lavender and rose water is so beautiful and tasty.  I have frozen these cookies with the icing and they taste just fine; however the rose water icing doesn’t seem to have as strong a smell as when first put on but it still tastes like rose water.

Ingredients for the cookies:

  1. 1/2 C. Sweet Butter
  2. 1 C. Bakers Sugar
  3. 2 Eggs
  4. 1 Tsp. Culinary Lavender, crushed
  5. 1 ½ C. flour
  6. 2 Tsp. Baking Powder
  7. 1/4 Tsp. Salt

Directions for the cookies:

  1. Preheat oven to 375.
  2. Cream together the butter and sugar. Add the eggs and lavender.
  3. Whisk the flour, baking powder and salt together and add to the butter, etc. mixture.
  4. Drop by teaspoons onto a cookie sheet that has been lined with parchment paper.  I lined mine 3 across because they do spread out flat-about 2” or so.
  5. Bake for about 10 minutes.  Watch carefully to see that the bottoms don’t get too brown.  Mine here took about 8-9 minutes.
  6. Let cookies sit a minute on the cookie sheet and finishing cooling them on racks.

Ingredients for the Rose Water Icing: (I started with ½ of this recipe and that’s about all I used.  You may want more though.)

  1. 2 C. Powdered Sugar
  2. 5 ½ Tsp. water
  3. 6 ½ Tsp. Rose Water (can be procured at Atkinsons’-about $5)

Icing Directions:

  1. In a small bowl, mix the powdered sugar with the water and rose water.

Finishing Directions:

  1. When the cookies have cooled, drizzle over them the icing.


Lavender Shortbread Bites

Standard

lavender

Lavender Shortbread Bites

Makes about 40 square 1 inch bites

 Here’s an easy and yummy recipe to make for all the little goblins that come visiting you on Halloween or anytime for that matter.  You don’t have to put in lavender, however I did and presented this as an appetizer course at my presentation at the Sun Valley Harvest Festival’s Grand Tasting last Sept. 22nd.  I thought that the lavender gave it a nice little tasty twist but use your imagination for another like ingredient if you wish such as cinnamon, rosemary, etc.

 Ingredients:

  1. 1 ¼ C all-purpose flour
  2. 3 Tblsp. sugar
  3. 1/2 C. butter at room temp is best (1 cube and I used salt-free)
  4. 2 Tsp. dried lavender
  5. 2-3 Tsp. Lemon zest (or grated lemon rind-finely or not is up to you.)
  6. Sifted powder sugar for final dusting when bites are done

Directions:

  1. Preheat oven to 325.
  2. In a medium bowl, whisk the flour, sugar, lavender and lemon till blended.
  3. Using a pasty cutter or two knives, cut the butter into the dry, lemon, lavender ingredients till the mixture resembles fine crumbs and starts to cling.
  4. Form mixture with your hands into a ball and knead till smooth (this won’t take long).
  5. Roll or pat dough on a cookie sheet that has been lined with parchment paper.  I patted the dough on the cookie sheet sized parchment paper on my counter top and placed some saran rap (or another piece of parchment paper would do) on top. I then rolled the dough to my desired thickness.  The recommended rolled size could be anywhere from 8 X 5 inches to 12 X 10 inches.  I do the 12 X 10 inches but if you want thicker cookies, your roll size should be smaller.  When you have finished rolling the dough, place the bottom parchment paper with the dough on your cookie sheet. Discard the top saran rap sheet. Then cut/score through the dough into the size cookies you wish.  I made 1” bites.
  6. Place the cookie sheet in the oven and bake for about 18-20 minutes or till lightly browned on top.
  7. Remove from oven, let sit for just a bit and then break the bites apart gently and transfer them to a wire rack to cool.  If you place some paper towels or something similar under the wire rack, it’ll be a breeze to dust them with the powder sugar if you wish to do that.
  8. Store the bites in a tightly covered container for up to 3 days or in the freezer for up to 3 months (thaw before serving).
  9. Try hard not to eat them all at once.