Tag Archives: dinner

Mediterranean Stuffed Spaghetti Squash

Standard

mediterrean spaghetti squash close up mediterrean spaghetti squash

Mediterranean Stuffed Spaghetti Squash

Serves 4

Easy on the belly and good besides—that’s what this dish presents. You don’t have to add the shrimp so it can be a totally vegetarian dish. I also have another recipe that uses this kind of squash, so be on the look out for that. It’s a south of the border version.

Ingredients:

  1. One spaghetti squash, halved lengthwise and seeded (I save the seeds to roast in a 400 degree oven. I let the seeds dry and then sprinkle them with olive oil and red pepper flakes. It takes about 20-30 minutes to roast them.)
  2. 2 Tblsp. olive oil
  3. 1 onion-chopped
  4. 2 garlic cloves minced
  5. One 14.5 oz. canned dice tomatoes including its’ juice. (The can I used also included oregano, garlic and basil.)
  6. 1/2 C. chopped artichoke hearts (I used the slightly marinated kind.)
  7. 3 Tblsp. sliced black olives (I used the slightly marinated kind.)
  8. 2 Tbslp. chopped fresh basil
  9. Medium sized cooked deveined shrimp, defrosted, tail taken off—I used about 15 (Optional)
  10. 3/4 to 1 C. crumbled feta cheese

Instructions:

  1. Preheat oven to 375 degrees.
  2. In an oven proof dish, put in 1/2 to 3/4 C. water and place the 2 squash halves, flesh side down, in your dish. Bake about 35 minutes in the preheated oven. You can check at 30 minutes however the squash is done when you are able to insert a sharp knife with little resistance. When the squash is done take a fork to rake the flesh into your “spaghetti”. Be careful not to rake through the skin because you are going to use that for the stuffing.
  3. Meanwhile, in a large deep pot heat the olive oil and when heated, put in the onion. Sauté till it has softened. (about 5 minutes) Add the garlic and sauté for about 2 more minutes. Stir in ingredients number # 5 through # 8, place a lid on the pot and let the sauce simmer for 10 to 15 minutes.
  4. If you are using the shrimp, now’s the time to put them in the sauce for 3 or so minutes or till they are heated through.
  5. Add the feta last and stir it in quickly.
  6. Spoon the sauce into your squash halves. I surrounded mine with some cold marinated hot Italian styled red peppers which I thought tasted quite good with this.
  7. If you wish, you can serve some crusty hot French bread with this. And of course a nice crispy light white wine would be nice to have as well. But even red is good with this dish.


Chocolate Pear Custard Tart

Standard

hb tart lois decortart crust forked tart w.no decor

Above on your left is the tart decorated for Lois A. 90th B-D. Besides the bought decorations I used some violets from my garden.

The middle picture shows the crust, pierced and ready to go in the oven briefly.

The right picture shows the tart undecorated.

Chocolate Pear Custard Tart

This is truly DELICIOUS. It’s hard to stop eating it. It’s somewhat time intensive to make, but truly worth it. If you don’t decorate it, it looks a little bland so I do suggest placing some little eatable flowers on top or something else to make it look a bit more appealing. I have doubled this recipe and used a 13X9 Pyrex dish; it worked out just fine but I did bake it somewhere between 45 to 60 minutes. Remember, I am in altitude so for your first baking it’s a watch and see mode.

HINT: Poach the pears first; then do the custard; then make your crust; then put the whole deal together and bake; then cool. Told you it’s a bit time intensive but believe me it’s worth it.

Ingredients and hints for the pears:

For the pears that will go on top of the crust please do the following and do this before making the crust:

  1. 6 (or more) UNPEELED Bartlet pears, halved, cored and sliced into half-inch slices. The pears can be semi-ripe but not mushy!
  2. Poach 4 of the pears according to my recipe on this blog. Use the method on top of the stove and I did put in currents.
  3. Save the extra 2 sliced unpeeled and un-poached pears for the last topping to go on top of the poached pears before you pour the chocolate custard sauce over all.
  4. Also, what I did was to buy extra pears and I poached them as well. So, when I served the tart, I also served a separate bowl of poached pears for those who are gluten intolerant. Of course I also served my no-churn homemade ice cream. YUM!!!!!
  5. Mix some sugar and cinnamon together to sprinkle on the extra 2 pears you will be placing on top of the poached pears before you pour the chocolate custard sauce over all.


Ingredients for the chocolate custard:

  1. 1/3 C. semisweet chocolate chips
  2. 2 Tblsp. unsalted butter, melted
  3. 1/4 C. plus 2 Tblsp. whole milk
  4. 1 Tsp. almond extract
  5. 1/2 Tsp. salt
  6. 1 egg and 1 egg yolk
  7. 3 Tblsp. granulated white sugar
  8. 3 Tblsp. all purpose flour
  9. 2 Tblsp. unsweetened cocoa powder (I always buy the best for this)

Directions for the custard:

  1. Combine the butter and chocolate in a small saucepan over low hear, stirring until totally melted. Sir in the milk, almond and salt. Set aside.
  2. Combine the egg, yolk, sugar, flour and cocoa powder in the food processor or mixer bowl and process for about 2 minutes. Pour in the milk and chocolate mixture and continue to process until smooth and completely incorporated. Set aside for a bit.


Ingredients for the Crust:

  1. 1 package of Walker’s plain shortbread cookies
  2. 1 large egg
  3. 4 Tblsp. butter, melted and cooled
  4. 1/2 C. all purpose flour
  5. 1/3 C. granulated white sugar
  6. 1 Tsp. almond extract


Directions:

  1. Prepare the crust:
  2. Preheat oven to 350 degrees
  3. Place shortbread cookies in food processor and process until finely ground.
  4. Add the egg, melted butter, flour, sugar, salt and extract and process again until a soft, buttery dough forms.
  5. Remove dough, roll into a ball, wrap in plastic and chill in frig. for 20 minutes.
  6. Press the chilled dough into a greased 13” by 4” or a 9” round tart pan and score all over with a fork.
  7. Place tart pan on a cookie sheet and blind bake in the oven for 7 minutes.
  8. Remove from oven and let cool.
  9. Now you can place the poached pears on top of the crust and after you have done that, place the last 2 sliced unpeeled pears skin side up in a nice pattern. Sprinkle those with a bit of your mixed cinnamon/sugar.
  10. Pour the custard over all.
  11. Bake in your still heated 350 degree oven on the cookie sheet for 25 minutes or till the custard is set, firm and the crust is slightly golden.
  12. Let cool completely before serving.


Massouka Margot’s Way

Standard

Massouka Margot’s Way

moussaka,tomato, bread plated

Serves 4-6


At the market today eggplant and shoulder lamb chops were on sale—so of course this led me to salivating for a good Massouka. In my estimation, this is not an absolutely gorgeous dish to view, even when plated, and I do like aesthetically pleasing dishes to serve. However, it’s so good to eat, particularly when you make it the time consuming way, that I have forgiven its looks. I prefer it without sliced potatoes, however, it’s good with as well. I add instead of potatoes a yellow, orange or red sliced pepper and 2 zucchini sliced. I also used my processor for most of the chopping, etc. They come in so handy! I serve it sided with a crusty loaf of French bread and a nice light salad. And for desert, it’s fun to have some fresh cut up fruit along with Greek yogurt.  So, when you have a minute to spare, do give it a try. Also remember, you don’t have to follow the amounts of the ingredients exactly—it’s a very versatile dish and you can alter and make it just to your very own taste and liking.

DSCN0970


Ingredients:

  1. 1 large eggplant-slightly peeled—leave strips of peel about 1 inch wide in-between peeled sections and slice in 1/2 inch slices.
  2. 1/4 lb. potatoes, peeled, boiled whole till just barely done, drained, cooled and sliced in 1/4 inch slices (optional)
  3. 1 yellow, orange or red pepper-seeded and thinly sliced (optional)
  4. 2 medium zucchini, sliced in 1/4 inch slices (optional)
  5. 2 egg whites slightly beaten with a dash of water and placed on a plate for primary eggplant dipping –SAVE THE YOLKS FOR THE BECHAMEL SAUCE
  6. 1 C. (or more if needed) plain bread crumbs placed on one plate for secondary eggplant dipping plus save some extra bread crumbs to place on the bottom of your final baking dish.
  1. Some olive oil to moisten your baking dish and also to moisten the aluminum foil on the cookie pan to bake your eggplant
  2. 1C to 1 ½ C. grated Parmesan cheese or grated/crumbled sheep or goat milk cheese


Ingredients for the meat filling: 

  1. 1 lb. shoulder lamb chops if you can’t find ground lamb in the store. Remove meat from chop bone and grind in processor. You can use ground beef but honestly, I love the lamb flavor in this dish.
  2. 1/2 to 3/4 large yellow onion—diced
  3. 1 garlic clove, minced
  4. 1 handful of sliced mushrooms
  5. 1/4 C. chopped parsley
  6. 1/4 C. red wine
  7. 1/2 Tsp. ground cinnamon
  8. 1/8 Tsp. ground allspice
  9. 1 C. (divided in two portions) fresh plum tomatoes, crushed in the processor
  10. 1/2 Tsp. sugar
  11. 1 Tbsp. tomato paste
  12. S&P to taste


Ingredients for the Bechamel Sauce:

  1. 1/4 C. unsalted butter
  2. 1/4 C. flour
  3. 1 C. whole milk, warmed
  4. 2 egg yolks slightly beaten
  5. Dash of ground allspice


Directions:


For the Meat Filling

  1. In a large and deep pot (but you can use a sauté pan), brown the lamb until the pink color disappears. Add onion and mushrooms and sauté until translucent, about 5 minutes. Add the garlic and sauté for about 1 minute or till fragrant. Add the wine and simmer until it reduces a bit. Add the spices, parsley, tomato paste, 1/2 C. crushed tomatoes and sugar. Allow the sauce to simmer on low uncovered for about 15 minutes so that the excess, if any, liquid disappears. It should look like a chunky tomato sauce. Season to taste with S&P. Now taste some more and see if you want to add some more cinnamon and allspice.


For the Eggplants

  1. Liberally salt each eggplant slice on each side and place them in a colander with a plate on top. Then place a heavy can on top of the plate. Let the eggplant slices sit and weep for at least 15 minutes but better if you can wait an hour.
  2. Pre-heat oven to 400 degrees.
  3. Place aluminum foil on a large cookie sheet and oil it.
  4. When the eggplant slices are ready, wash each slice and pat dry it with a paper towel. Then dip each side of each slice first in the egg whites and then in the bread crumbs and place on the cookie sheet.
  5. Bake the eggplants for 30 minutes but at 15 minutes, turn the egg plants over to the undone side.
  6. When the eggplants are done, turn the oven down to 350 degrees.


For the Bechamel Sauce: (If you wish a liberal serving of this sauce, double the recipe)

  1. Melt butter in a skillet over low heat and using a whisk, add the flour to the melted butter whisking continually to make a smooth past. Allow the flour to cook for a minute but do NOT allow it to brown because otherwise it won’t be béchamel sauce; it’ll be brown sauce.
  2. Add the warmed milk to the mixture in a steady stream, whisking continually. Simmer over low heat until it thickens a bit. WATCH CAREFULLY.
  3. Take the skillet off the heat and slowly whisk in the egg yolks and a pinch of nutmeg. Return to low heat and keep whisking until the sauce thickens.


Assembling the Moussaka:

  1. In a well oiled large round (10” or 12”) Pyrex dish, sprinkle the bottom with breadcrumbs. You are going to make at least 2 layers but it can be even three—so divide your ingredients accordingly.
  2. Leaving about 1/4″ space around the edges, place a layer of all of the potatoes if you are using them and if not, then start with placing a layer of sliced eggplant, then some of the remainder of the 1/2 C. of crushed tomatoes, and then the zucchini and pepper, then some of the meat sauce, then some cheese and so on except be sure to save some cheese for placing on top of the béchamel sauce.
  3. Then pour the béchamel sauce over the eggplant and be sure to allow the sauce to fill the sides and corners of the dish. Smooth the sauce on top with a spatula and sprinkle with the remaining cheese.
  4. Bake in the 350 degree oven for 45 minutes or until the béchamel sauce is a nice golden brown color. Allow to cool for 15-20 minu8tes before slicing and serving.
  5. This dish can be refrigerated and made ahead up to when you place the béchamel sauce. If you do that, let the dish come up to room temp and make the béchamel sauce right before baking.


Spaghetti and Meatballs the Easy Way

Standard


\spaghetti & meatballs

Spaghetti and Meatballs the Easy Way

Makes 6-8 servings and about 30 golf sized meatballs


Here is a dish that bases itself on simplicity and best of all, can be made one or two days ahead of time and then reheated very slowly. The sauce is extra creamy because of the butter in it and the meatballs are cheesy for a bit of a different twist. There are no added spices except for salt and pepper so that’s why I stress simplicity in nature. I made it for a friend of mine who just finished a brutal series of chemo treatments and could only taste and eat simple food. Pasta helps her settle her stomach and this was a perfect dish for her at this difficult moment in her life.  However, you don’t have to have been through that kind of hell to enjoy this dish. I used my 10 inch wide deep pot (though I wished I had a 12 inch wide pot) and my food processors. Processors make life in the kitchen so very easy don’t you agree? As well, if you wish a saucier dish, either cut down on the amount of spaghetti to use and/or add one more 28 oz. can of tomatoes plus some more butter to the initial recipe. And of course, if you wish to add your favorite seasonings to the sauce, that is always an alternative but it is very delicious just as stated and that also is what my friend requested.


Ingredients:

For the Sauce:

  1. 2- 28-oz. cans of whole peeled tomatoes in their juice
  2. 1/2 C. unsalted butter (1 cube)
  3. 2 medium yellow onions, peeled and halved through the root end
  4. 1/2 Tsp. salt (or more if you wish)


For the Meatballs:

  1. 1 C. fresh breadcrumbs made in the food processor from crust less French or country-style bread
  2. 1/3 C. whole milk
  3. 8 oz. ground beef
  4. 8 oz. ground pork
  5. 1 C. ground in the processor Parmesan cheese (about 5 oz. of the shaved variety will do the trick)
  6. 1/3 C. finely chopped Italian parsley (about 1 bunch) once again I used the processor
  7. 1 Tsp. salt
  8. 1/4 Tsp. ground pepper
  9. 2 large eggs
  10. 2 large garlic cloves that you’ll use your garlic presser to add to the eggs

Spaghetti, etc. 

  1. 1 pound spaghetti (cooked per directions al dente)
  2. Fresh grated Parmesan cheese for serving
  3. More Italian Parsley for decoration


Instructions for the sauce:

  1. In a 10 inch or preferably a 12 inch deep pot, place a strainer over the pot and pour the canned tomatoes into the strainer so that the juice goes in the pot and the tomatoes are reserved. Place the tomatoes in the processer and pulse very briefly—just so that they become finely chopped.
  2. Place the tomatoes in the pot along with the salt and onions.
  3. Simmer for 45 minutes without a top. I used a splatter pan to top my pot.
  4. Taste the sauce and if you feel it needs more salt and ground pepper, go for it.
  5. Also, if you want a smoother sauce, you can use an immersion blender the process the sauce briefly. But you don’t want a too smooth sauce and you do want to have texture. So, I skipped this step totally and find that my sauce is definitely smooth enough.


Instructions for the meatballs:

  1. Combine the breadcrumbs and milk in a small bowl; stir till the breadcrumbs are evenly moistened. Let stand for 10 minutes
  2. Place the beef and pork in a large bowl, mix the two and add the 1 C. ground Parmesan and parsley. I use my hands for the mixing.
  3. Whisk the 2 eggs in a separate bowl; press the garlic into the eggs along with the 1 Tsp. salt and 1/4 Tsp. ground pepper. Whisk once more to make sure it’s all blended
  4. Add the eggs to the meat mixture and combine it all with your hands. Try not to man handle it too much.
  5. If the breadcrumbs have been soaking for 10 minutes, now’s the time to squeeze the milk from the breadcrumbs and save the milk. My breadcrumbs sopped up all the milk so I didn’t have any to reserve and actually I didn’t need any more to form the meatballs. It all depends on the bread you use.
  6. Add the breadcrumbs to the meat mixture; using the hands, quickly and gently mix the meat mixture just until all the ingredients are evenly combined. Do not over mix.
  7. Place this bowl, covered with saran rap, in the frig for at least 15 minutes but it could be even one hour.
  8. By this time, I think that your sauce has finished its 45 minute simmering gig and you can then take the bowl with the meat out of the frig. and start forming golf sized meat balls to put in one layer in the tomato sauce. If the meat seems to be sticking to your hands, you can dip the hands in some milk and the balls will form easier.
  9. Bring the sauce with the meatballs to a simmer, reduce the heat to medium-low, cover and simmer till meatballs are cooked through—about 15 to 20 minutes.


sauce in pot


Additional Hints:

  1. If you are making this ahead of time, cool slightly and chill in frig. uncovered till cold and then place a cover on it. Re-warm gently before serving.
  2. When you are ready to serve this dish, cook the spaghetti and drain it. I always run cold water over it when done so that it’ll stop cooking.
  3. When serving I use a huge serving dish which has been heated so that guests can help themselves. (You can also individual plate it.) However, for my platter, I remove the meatballs from the tomato sauce to a separate dish, place the cooked spaghetti in the middle of the platter, spoon the sauce over the spaghetti and surround this with the meatballs and some extra sprigs of Italian parsley. You can also throw some shredded Parmesan over it all and/or place a dish with the Parmesan to the side of the dish for guests to help themselves.
  4. Of course, DON’T FORGET the hearty red wine such as Chianti to go along with this dish. A baguette of French bread is also a nice addition. For the green stuff, I actually just make my Original Caesar Salad. Desert? Fresh black cherries and my no-churn coffee ice cream. Bon Appétit.

The One Dish Oven Roasted Salmon with Asparagus, Fingerling Potatoes and Sliced Lemons

Standard

salmon dish ready to eat  salmon roasted,plated

The One Dish Oven Roasted Salmon with Asparagus, Fingerling Potatoes and Sliced Lemons

Serves 4

Oh my—so easy and so delicious. It’s a country style dish— not quite the elegant dish that my previous oven poached salmon presents however in a different way, every bit as excellent and certainly a bit more economical. This time I bought a nice fresh flown-in salmon fillet for $6.99/lb. It weighed a little more than 1 lb.; it was not super thick but just perfect for the making of this one dish meal.


Spring time does bring some of the best foods around such as the fresh salmon from WA and Alaska; and then there is the fabulous fresh asparagus that appears. Lucky are we that there is a continual wonderful array of lemons, dill and fingerling potatoes that arrive in our markets for us to purchase. We are so spoiled; sometimes I really feel guilty being able to enjoy these feasts on a daily basis. I truly think about those in other parts of this world who are going hungry—no food for them—no glorious markets and displays for them. I think about that a lot however, that doesn’t stop me from writing these recipes for all of us to enjoy. So, here I am with another yummy recipe for you to cook for your family and friends—and maybe when enjoying your repast, you could send out a little prayer for those who aren’t fortunate enough to be able to enjoy a repast such as this. Sorry to have become maudlin but I do think that prayers are important. Enough Margot—-and on to the good stuff!!!!


Ingredients:

  1. 1 lb. plus a bit more if you wish of a nice fresh salmon fillet—skin on
  2. 1 lb. fingerling potatoes, washed and cut in half
  3. 4 Tbsp. olive oil divided in two parts plus some more
  4. 1/2 lb. asparagus—medium sized- washed, ends trimmed (if you wish you can cut the asparagus in 1-inch pieces but I like to leave them whole. If your asparagus are pencil thin and in particular if you have cut them they may only need 12-15 minutes of baking so you might have to add them a bit after you’ve added your salmon and then continue cooking the dish.)
  5. 1 Tbsp. chopped fresh dill
  6. 1 strip of lemon zest and 1 tsp. grated lemon zest
  7. 1 garlic clove, coarsely chopped
  8. S&P to taste
  9. 1 lemon sliced thin
  10. 1 other lemon for garnish—cut into wedges
  11. Dill sour cream sauce if desired (combine 1/4 C. sour cream with 1/2 tsp. dill and 1 Tsp. lemon juice; I like it plain like this but if you insist, you could add a bit of Dijon)


Directions:

Place the asparagus, lemon slices, 2 Tbsp. olive oil, 1 Tbsp. chopped dill, 1 Tsp. grated lemon zest, garlic and a bit of salt in a plastic bag, close, shake and let marinade for at least 20 minutes up to 30 minutes. I also add a bit of my Gomasio (a sesame seed splash) to this mixture. For the Gomasio recipe please refer to my roasted vegetables on my blog: http://blog.tempinnkeeper.com

asparagus marinating

Preheat oven to 400F.

In a large Pyrex baking dish, place the cut potatoes with 2 Tbsp. olive oil and a bit of salt. Stir well and place in oven for about 10 minutes fingerlings in dish to roast
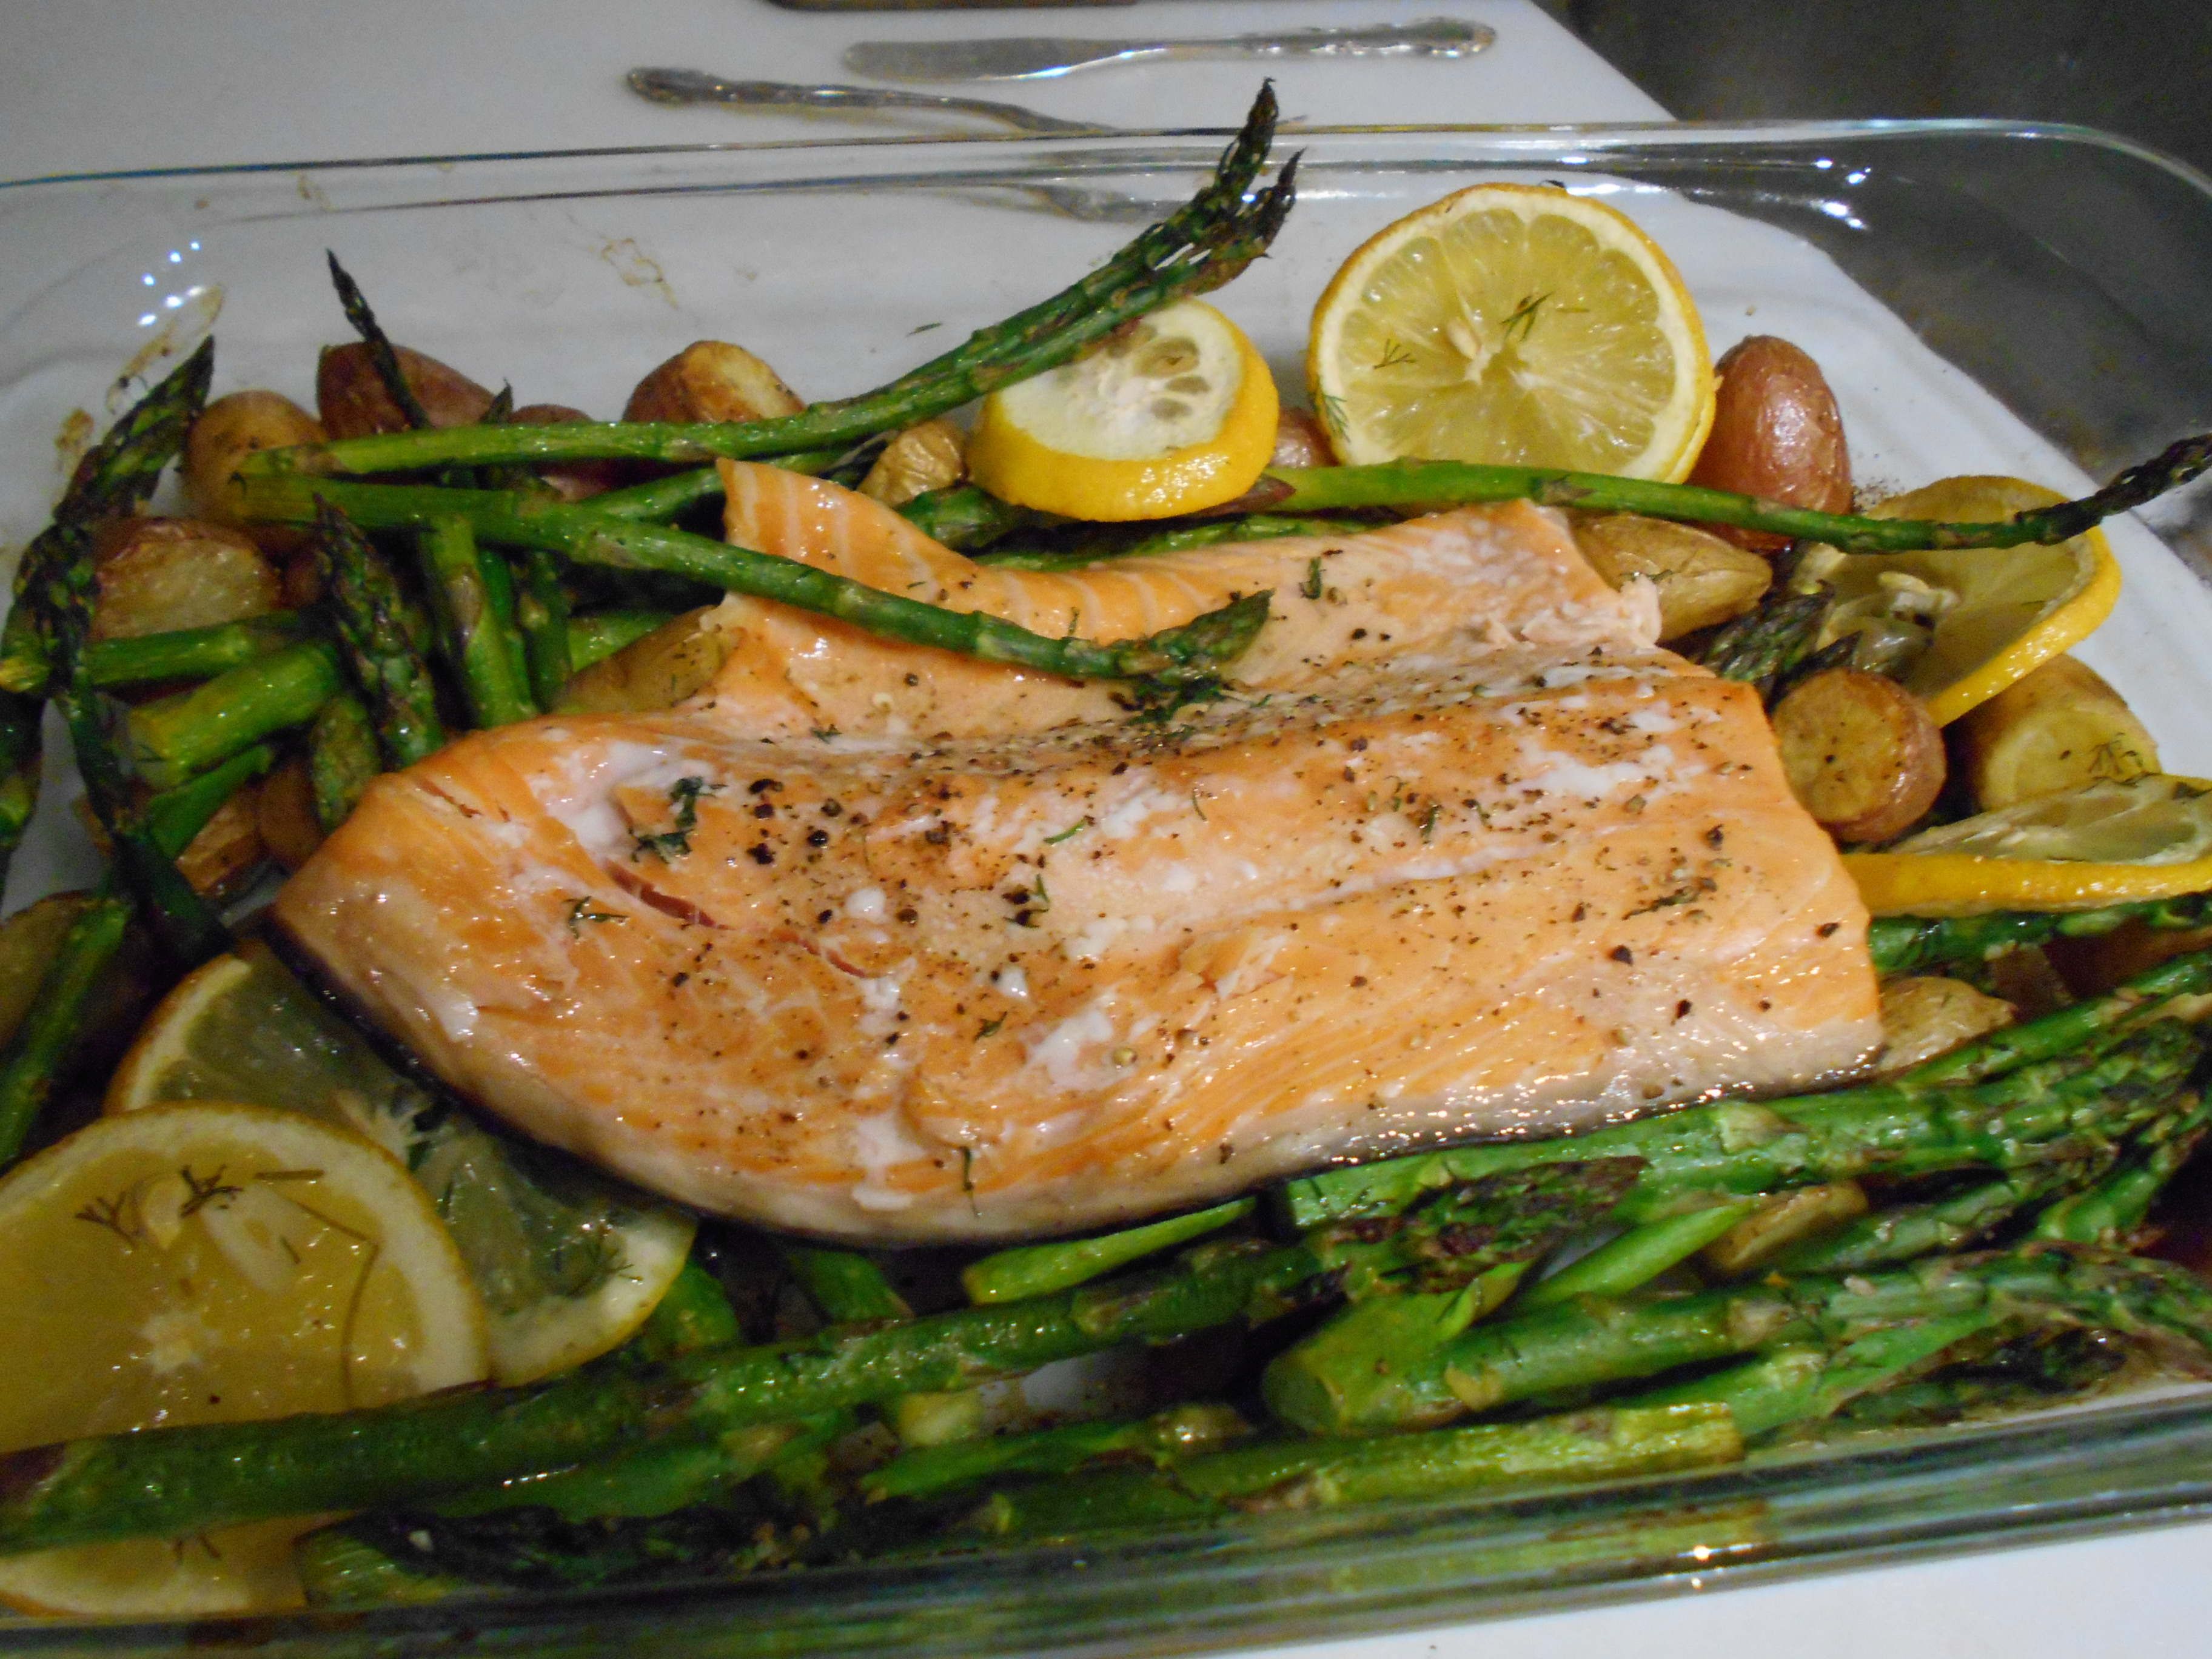
or until the potatoes begin to brown a bit. At this point, shake the dish and roast the potatoes for another 10 minutes.Take the dish out of the oven, push aside the potatoes to the side and place the asparagus mixture in the dish and mix it all; then place the salmon, skin side down, on top of all and brush some olive oil on top of the salmon.Isalmon,etc. in dish ready to go in ovenI roasted my 1 lb. plus a bit salmon for about 20 minutes. (See below for further baking instructions for salmon.) The salmon was divine, the asparagus not too done and the potatoes were perfect. I did serve the sour cream sauce (minus the mustard addition) with the dish. Also, before serving the salmon, if you wish, lift it off the skin with a metal spatula.

All in all, it was a delicious and easy dish to serve.

And best of all, the next day I had the Real Deal Caesar with the left over salmon, etc.


caesar,salmon,asparagus,potatoescaesar salmon lemmon


Please see below for “good rule of thumb’s “rules for baking salmon:

  • A good rule of thumb is that the salmon will bake about ten minutes per one inch thickness of your fillet. A two-inch thick fillet will bake for 20 minutes. A 1-1/2 filet will take 15 minutes and so on.
  • Check the salmon frequently. Start checking at about 10 minutes, and keep checking until the flesh of the fish is just barely an opaque pink.
  • As previously mentioned, salmon baked in a closed packet – whether parchment, foil or a covered dish – is likely too cook a bit more quickly. Check it starting at about ten minutes and re-cover the fish before continuing.
  • Remove the salmon from the oven as soon as the flesh becomes opaque. Serve immediately.

Margot’s Oven Poached Salmon with Dill Sauce

Standard

DSCN0729 DSCN0735 DSCN0742

before poaching                             after poaching                     ready to eat


I love fresh salmon and when I find some well priced, I buy it immediately. I was really lucky to have found this King Salmon for the same price as the North Atlantic variety–$6.99/lb. What a deal!!!! I have many recipes for salmon but there are two which I prefer: oven roasted and this recipe which is oven poached. Both are simple and easy to prepare yet make for a very elegant looking and tasting dish. As such it is a fine one to serve for guests.


I many times serve my poached salmon with couscous or roasted fingerling potatoes (see my blog for vegetable roasting recipes) as shown in the third food picture above; they took about 20 minutes to get done in the 450 oven so see how easy this dinner can be because you can roast them during the same time that you oven poach the salmon. Sometimes I’ll serve this dish with our wonderful Hagerman fresh corn which I so easily cook in the microwave (see my blog for the easy recipe). For the greens I really love making my Lemon Lovers’ Asparagus recipe (also found on my blog) which features roasted asparagus and freshly cut and roasted lemon slices.


You can use any kind of nice looking and fresh salmon fillets but the King Salmon makes for a very fine dish indeed. You can roast fewer fillets or more so for instance for one fillet in a smaller baking dish, I reduce the specified amounts of wine, water, etc. mentioned below to 1/2 of what the recipe calls for. As well, because my fillet (shown in picture) is one luxurious inch thick and measures 4” X 4”, it took about 13 minutes instead of 10 minutes to poach. So, take this all in consideration if you poach fewer or more fillets and as well as to the thickness and size of each one. The trick here I think is to keep a close eye on it all. You definitely don’t want an overdone fillet. Lastly, this is a dish that does not have to be steaming hot when served. It is fine served at medium hot temperatures or even at room or cold temps.


In conclusion, I think that this is an easy meal to serve for just yourself or for a crowd of people without sweating the preparation because actually you can make it well before you serve it and serve it at room temp.


Ingredients for the salmon poaching:

  1. Four 6-8 oz. salmon fillets with the skin. I lift the salmon off the skin with a metal spatula.
  2. For 4 filets, use 2/3 C. white wine or white dry vermouth. Adjust the amount for less or more filets.
  3. 1/4 C. water –once again adjust if necessary
  4. Salt to taste
  5. 1 Tblsp. chopped FRESH dill and some more for presentation purposes
  6. 2 scallions, thinly sliced
  7. Lemon wedges for décor and individual use if desired

Directions for the oven poaching of the salmon:

  1. Pre-heat oven to 450 degrees F.
  2. Smear olive oil on a 7 X 11 nonreactive (glass, Pyrex, etc.) dish
  3. Place the fillets, skin side down, into your dish. Pour the wine and water over them, season lightly with salt and sprinkle the 1 Tblsp. dill and the scallions on top.
  4. Cover the dish tightly with aluminum foil and place in the preheated oven.
  5. Bake until just cooked through and flaky usually about 10 minutes however, if your fillets are quite thin, you might check after 5-7 minutes. Be sure not to cook them too long. Even if they look a bit underdone, remember, they will cook a bit longer when out of the oven.

Ingredients for the Dill Sauce:

  1. 1/4 C. sour cream
  2. 1/2 Tsp. Dijon mustard
  3. 1 Tsp. lemon juice
  4. 1 Tsp. chopped FRESH dill
  5. Ground black pepper to taste

Directions for the Dill Sauce:

  1. In a small bowl place the above ingredients and stir well.
  2. I place a generous dollop of the sauce on top of the salmon, but if you wish you could pass the sauce around and let people serve themselves. In that case, I do put some extra chopped fresh dill on top of the salmon for the presentation.


Margot is a self-taught enthusiastic & passionate cook. Having been an inn-keeper for 5 years at her own inn, she accumulated a lot of good recipes which she loves to share.


Be sure to take a minute to visit Margot’s blog http://blog.tempinnkeeper.com for over 200 more simple and delicious recipes. You also can call Margot for personal cooking help or hosting for small B&B kinds of food gatherings. Margot’s phone number is: 208-721-3551. Friend Margot on Facebook and also find her on Linkedin,Twitter,Pinterest and other social sites.


pic Pats oven poached salmon 6.14

Pat’s picture above of her oven poached Copper river salmon

 6/18/14  email from Pat below:

Hi Margot

Did your poached salmon with my Copper river salmon. It was outstanding !!!

Will do again in SV

Yummy. Pat


Pork Tenderloin, Margot’s Easy Way

Standard

DSCN0636DSCN0631

Pork Tenderloin Margot’s Easy Way

Serves 6


This is a fun and easy dish to prepare: fun because I decided to do some colorful accompaniments for my presentation and certainly easy because there was so little prep work. But best of all, the roast was even better the next day— sliced and served cold. So I am thinking that this might be a good dish to make the day before and then slice and serve it at a picnic or for a cold buffet for your family or guests. Even the veggies were delicious cold. Think ahead to our wonderful SVSS picnics and other summer events as well.


Ingredients:

  1. One 2 lb. pork tenderloin
  2. 2 C. Italian seasoned bread crumbs
  3. 1/2 C. olive oil or more if you need it
  4. Some mini sized mixed bell peppers
  5. Some whole mushrooms
  6. Use your imagination for more veggies
  7. Parsley and some large leaves of some sort of lettuce for décor


Directions:

  1. Preheat oven to 425 degrees
  2. Place the pork roast on an aluminum foil covered baking sheet that has some sides to it. (You don’t have to use aluminum foil but I find it easy with which to wrap the roast for later refrigerator storage and also for the cleaning of the baking sheet.)
  3. In a bowl, mix the bread crumbs and olive oil so that he makes a nice consistency to pat all over the roast and so that it sticks to it.
  4. Bake the roast for at least 35-45 minutes or until there is no rare pink showing when you poke it a bit or/and if a meat thermometer reads 165 degrees. Frankly, a little pink does not scare me in this day and age.
  5. Let the roast rest for at least 10 minutes and then slice it into 1/2 inch slices if you wish to serve it the same day. If you are planning on serving it the next day, wrap it in the foil and slice it then.
  6. For the veggies (mushrooms and mini peppers)—you can roast them along with the roast or if you wish, sauté them in some olive oil in a frying pan; then surround the roast on a platter (lately I favor white dishes) with your colorful veggies. By the way, with the peppers, I actually left them whole—stem, seeds and all. Roasted they were delicious and it was fun to pick up the pepper and discard the stem (not for the feint of heart I guess—) As well as I mentioned previously, this is a dish that is almost more excellent the next day—served cold.
  7. Please see my blog for multiple vegetable oven roasting directions: http://blog.tempinnkeeper.com P.S. I like my roasted veggies to have a little “burnt” character to them–but you don’t have to do this.


Braised Chicken Thighs with Collards & Mushrooms

Standard


DSCN0593DSCN0602

Braised Chicken Thighs with Collards and Mushrooms

Serves 4

This could easily be a very economical company dish—but it’s good for your lonesome as well as for your family. Chicken thighs really are very economical to buy and frankly, though I know they are dark meat and have skin, I feel are much better tasting than your almost tasteless skinless chicken breasts—which by the way have become terribly pricey. Collards are so good for you but if you insist, you can use kale, spinach or some other kind of green. You can also introduce carrots in this dish to give it some color jazz. I really like this served over rice or some pasta, however the scales were not kind to me this morning and our fresh corn is in, so that’s the way I had it—sided with an ear of corn. I used my large cast iron skillet for this and it was perfect for the cooking of this dish.

Ingredients:

  1. 8 chicken thighs with skin
  2. 1-8-oz basket of mushrooms
  3. 4 or 5 garlic cloves—cut in half
  4. 1/4 C. balsamic vinegar or red wine but I like the vinegar and save the wine for the drinking
  5. 1 Tblsp. butter
  6. 3 cups chicken broth
  7. S&P to taste
  8. 1 bunch of collards (or some sort of similar greens) washed well, rough chopped and include the better part of the stems also rough chopped.


Directions:

  1. Pre-heat the oven to 400.
  2. After having rinsed and pat dried the chicken thighs, brown them over medium high heat in the skillet. When they are nice, crisp and brown, remove them to a platter.
  3. Add 1 Tblsp. butter to the skillet and over medium heat brown the mushrooms until they become moist and glistened; add the garlic and keep on stirring. Then add the vinegar or wine and keep simmering till the liquid is reduced by half. S&P to taste.
  4. Place the chicken thighs back in the skillet and add the chicken broth. The broth should ALMOST reach the top of the thighs, but it should NOT cover the thighs. You want them to remain crispy.
  5. Place the skillet in the oven and bake uncovered for 45 minutes to 60 minutes (depending on the size of the thighs). At 45 minutes, test the thighs to see if they are done because you don’t want them to dry out.
  6. When the thighs are done, take the skillet out of the oven, remove the thighs to a warm platter. Place the skillet on the stove top over medium heat and add the greens. The collards will take longer to cook than spinach. The collards take about 10 minutes of cooking where as if you use spinach, that should take just a couple of minutes. Just to make sure everything is equally heated, you can add at the last minute the thighs back to your pan and finally after the thighs are really warm, place the mushrooms and greens on top of each thigh and keep on a low heat for several minutes more.

Ham and Cannellini Soup-the quick and easy way

Standard

DSCN0585

Ham and Cannellini Soup—the quick and easy way

It’s still cool in these parts and I had taken out from the freezer a ham with bone, left over from Easter. The ham was so tasty but I was in a mood for something hot and easy. So, here is what I did and it really turned out good. I did top it with some shaved Parmesan and croutons and that made it even more delicious but I am sure not very non-caloric. Oh well———


Ingredients:

  1. 2 carrots, peeled and sliced
  2. 1 celery stalk, sliced
  3. Several bits of parsley
  4. 2 garlic cloves, rough chopped
  5. 6 cups chicken broth (I use Better Than Bouillon which I really like)
  6. 1 Tsp. mustard powder
  7. 1 large bay leaf
  8. 1 ½ to 2 C. chopped ham
  9. 1- 15-oz. can Cannellini beans well rinsed
  10. Optional: Croutons and shaved Parmesan for the topping


Directions:

  1. Add the first 6 ingredients in a medium sized pot and bring these ingredients to a slow boil; then reduce to a simmer. Simmer for about 30 minutes.
  2. Then add your two last ingredients and simmer for another 30 minutes.
  3. Voila—easy and yummy
  4. Variations: you could use different kinds of beans; you could add different and more veggies; and you could also use different kinds of seasonings.   Versatility and imagination is always the fun in creating a good dish.

Versatile Vegetable Soup

Standard

DSCN0551

Versatile Vegetable Soup

8 Servings


This is such a healthy and easy dish to make. You can really use any kind of vegetables (even frozen though I love the fresh variety) that you wish so almost every ingredient mentioned here is optional. You also can add rice or pasta along with the chick peas; or you can use white beans instead of the chick peas. You can omit the meatballs and use ingredient combinations like pasta or rice plus beans to make a complete protein. (Look online to find the food combinations that make a complete protein.) You can use chicken or vegetable stock instead of beef stock. You can change the Italian slant of this dish a make instead a Mexican one (add enchilada sauce and tortillas) or German (add slice bratwurst) or Indian (add curry seasoning and Nan) or—well I leave it up to you. Just use your imagination and it’ll come out superb and healthy. It’s also a very economical dish and can be served for lunch or dinner; and why not serve it for a very healthy and filling breakfast? Lastly, for the busy ones, if you have a slow cooker, you can cook it in there (5-6 hours on low), leave home and come back to an almost cooked meal. You just have to add the last half hour ingredients when you are home. I love dishes like and this and it’s one that the whole family can participate in—including of course the kids.


Ingredients:

  1. 1 onion, finely sliced
  2. 2 garlic cloves, rough chopped
  3. 3 Tblsp. olive oil
  4. 1/4 head cabbage, rough chopped
  5. 6 Brussels sprouts, sliced
  6. 1/2 to 3/4 head of Boston lettuce, rough chopped
  7. 1 C. Swiss chard, chopped
  8. 1 C. spinach, chopped (or a 10 oz. package of frozen spinach)
  9. 2 celery stalks, rough chopped
  10. 1/2 (or more) large head of broccoli, finely chopped
  11. 8-10 cups beef stock
  12. S&P to taste
  13. 1/2 to 1 Tsp. dried Italian seasoning
  14. 1/4 C. sherry, Madera or Marsala (optional)
  15. 1 bay leaf
  16. One small basket of cherry tomatoes, sliced in half
  17. 1 small can of chick peas, drained and rinsed in cold water
  18. Ground beef, chicken or turkey to make into meatballs (see ingredients needed and instructions below)
  19. 8 oz. shelled fresh peas or frozen ones
  20. 6 slices coarse country-style bread which has been rubbed with garlic and toasted in the oven. (optional)
  21. Shaved Parmesan
  22. 1 Tblsp. chopped parsley

Instructions for the soup:

  1. In a large pot, warm the olive oil and then sauté the onion and garlic until translucent. (about 5 minutes)
  2. Add the ingredients numbering 4 through 10 and cook gently, stirring from time to time, for about 15 minutes.
  3. Add the ingredients numbering from 11 to 15, bring to a boil, turn down to a simmer, cover and cook for 1 ½ hours.
  4. Add the ingredients numbering from 16 to 18 for one more 1/2 hour.
  5. Serve over the optional French bread and/or topped with the shaved Parmesan and chopped parsley.

To make the meatballs you’ll need the following ingredients:

  1. 1/2 lb. ground beef, turkey or chicken
  2. 1 beaten egg
  3. 1/2 to 3/4 C. Italian or plain bread crumbs
  4. 1 dash of tobacco

Instructions for forming the meatballs:

Mix everything together till not too soppy and form into one-inch diameter meatballs.