Category Archives: 12. Holidays

Crudities with Green Goddess Dressing

Standard

Crudities with Green Goddess Dressing

Makes 12-18 appetizer servings


Crudities Ingredients:

  1. 2-3 lbs. small raw mushrooms
  2. 2-3 lbs. asparagus (tough ends removed)
  3. Broccoli (cut into small flowerets)
  4. Small peeled carrots
  5. Edible-pod peas
  6. 40 to 50 small inner leaves from 3-4 heads of romaine lettuce(washed/crisped)

Green Goddess Dressing ingredients (makes 1 ½ C)

  1. 3 large egg yolks
  2. 3 Tblsp. white wine vinegar
  3. 2/3 cup chopped parsley
  4. One 2-oz. can anchovy fillets
  5. Green onions, chopped including the tops
  6. 1 ½ Tsp. dry tarragon
  7. 1 ½ C. olive oil

Directions:

  1. Place all of the ingredients except the oil in a blender and whirl until a smooth puree.  Slowly add the oil till well blended.
  2. Serve or cover and chill for up to a week.

Roasted Buttered Nuts with Two Variations

Standard

Roasted Buttered Nuts with Two Variations for appetizers

Makes about 4-6 servings

Ingredients:

  1. 2 C. (about 1 lb.) unsalted nuts such as pecans, almonds or cashews
  2. 1 Tblsp. peanut oil or melted butter
  3. S&P to taste

Instructions:

  1. Preheat oven to 450
  2. Toss the nuts in a bowl with the oil/butter and S&P.
  3. Place on baking sheet and roast, shaking occasionally, until lightly browned, about 10 minutes.
  4. Cool before serving; they will crisp as they cool

Two Variations:


Sautéed Buttered Nuts:

Instructions:

  1. Place 4 Tblsp. butter or peanut oil in a large skillet and turn heat to med.-low.
  2. When the butter melts or the oil is hot, add the nuts and cook, stirring, until lightly browned—about 10 minutes.  Be patient; high heat will burn the nuts.
  3. As they cook season with S&P.

Spiced Buttered Nuts:

Instructions:

  1. Add 1 Tsp. to 1 Tblsp. of any spice mixture such as chili powder or all purpose curry powder to the mix as directed below:
    1. When roasting, toss the spice with the nuts at the beginning.
    2. When sautéing, add it to the butter or oil as it heats.

Smoked Salmon with Endive, Mini-Bagels, & Seasoned Cream Cheese Dip/Spread

Standard

smoked salmon

Smoked Salmon with Endive & Romaine Inner Leaves, Mini Bagels & Thin French Bread Slices with Seasoned Cream Cheese Dip/Spread and Other Significant Additions

Makes 30 to 40 appetizers


I love smoked salmon and as far as I am concerned, it can be the thick or the very thin variety.  I don’t care; I just really like it and I’m sure I’m not the only one.  So, still thinking about picnicking on the beautiful lawn listening to the even more beautiful and melodious Sun Valley Summer Symphony, here’s something you can enjoy with your picnic gang.


Ingredients:

  1. 1 lb. whipped cream cheese (at room temp.)
  2. 1/2 C. sour cream
  3. 2 Tblsp. lemon juice
  4. 3 Tblsp. minced shallot
  5. 1/4 C. fresh dill finely minced and save some sprigs for garnishes
  6. 1 smoked salmon fillet (2 ½ to 3 Lb.)
  7. About 1 Lb. endive, washed and separated in spears; or small inner leaves from 6 heads romaine lettuce; or some of each.
  8. Medium sized sliced cucumbers which can be topped with the salmon, etc.
  9. 3 to 4 dozen small bagels (2-“size) partially split and/or combine the bagels with thinly sliced crusty French bread.
  10. 3 lemons thinly wedged mostly for décor but some like it squeezed on their salmon.
  11. Thinly sliced red onions for toppings.
  12. Capers (in the bottle and drained for easy picnic serving but you can put them in a small bowl if you would rather.)

Directions:

  1. Beat the cream cheese with the sour cream, lemon juice, shallot and dill till nicely blended; put it in a serving bowl.
  2. Set the salmon on a large platter or board. Surround the boarded salmon with the lemon wedges, dill leaf sprigs and sliced red onion; a bowl with the cream cheese dip; a larger bowl filled with endive and romaine inner leaves; a bowl with the medium thick sliced cucumbers and the drained bottle of capers which has a little fork in it for easy serving (hint: capers usually go on last).
  3. Place the split bagels and thinly sliced French bread in a pretty basket near the boarded salmon.
  4. Pre-fill/top some of the endive/romaine lettuce leaves and sliced cucumbers with some of the salmon topped with the cream cheese dip and other goodies; set these on a separate dish or if your board is large enough, on that—to show guests how really yummy this is and for quick, fun appetizer grabbing. Let the guests put on the capers because not everyone likes them.
  5. PS—Napkins, toothpicks and small plates are a nice addition for this spread.
  6. Frankly, I love a bit of champagne with this spread.

 For easy access and printing of this and past recipes, visit Margot’s blog http://blog.tempinnkeeper.com  Call Margot for personal cooking help or hosting

 @ 721-3551.

Margot is a self-taught enthusiastic & passionate cook. Having been an inn-keeper for 5 years at her own inn, she accumulated a lot of good recipes which she loves to share.


Spiced Pear Jam with Pineapple

Standard

5 pears

Spiced Pear Jam with Pineapple

I had some Bosc pears left over from a catering job I had where I presented my wonderful Poached Pears and I knew that I needed to make use of them quick like before they went bad.  Jam is easy to make and so nice to give for hostess gifts.  So, I looked through my old array of recipes and found this.  It turned out really good and I think that you could even use it for an appetizer by placing a dab on some cream cheese that has been placed on a baguette slice.  Then you could surround the baguette slices with slivers of fresh pears. It also would be good on some peanut buttered toast.  Oh well, up to you—————

Ingredients:

  1. 7 or 8 firm pears (about 3 lbs. worth)
  2. 1 orange
  3. 1 lemon
  4. 1 C. canned and drained crushed pineapple
  5. 4 C. sugar
  6. 3-4 whole cloves
  7. Two sticks of cinnamon
  8. One inch piece of fresh ginger

Directions:

  1. Peel and core the pears
  2. Put the pears, orange and lemon in a processor and rough chop process.
  3. Place the above mixture in a large pot and add the pineapple, sugar, cloves, cinnamon and ginger.
  4. Place pot on medium high heat and stir fairly constantly until it comes to a boil.
  5. Reduce the heat to a medium high or even a bit lower so that the mixture will  be gently simmering for at least 30 minutes but most likely around 45 minutes.  Do watch it and stir it every 10 minutes or so.
  6. When the mixture becomes thick (test it by taking a bit out, putting it in the freezer for several minutes to see if it’s the consistency you desire) take it off the heat and let it cool.
  7. Hopefully you have put out some jam jars that you have sterilized in your dishwasher so that when the jam has cooled you’ll be able to place the jam in the jars and then put your paraffin on top.
  8. Save some to put in the frig for yourself to enjoy immediately.

Linzer Torte and an option of mini-tortes and a bonus of Meringue Kisses

Standard

Linzer TorteLinzer Torte

Serves 8 (but don’t expect any leftovers)

Festive for anytime of the year


linzer torteindividual-mini-ltmeringue-kisses


Linzer Torte ( in a large spring form pan or mini kinds)

Serves 8 or makes 36 mini Linzer Tortes

Bonus recipe for no-waste egg white Meringue Kisses (makes 30)

Ingredients:

  1. 1 ½ C. sifted flour
  2. 1/4 Tsp. salt
  3. 1 C. sifted sugar
  4. 1 C. sweet butter, room temperature –2 cubes
  5. Grated rind of 1 lemon
  6. 3 egg yolks (keep them separated in their shell half) and save the egg whites in another bowl
  7. 1 C. slivered almonds, blanched or un-blanched (I mostly use the blanched ones); grind them in a grinder( I use my mini-Cuisinart) and then add 1/2 Tsp. cinnamon and 1/4 tsp. ground cloves and grind the nuts with these spices a bit more.  
  8. 1- 10 or 12 oz. jar jam (NOT JELLY or it will leak like mad) of your choice. If you wish, you can mix in well 1 ½ Tblsp. Brandy in it.   Traditionally the torte was made with Lingonberries but you can use your imagination for whatever you wish however makes sure that the filling is of a substantial consistency.  I use the Red Raspberry Preserve bought straight from the store.
  9. Turbinado Sugar for light dusting before baking.
  10. Confection sugar for the final dusting just before serving; Fresh berries for final décor.                                                                                                            Directions:
  1. Preheat oven to 375F AFTER your dough has been refrigerated for an hour or more.
  2. In a bowl, sift the flour once more with the salt.
  3. In a larger bowl, cream the sugar with the butter with electric beaters until the mixture is light and fluffy.(about 3 minutes).
  4. Add the grated rind of 1 lemon to this mixture (juice the grated lemon for the meringues) and then add the 3 egg yolks (one yolk at a time) beating well after each addition. (Save 2 of the egg whites in a separate bowl and let sit at room temp to make easy and delicious meringues. See recipe below.)
  5. Gradually add the dry ingredients (in about 3 divisions for each) to the creamed mixture alternately with the 1 C. ground almonds which has been already mixed with the cinnamon and cloves.
  6. Chill the dough in the refrigerator for an hour or more. If it becomes too cold to be pliable when you remove it, leave it out for a bit and keep testing it for the right pliability.
  7. Prepare an 8”,9”,or 10” spring-form pan. This will take a bit of time so patience please. First measure the round pan pieces on parchment paper; with a pencil draw its circle and cut it out. Save the left over pieces to fit around the pan sides. Before placing the parchment paper in the pan, brush the bottom and sides with Crisco oil, then place the parchment paper pieces on the oiled bottom and around the oiled sides. Then brush the parchment side and bottom once more with Crisco oil. Then lightly dust some flour on the bottom and shake the pan all over so that the sides get flour dusted as well. Then carefully shake out any residual flour.
  8. First, before placing the dough on the bottom of the pan, save a fist full of dough for making the top decorative strips. You’ll probably want about 6-8 strips. (See picture above.)The remainder of the dough place on top of the bottom of your prepared pan. Then with your knuckles, gently spread the dough over the bottom and up the sides about one and a half inch up.
  9. Spread the dough with the jam of your preference. I use a rubber spatula to do this. If you have homemade jam, all the better—but no jelly please.
  10. Now is the time to roll with your hands several long thin strips to use as a lattice. Intertwine the strips so that it’ll look pretty when served and place each on top of your torte. If the strips break when placing them on top don’t worry—just combine them in any way to make a long strip.  Rustic is the theme here.
  11. Then, lightly sprinkle it all with Turbinado Sugar which will make the top look a little shinny.
  12. Place the torte on a pizza or cookie sheet that has been lined with parchment paper (not aluminum foil because of possible extra heat conducting).This is because your torte may possibly leak.
  13. Bake the torte in your preheated 375F oven on the middle rack for 30-45 minutes till it is golden brown on top and the jam is slightly bubbling. I watch it carefully so that it doesn’t get overdone and too brown because then the crust will be tough.
  14. Cool the torte thoroughly and then gently run a steel spatula or a sharp knife around the sides to make sure it’ll release properly after unlatching. Then place the torte, covered with aluminum foil or saran wrap, in the refrigerator for several hours or even overnight. It must be very cold to release properly. Then unlatch the pan and the torte should release easily. Then you can run a knife under the bottom or just under one tiny side just to make sure that it will lift. At this point, I can usually tip the torte (with the pan’s bottom still on) on its side. It should come apart easily. At this point you can tear off your bottom parchment sheet. Place the torte on whatever dish you wish to use to serve it. I many times use a Chinette plastic plate for the top and bottom which then allows me to wrap it well, store it in the refrigerator for a week or so or wrapped well in the freezer safely without fear of breakage. The torte freezes just beautifully and you’ll be hard pressed to notice it when serving it. Before last minute serving, if you wish, you can spread a little more jam in the holes and dust it all with powdered sugar. Then you can surround your torte with fresh raspberries which does present a nice look.
  15. You can also make mini-cupcake like Linzer Tortes. I use the mini-cupcake paper liners which I brush lightly with the Crisco oil and follow the same directions as for a large one. Bake them in a mini-cup cake pan from anywhere from 12 to 15 minutes in a 375F oven. Watch carefully so they won’t get overdone.  Use your middle oven rack.  One recipe will make 36 mini-cupcake-like Linzer Tortes.            


Meringue Kisses—makes about 30

Ingredients:

  • 2 large egg whites @ room temp
  • 2 tsp. fresh lemon juice
  • 2/3 C. granulated white sugar


Directions:

  • Preheat oven to 225F.
  • Line a large baking sheet with parchment paper.
  • In a medium size bowl, with your electric beaters using the whisk attachment beat the egg whites at a medium-low speed until foamy.
  • Add the lemon juice and beat at medium speed until the whites begin to form soft peaks.
  • Add the sugar one third at a time, then increase the speed to high and beat until stiff peaks form.
  • With a spatula and a small butter knife to help slip the mixture off, pick up some of this mixture and drop onto your parchment covered baking sheet. Let your drops go upwards to form the “kiss” mode (like those chocolate ones).  The size can be around 2” circumference rounds. You should be able to place all of the kisses on a 17” X 12” pan.  Also, you can place around 4 or 5 across—they don’t spread much.
  • If you wish you can sprinkle sifted good chocolate unsweetened cocoa and a dusting of fun colorful cake décor sprinkles. (see picture)
  • Bake for about 60 to 70 minutes until they are firm to the touch and seem thoroughly dry.
  • Store the “kisses” in an airtight container for up to 2 months.


Page 3/3


Poached Pears Two Different Ways

Standard

poached pears #1 close up

poached pears in the skillet

poached pears in bowl

Poached Pears – Two Different Ways

Serving size depends on the amount of pears you use

(Half to one pear per person is just about right.whole poached pears in skillet whole poached pears

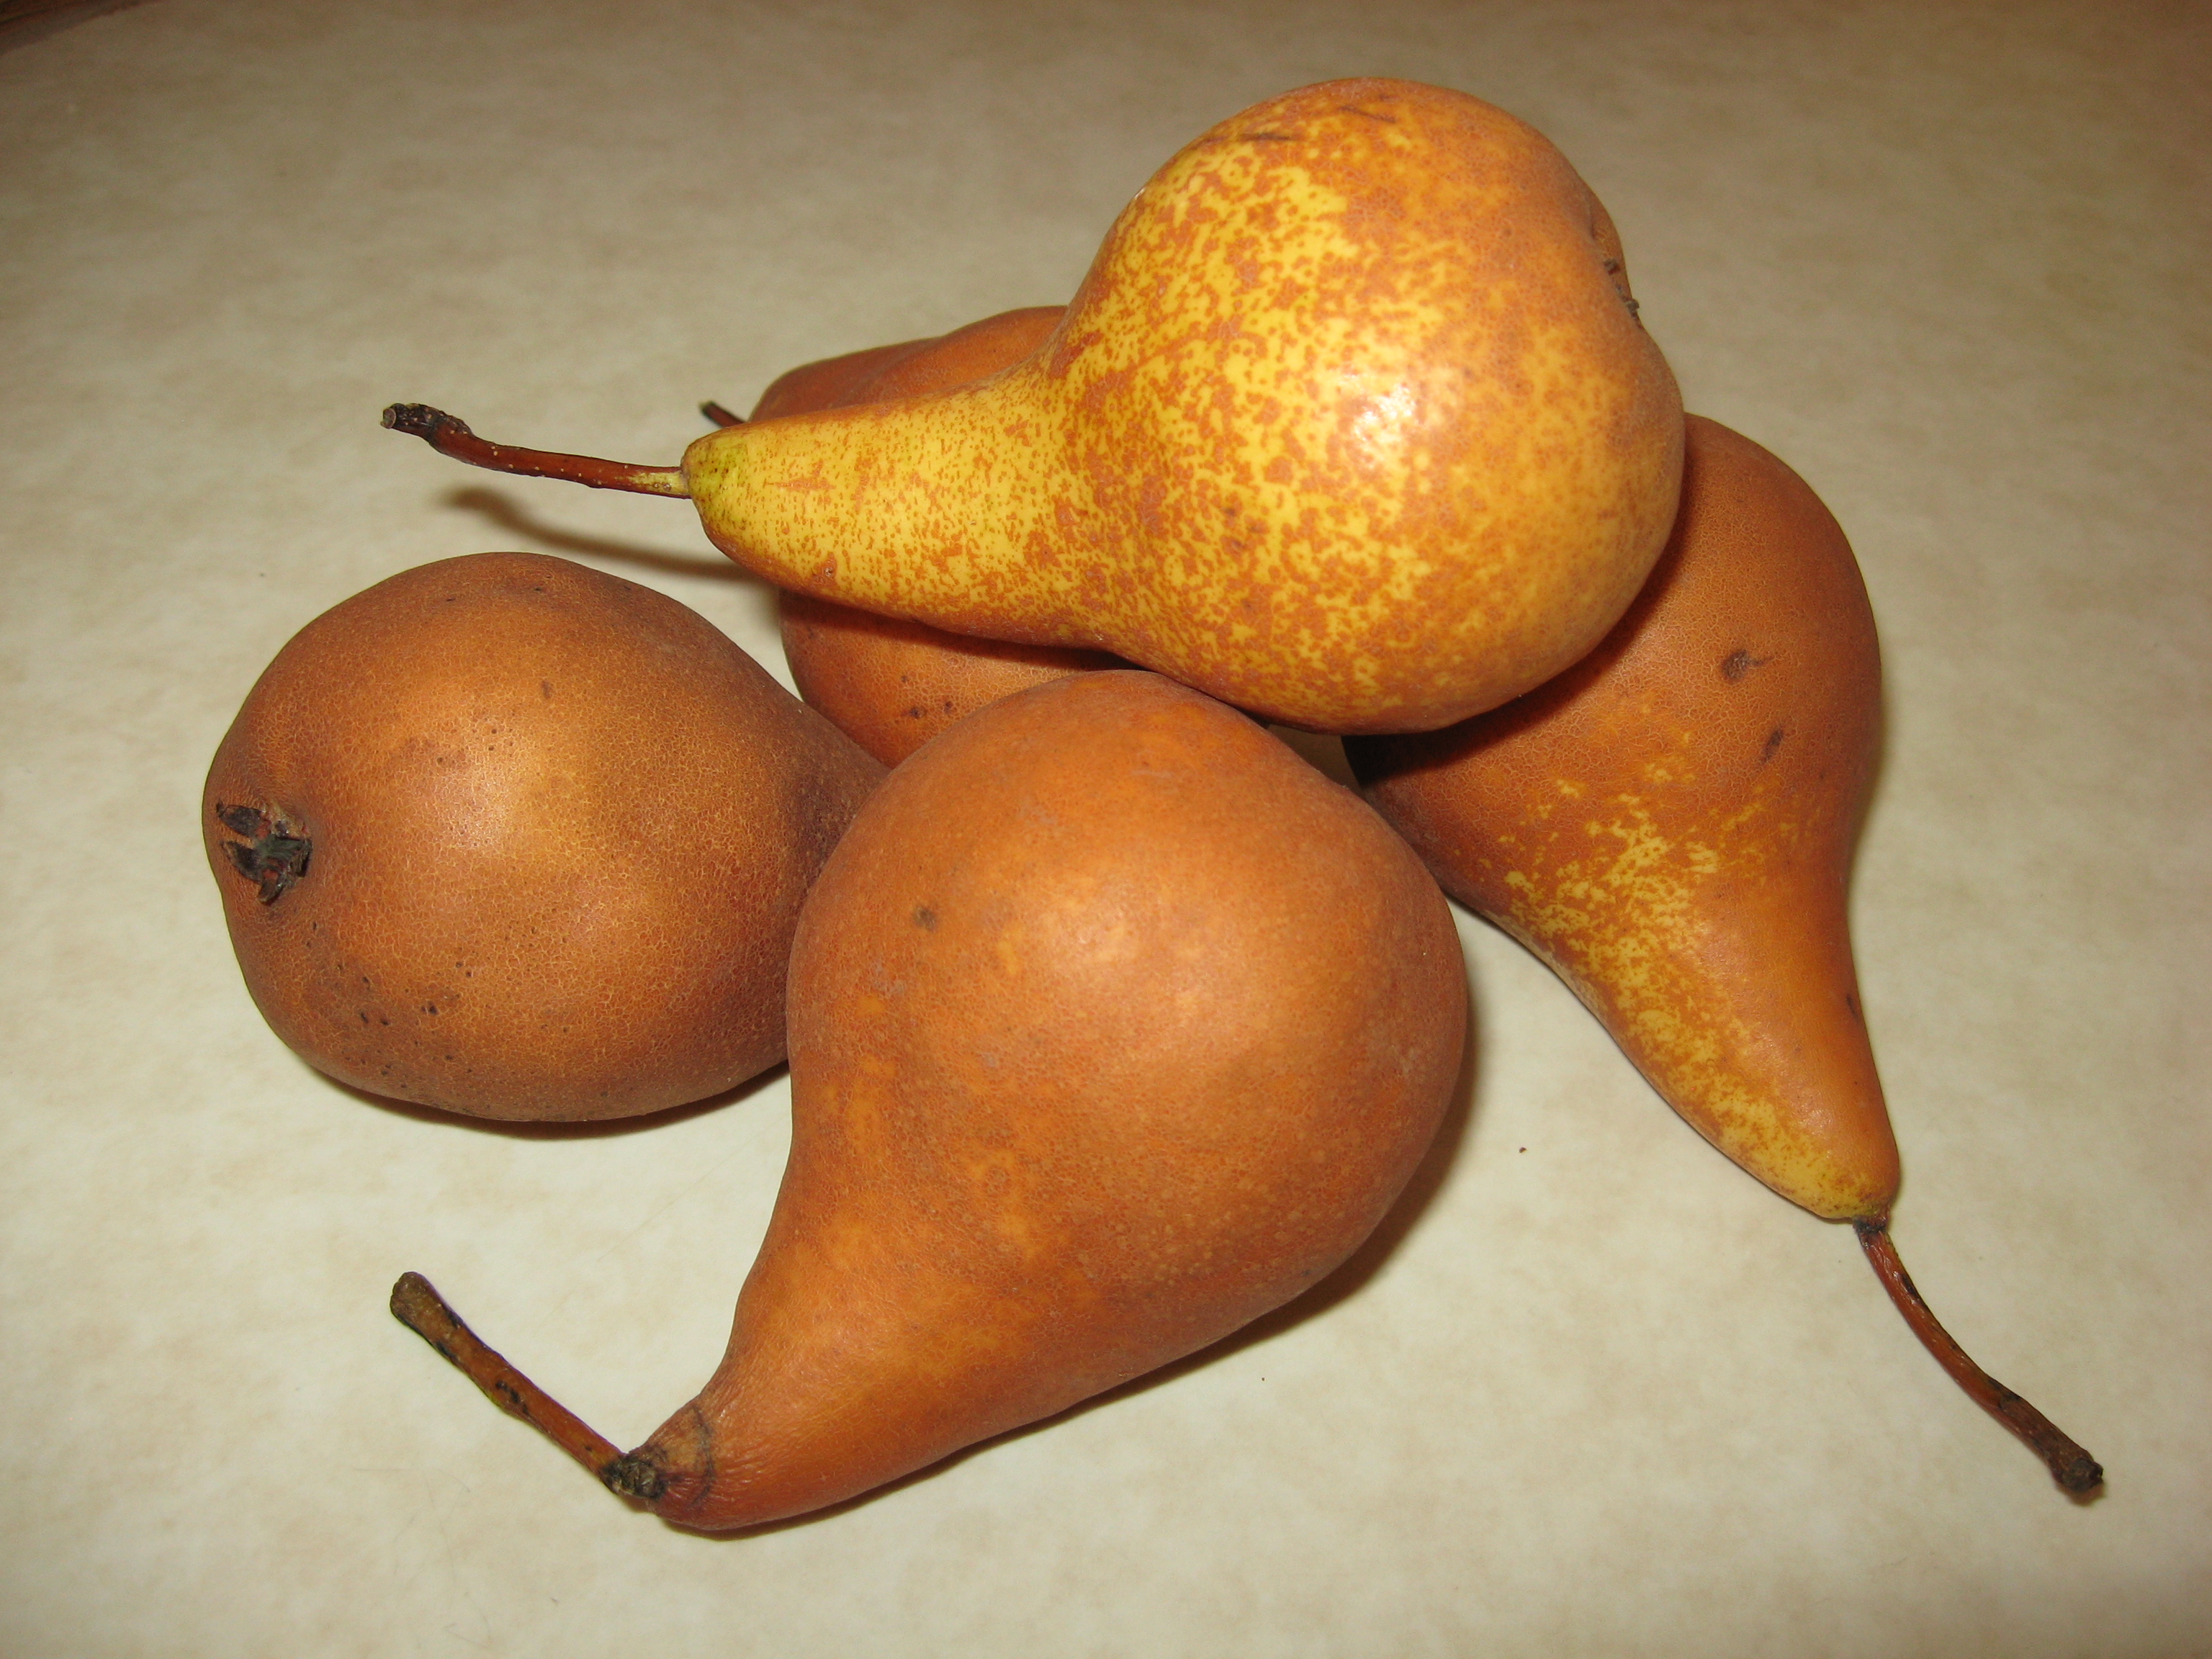
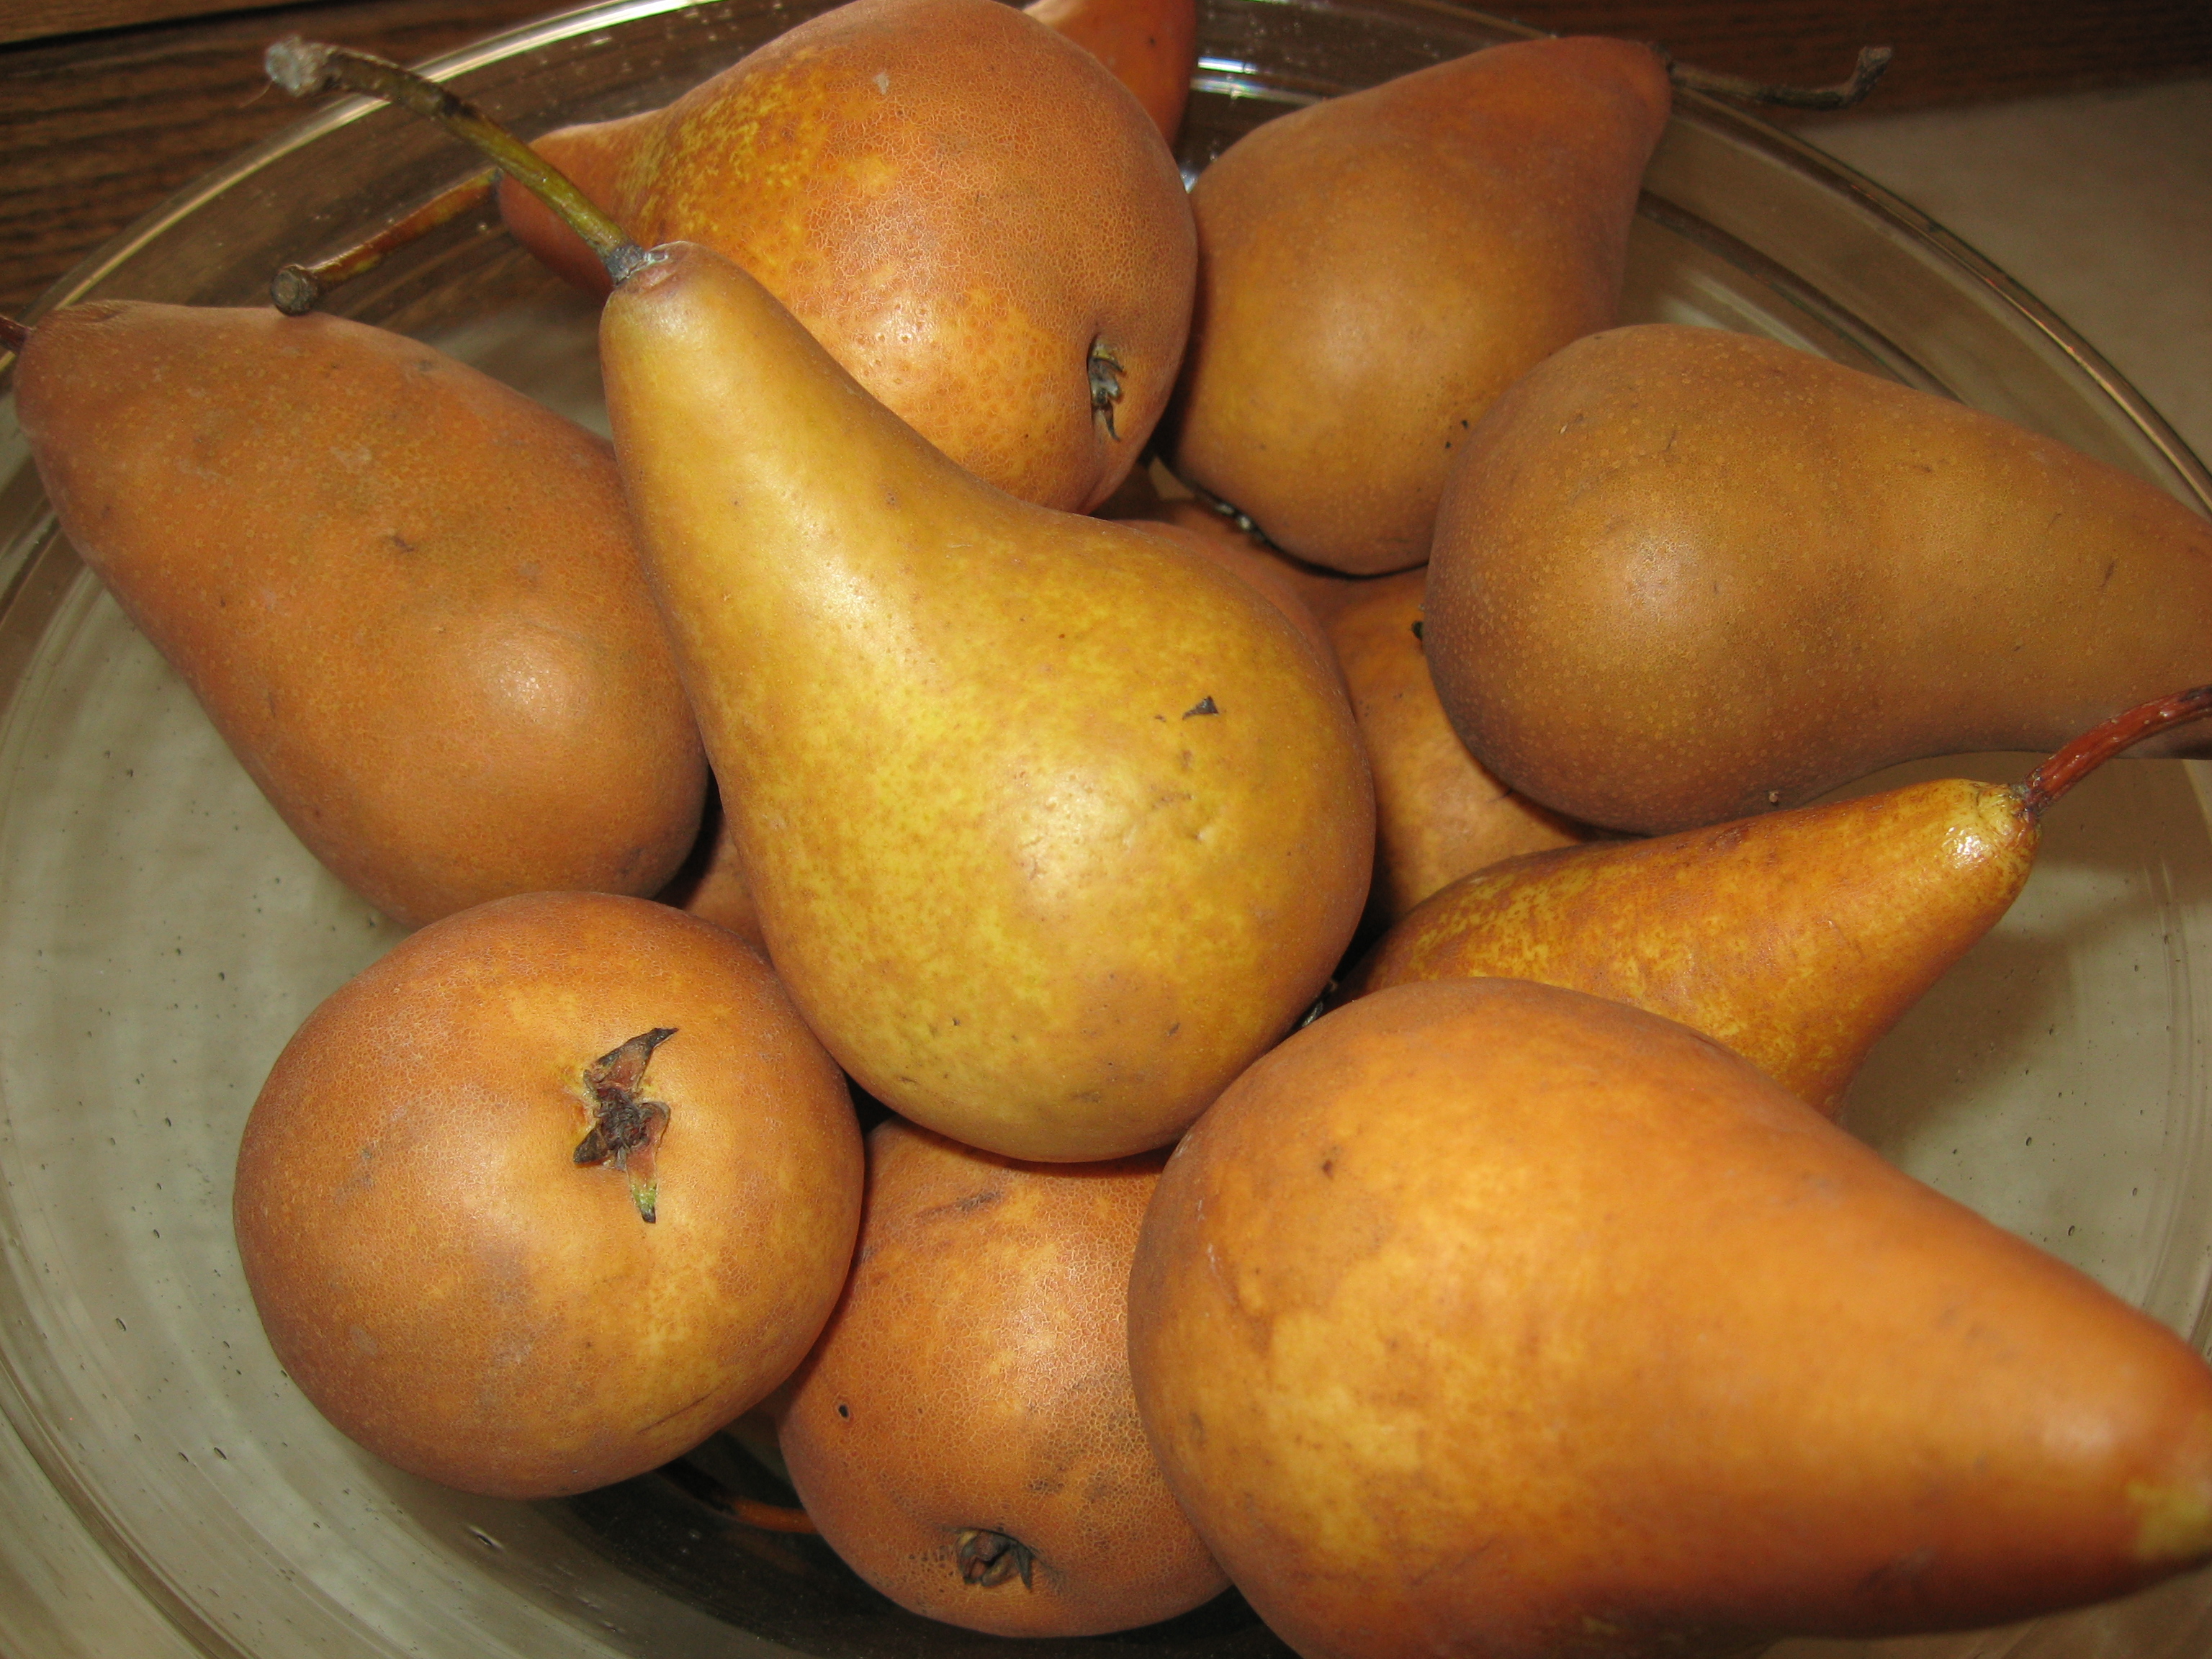
Atkinsons’ had 3 pound bags of Washington state organic golden russet Bosc pears for right under $2.00 so I bought several bags of them.  They were really good but I was also preparing for a little catering gig so I had them in mind for the fruit side of breakfast.  I decided to make poached pears which, if not overcooked, can really be good.  These are the recipes I use for the poaching of a pear.

Ingredients:

  1. 6 large pears—pared, quartered and cored.
  2. 2 sticks of cinnamon
  3. 1/2 Tsp. or more if you wish Fennel Seeds
  4. 1/2 a lemon sliced rather thickly
  5. 1/2 C. to 1 C. sugar
  6. 1/8 Tsp. salt
  7. 2 Cups Water
  8. Optional: 1/4 C. to 1/2 C. Toasted Pumpkin Seeds; Yogurt or Crème Fraiche; Plumped Currants.

Directions:

  1. In a wide deep skillet boil 2 cups of water with the sugar, salt, cinnamon and lemon for 3 minutes.
  2. Turn the heat down and place your pears in the boiling syrup.
  3. Over low heat cook the fruit until just fork tender. Depending on the pear size and quality, that could be anywhere from 10 to 15 minutes. Be careful not to overcook because when you take the pears out with a slotted spoon, they’ll still cook a bit.
  4. Let cool and serve mixed with the toasted pumpkin seeds which always should be placed on right before serving.  You can also refrigerate the whole mixture and serve the pears later.  They’ll marinate in the syrup and be delicious.
  5. Finally, if you wish, you can also add some plumped currants or dark raisins to the whole mixture after the pears have been cooked.  I prefer the sassiness of the currants.

Another slight variation of this recipe is the following:

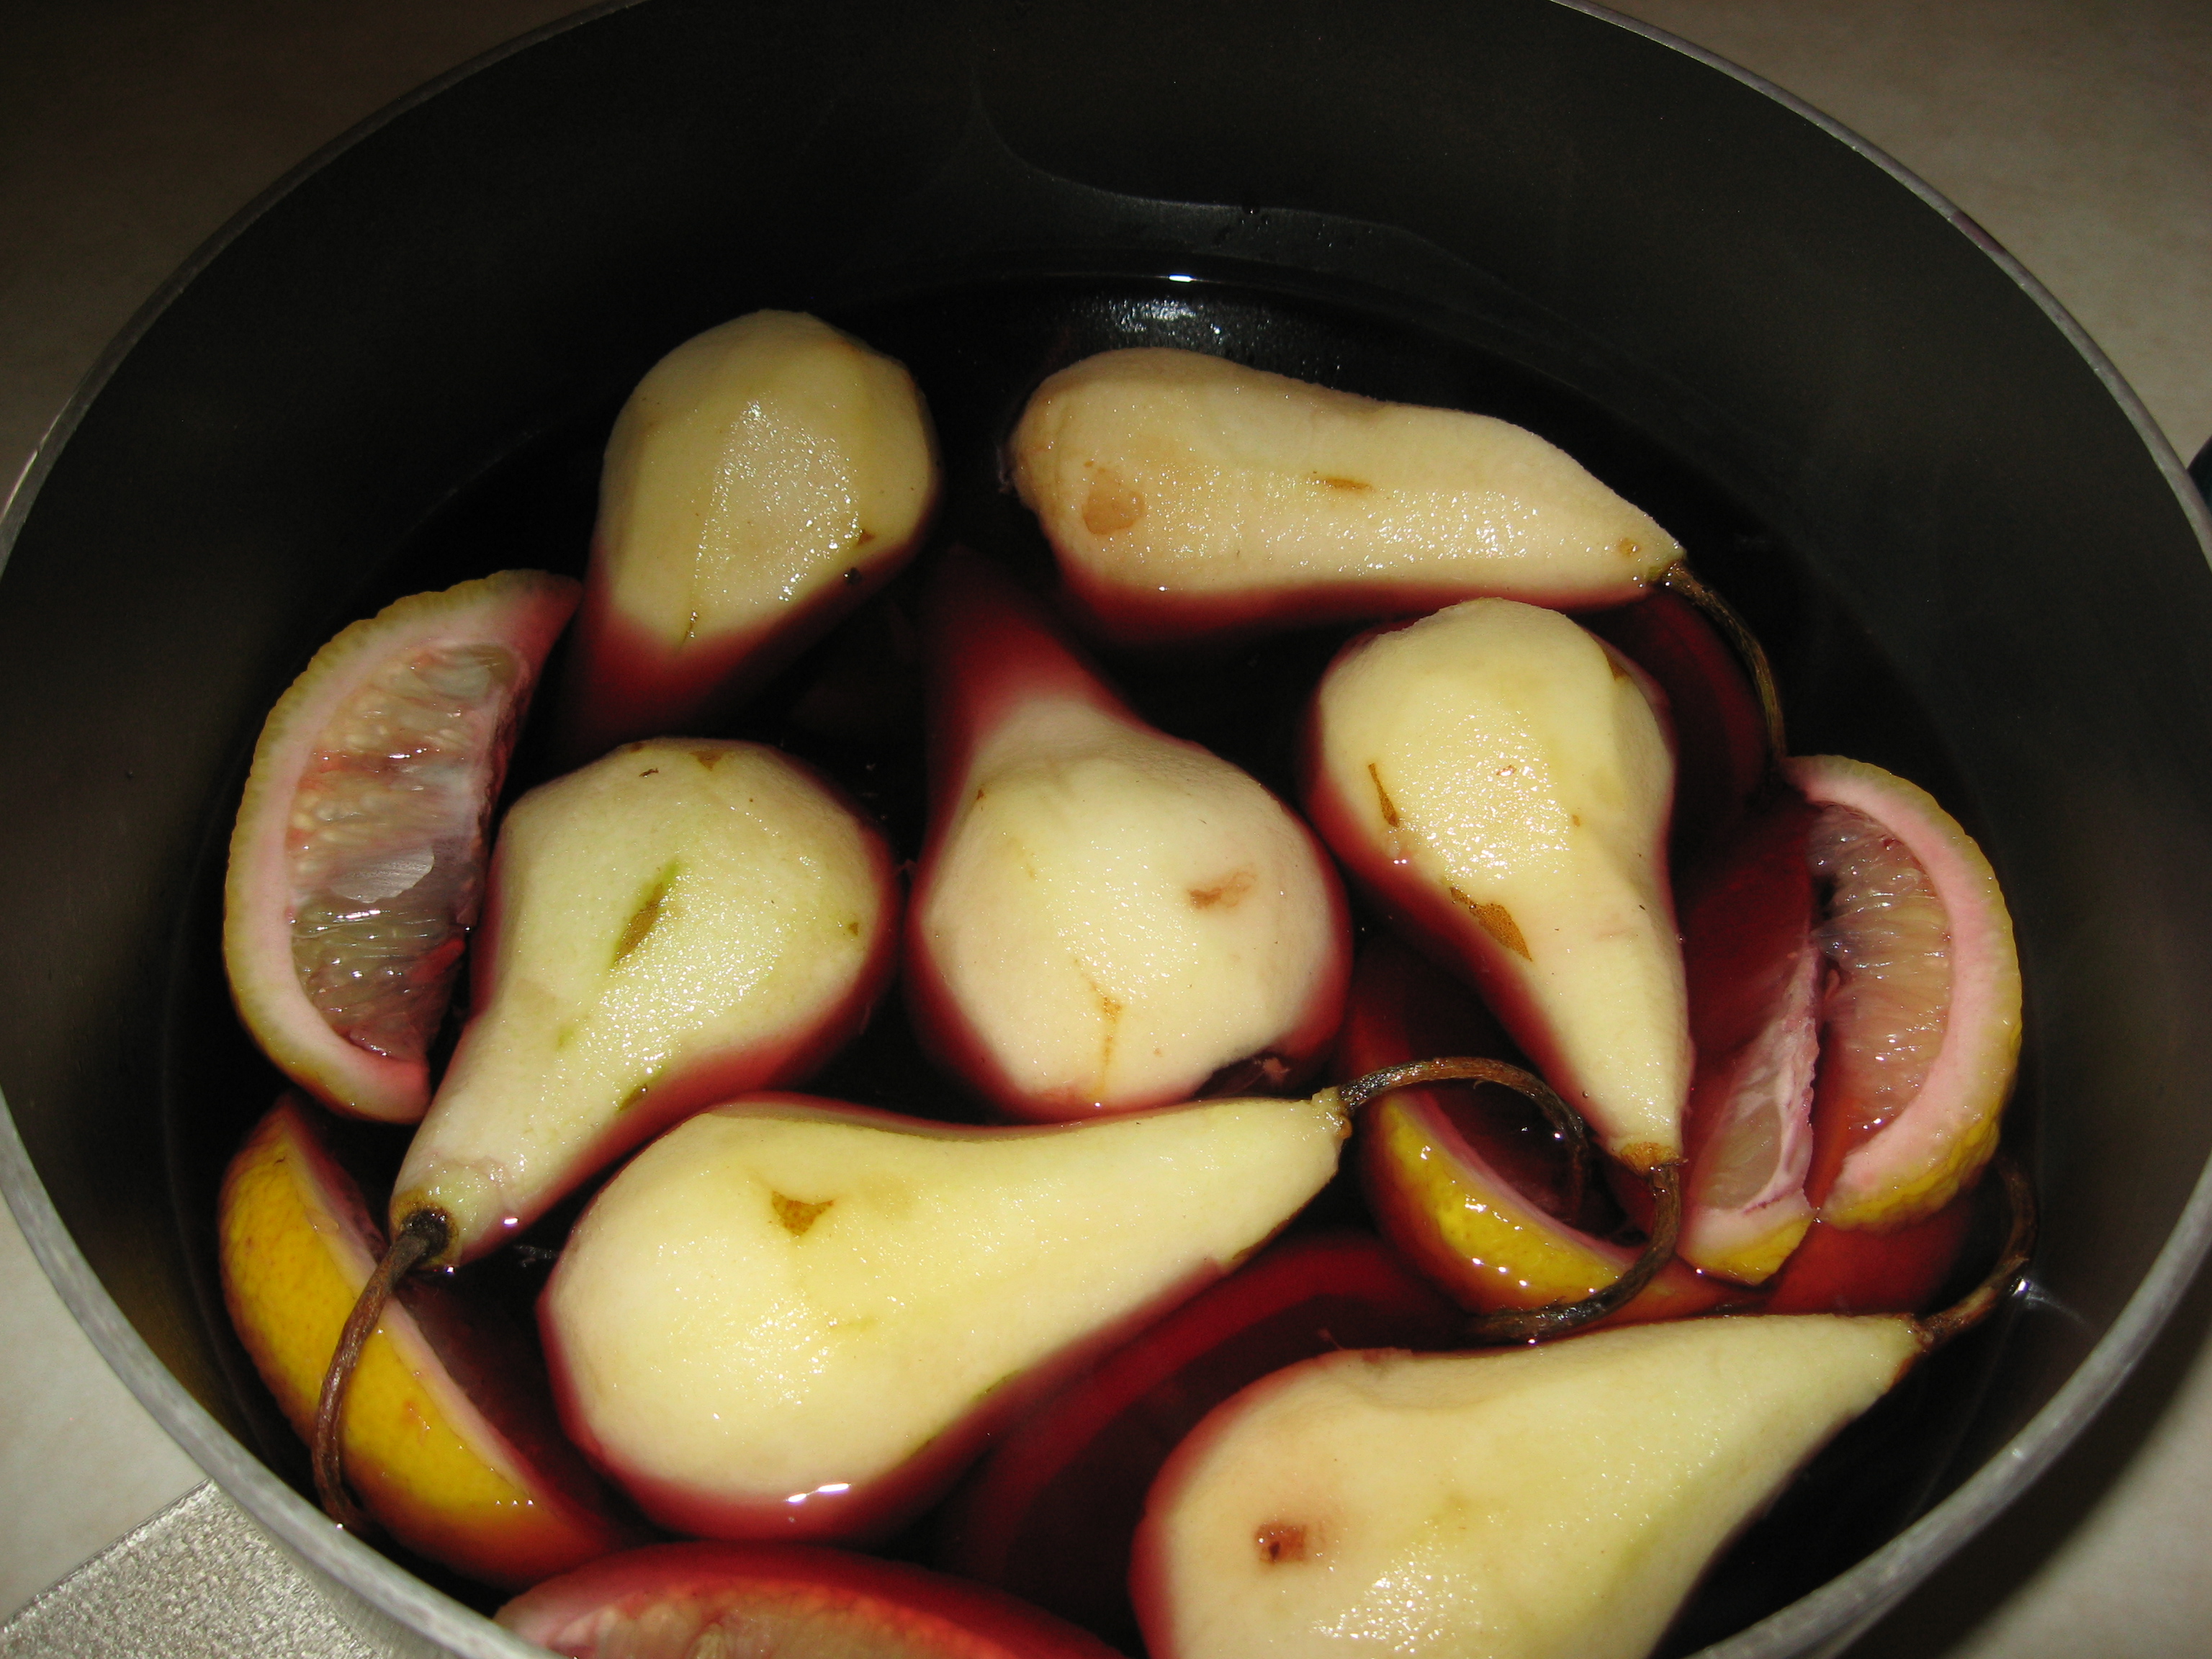
  1. Peel the 6 pears, leave the stems on and gently scoop out the blossom end (I use the rounded end of the peeler but you can use a melon ball scooper as well).
  2. In a large sized pot, bring to a boil 1 ½ C. of red wine, 1 ½ C. water and 3/4 C. sugar to a boil.
  3. Place in the pot the pears, 1 whole lemon sliced, and 1 cinnamon stick.
  4. Simmer covered for 20 to 30 minutes until the pears are nice and tender but certainly not falling apart! Remember, they will keep cooking a bit when you take them out.
  5. When pears are tender, with a slotted spoon, put them aside in a bowl.
  6. Keep on cooking the sauce without a cover over medium-high heat until the sauce reaches 1/2 of what it originally was and is thick and syrupy.
  7. Strain and pour over pears;  or if you wish, pour, the whole mixture with the lemon slices and cinnamon stick over the pears; refrigerate overnight.  Once again add plumped raisins or currents if you wish.
  8. Serve the next day with a bit of syrup over each pear.

Manchego Cheese wedges or crème fraiche  go very nicely with either one of these delectable desert dishes.

For easy access and printing of this and past recipes, visit Margot’s blog http://blog.tempinnkeeper.com  Call Margot for personal cooking help or hosting

 @ 721-3551.

Margot is a self-taught enthusiastic & passionate cook. Having been an inn-keeper for 5 years at her own inn, she accumulated a lot of good recipes which she loves to share.


Janet’s Crab Mold Appetizer (an appetizer made the night before serving)

Standard

Janet’s Crab Mold Appetizer- (an appetizer made the night before serving)

My friend is a twin.  She lives here in Sun Valley but her sister lives in Alaska.  This is the sister’s recipe.  Her sister says that at her parties her guests can’t get enough of this and I can see why.  It’s delicious!! and like potato chips, hard to stop once you start. Even though I don’t favor cream cheese that much, Miracle Whip at all or processed foods like canned mushroom soup, however, with this particular recipe, II totally concede.  If you think like me, I believe that once you taste this, you will too.

Ingredients:

1-      1-8oz. package of cream cheese

2-      1 small grated or finely chopped onion

3-      1/2 C. finely chopped celery

4-      1/2 C. cream of mushroom soup-undiluted

5-      1 package unflavored gelatin—(you only use 1 dissolved Tblsp. for this recipe)

6-      1/2 C. Miracle Whip

7-      1 ½ C. crab meat (fresh is the best however good canned , drained, will do)

Instructions:

  1. Heat soup in a medium sized pan and add the dissolved gelatin. (Dissolve the gelatin according to package directions.) Stir well.
  2. Add the cream cheese and the Miracle Whip.  Mix until melted.
  3. Add rest of the ingredients and put in a pretty greased mold.
  4. Refrigerate overnight.
  5. Before serving, set mold in warm water to help release.
  6. Serve on a pretty plate surrounded by thinly sliced baguette bread, good crackers, and celery.

Zucchini and Mushroom Casserole

Standard

Zucchini and Mushroom Casserole

8 serving


This is a good, easy and nutritional dish to serve.  Zucchini and mushrooms are so versatile so it’s nice to see them meld together.  Enjoy.

Ingredients:

  1. 1 ½ Lb. zucchini, trimmed and scrubbed
  2. Pinch of chopped or dried dill
  3. S&P to taste
  4. 1-2 cloves of garlic
  5. 3/4 Lb. mushrooms, sliced
  6. 4 ½ Tblsp. butter
  7. 2 ½ -3 Tblsp. flour
  8. 1 ¼ C. sour cream
  9. Bread crumbs dotted with butter
  10. Up to 1/4 C. chopped parsley (optional)
  11. Up to 1/4 C. shredded Parmesan (optional)

Instructions:

  1. Cut the zucchini crosswise into one-inch slices.  Place in a pot with salted water to cover. Add the dill and garlic and some S&P.  Cover and bring to a boil.  Reduce the heat and simmer gently until the vegetable is barely tender (about 8 minutes).  DO NOT OVERCOOK.
  2. Drain, reserving 2 Tblsp. of the cooking liquid, and discard the garlic. Set the zucchini aside.
  3. In a skillet, sauté the mushroom in the butter (about 5 minutes), stirring occasionally till they glisten; then stir in the flour. Cook about 2 minutes longer till flour is well absorbed.
  4.  To the mushrooms in the skillet add the sour cream and zucchini and the reserved 2 Tblsp. zucchini cooking liquid stirring constantly.  DO NOT BOIL but heat thoroughly.
  5. Transfer the mixture to a buttered or Pam sprayed casserole dish and top with some buttered bread crumbs.  If you wish, you can mix the crumbs with chopped parsley and/or some shredded parmesan.
  6. Brown quickly under the broiler.

Caesar Salad Spears

Standard

Caesar Salad Spears

Serves around 6-8


This is a wonderful light and delicious hors d’oeuvres to have-particularly before a hearty dinner.   For a faster version, I have used pre-made Caesar bread crumbs and anchovy paste—but the homemade version is a bit tastier I think.  No matter, you and your guests will enjoy this and beware-they do go quickly.


Ingredients:

  1. 2 C. 1/4 –inch-diced white bread or for shortcut use somewhat crushed Caesar store bought croutons
  2. 1/4 C. grated Parmigiano-Reggiano cheese plus some for garnish
  3. 5 Belgian endives
  4. Lemon wedges for garnish and additional color

For Dressing: (you can double this recipe because it’s good for a left-over salad dressing)

  1. 2 minced anchovies or a comparable amount of anchovy paste
  2. 1 egg yolk
  3. 1 clove garlic, minced
  4. 2 Tblsp. grated Parmesan
  5. 1 Tblsp. red-wine vinegar
  6. 1 Tblsp. lime juice
  7. 1 Tsp. Dijon mustard
  8. ¼ tsp. Worchestershire sauce
  9. 2 dashes Tabasco
  10. 1/2 Tsp. salt
  11. 1/2 Tsp. ground black pepper
  12. 1/2 C. olive oil


Directions:

  1. If you wish to make your own croutons, preheat oven to 350.  In a medium bowl, toss the bread with 2 Tbls. of the olive oil and season with salt and pepper.  Spread the bread on a baking sheet and toast for about 10 minutes, stirring once, until golden and crisp.
  2. In a food processor, blender or by hand, whisk together ingredient #4 through #14. When well blended slowly add the olive oil.  Taste to see if you wish to add more S&P.
  3. Trim the endives and remove the largest leaves from 3-4 of the heads. If you wish you can stack the leaves and trim them to about 4 inches. (I don’t do this.)
  4. Thinly slice the remaining endive and toss with the dressing and the croutons.
  5. Spoon the salad onto each spear and garnish with grated cheese.
  6. Note: If you wish you can use a combination of endive and romaine heart leaves to fill and also you can chop very finely some of the romaine for the inclusion in your salad mixture.  So then you would have a mixture of endive and romaine hearts.  I personally like this combination.  It’s also more financially economical.

Balsamic Roasted Pears with Pepper and Honey

Standard

pears in a bowlBalsamic Roasted Pears with Pepper and Honey

Serves 8


This is a very simple but elegant desert.  I used the Manchego Mexican cheese which is delicious.  If the pears in your market are not quite ripe enough, buy them a couple of days before serving and place them in a paper bag along with an apple.  Close the bag and several days later, they should be perfect.


Ingredients:

  1. 4 Tblsp. sweet butter
  2. 4 firm-ripe pears, halved lengthwise and cored
  3. 6 Tblsp. balsamic vinegar
  4. 8 Oz. Manchego cheese or mild goat cheese, cut into 8 pieces—room temp.
  5. 1/2 C. honey

Directions:

  1. Preheat oven to 400
  2. Melt butter in an oven proof dish in the oven—about 3 minutes
  3. Arrange pears, cut sides down, in 1 layer in butter and roast in middle of oven until tender-about 20 minutes.
  4. Pour vinegar over pears and roast 5 minutes more.
  5. Transfer pears, cut sides down, to serving plates with cheese and spoon some of juices from baking dish over pears.  Drizzle pears and cheese with honey and sprinkle with pepper.